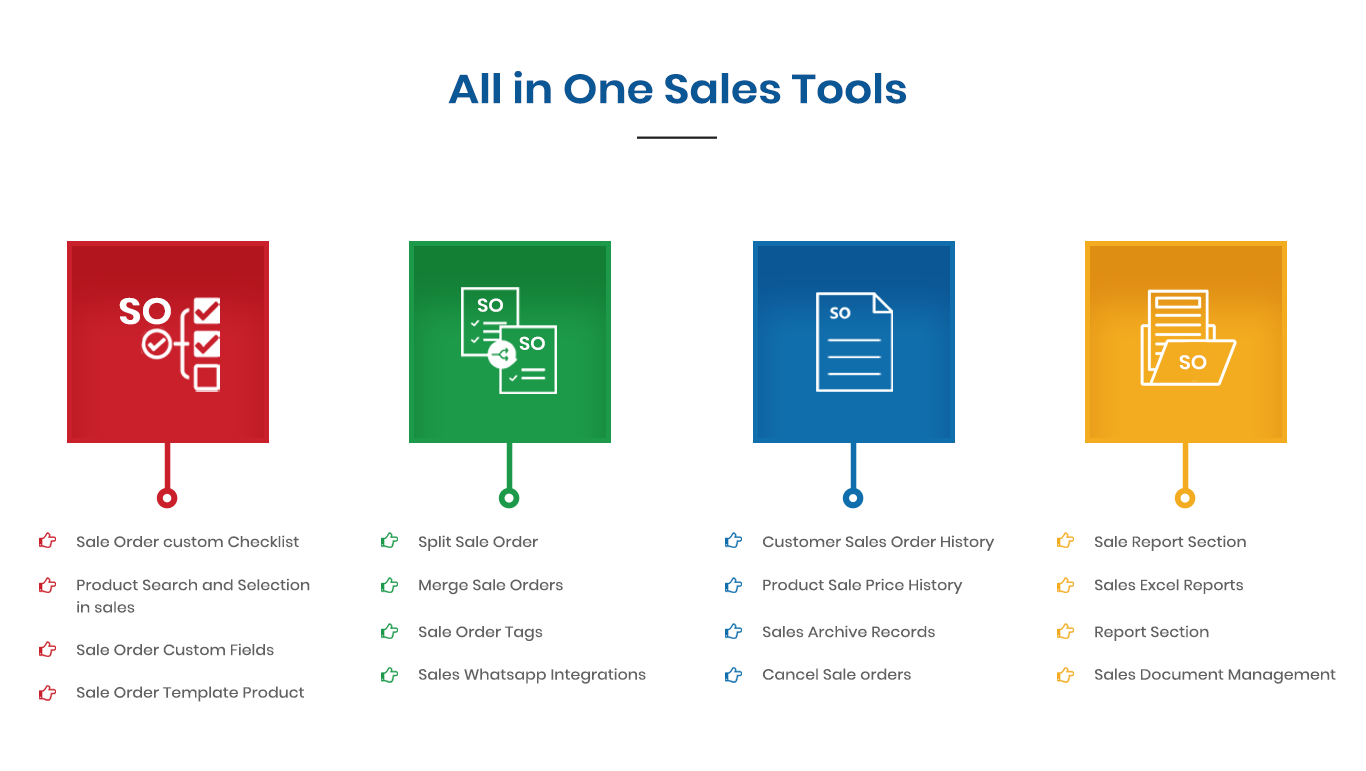
Related Modules

Key Features
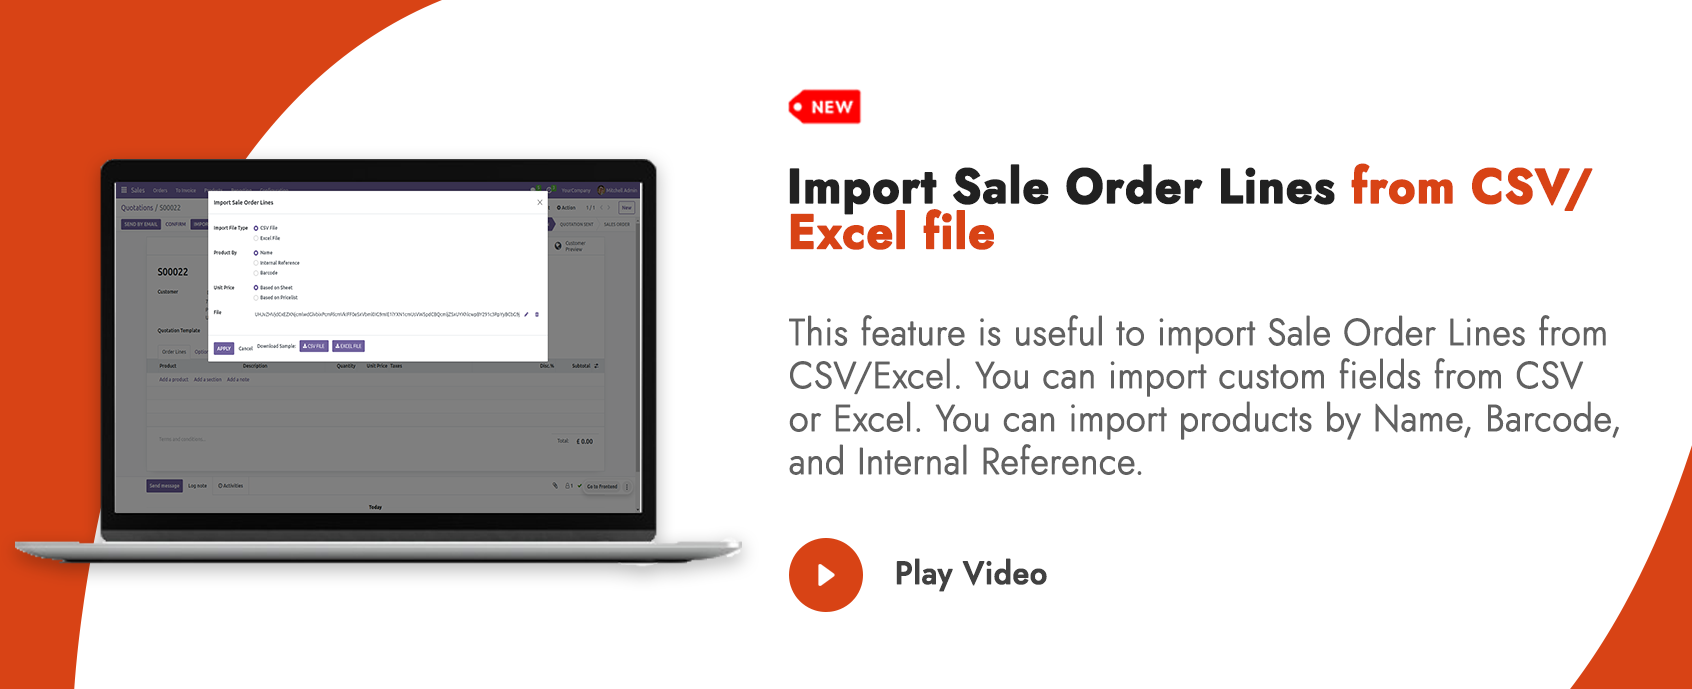


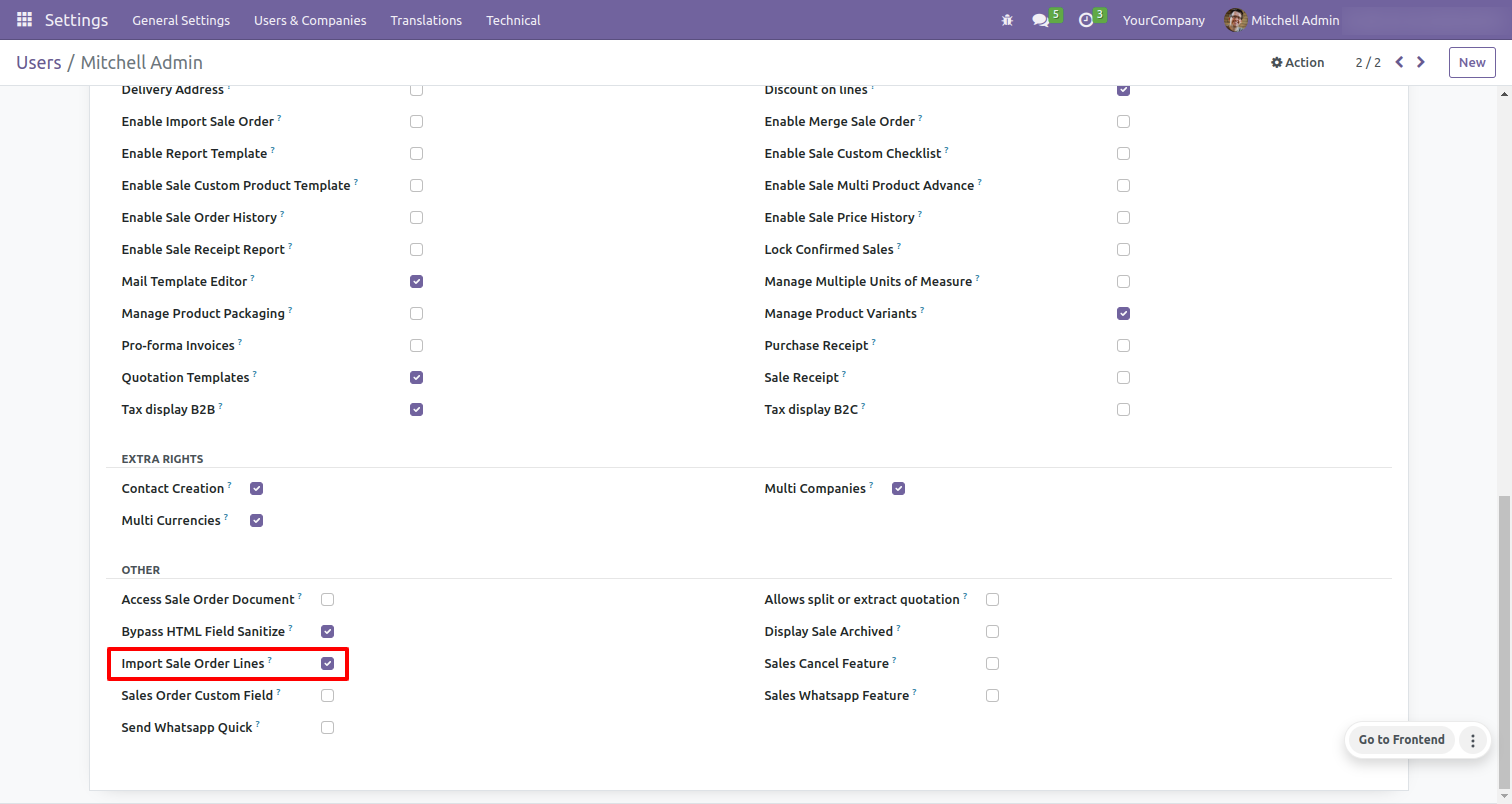
Goto the user setting and tick the "Import Sale Order Lines" group to import the sale order lines.
In the sale order form view you will the 'Import Sale Order Lines' button.
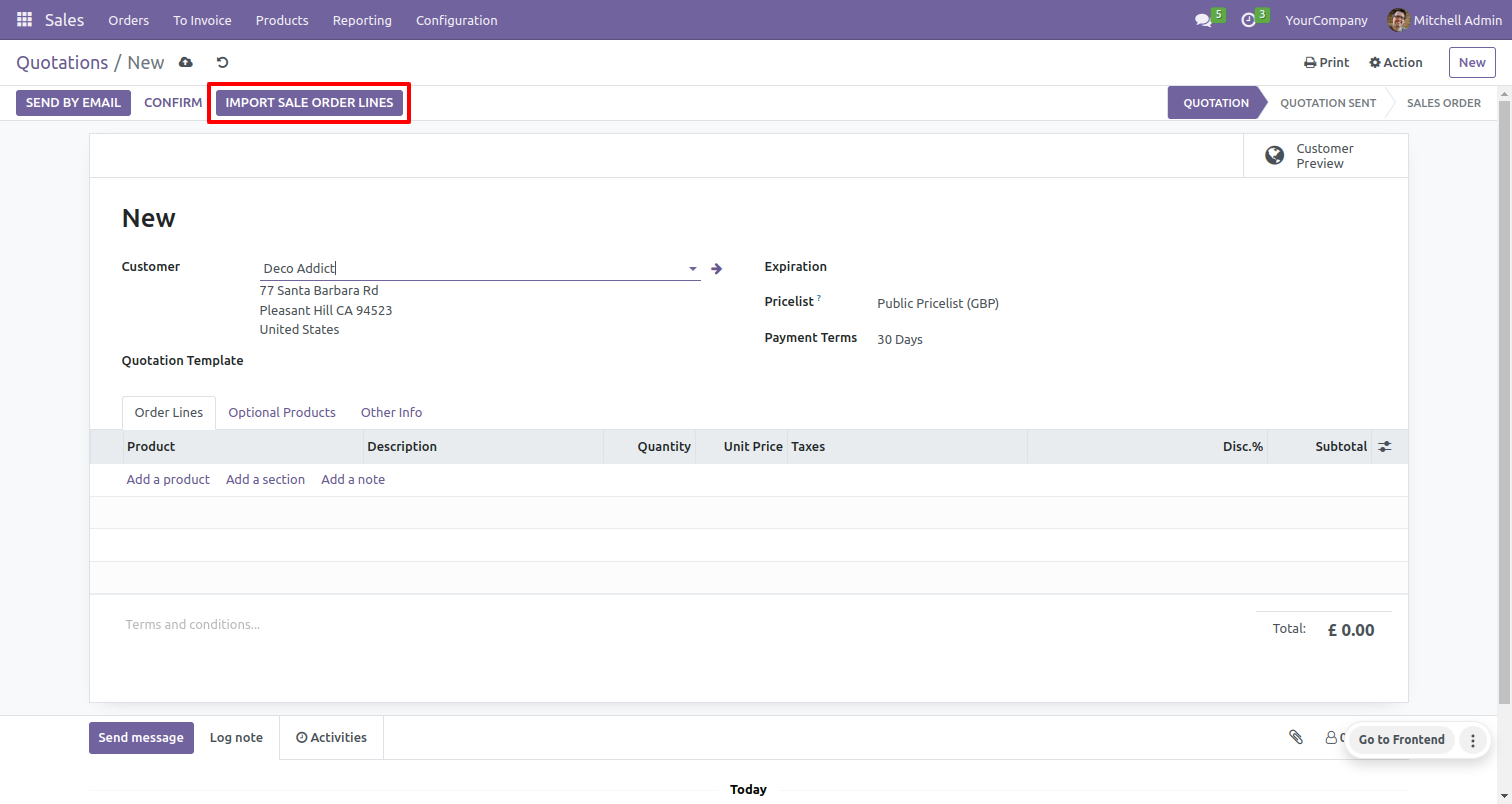
To import the sales order line, click on the 'Import Sale Order Lines' button.
This action will prompt the appearance of the import sales order line wizard.
To download the sample file, click on either the 'CSV File' or 'Excel File' buttons.
You have the option to import the file in either CSV or Excel format, depending on your requirement.

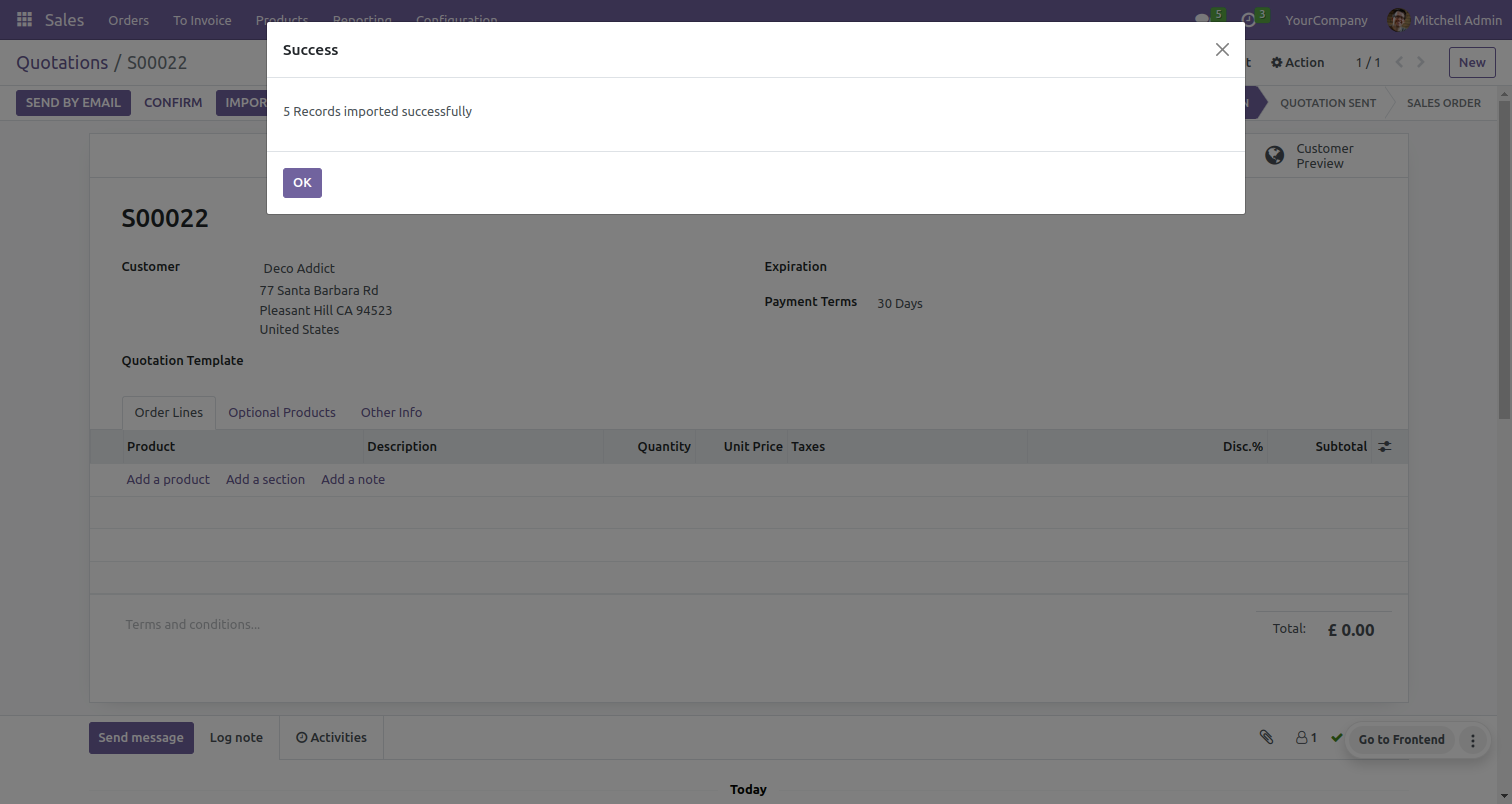
Success message looks like below it shows successfully imported records and also provides a list of unimported records with row number in sheet and relative details of data invalidation.
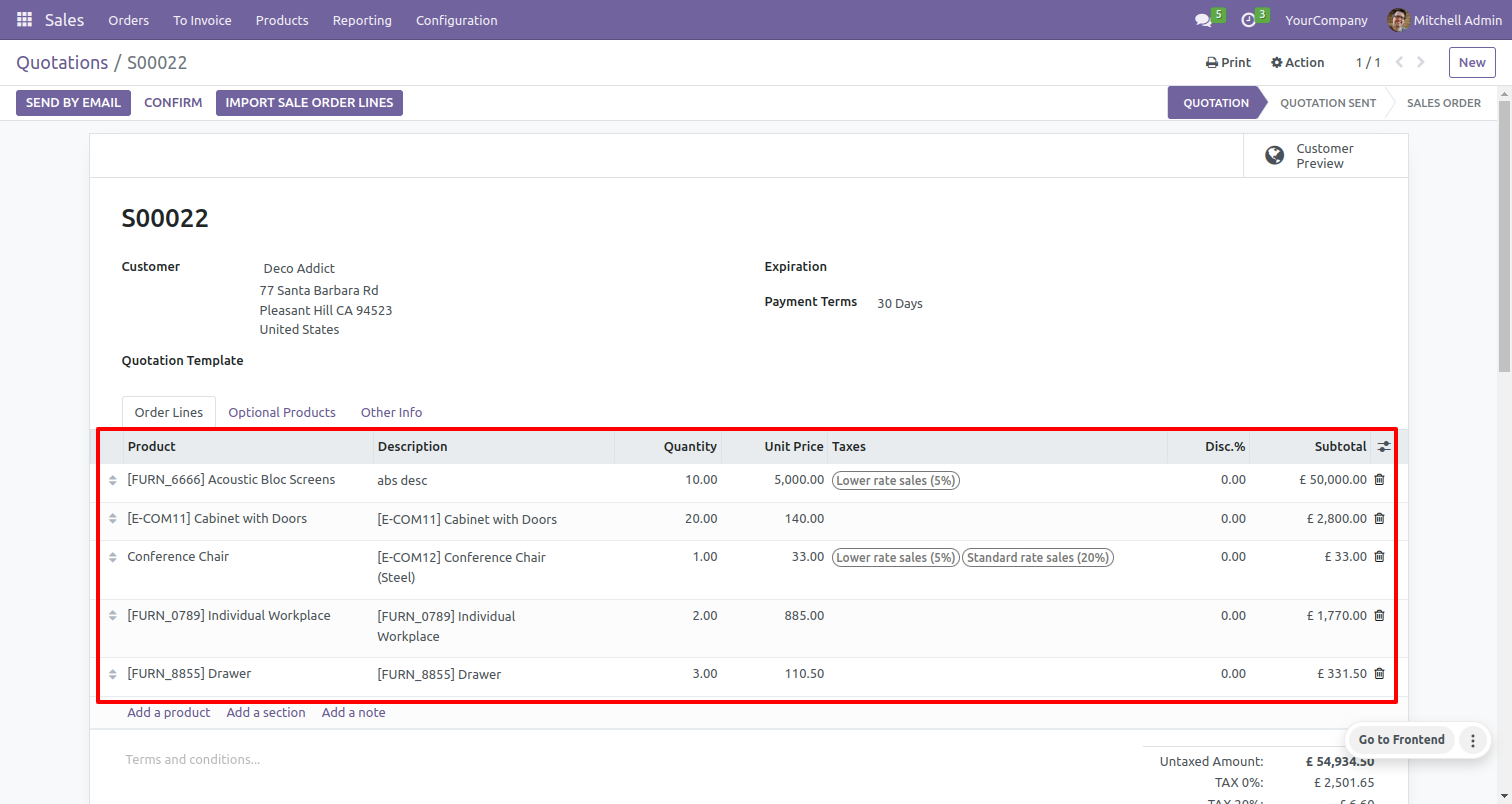
Here, you can see the imported sale order lines.
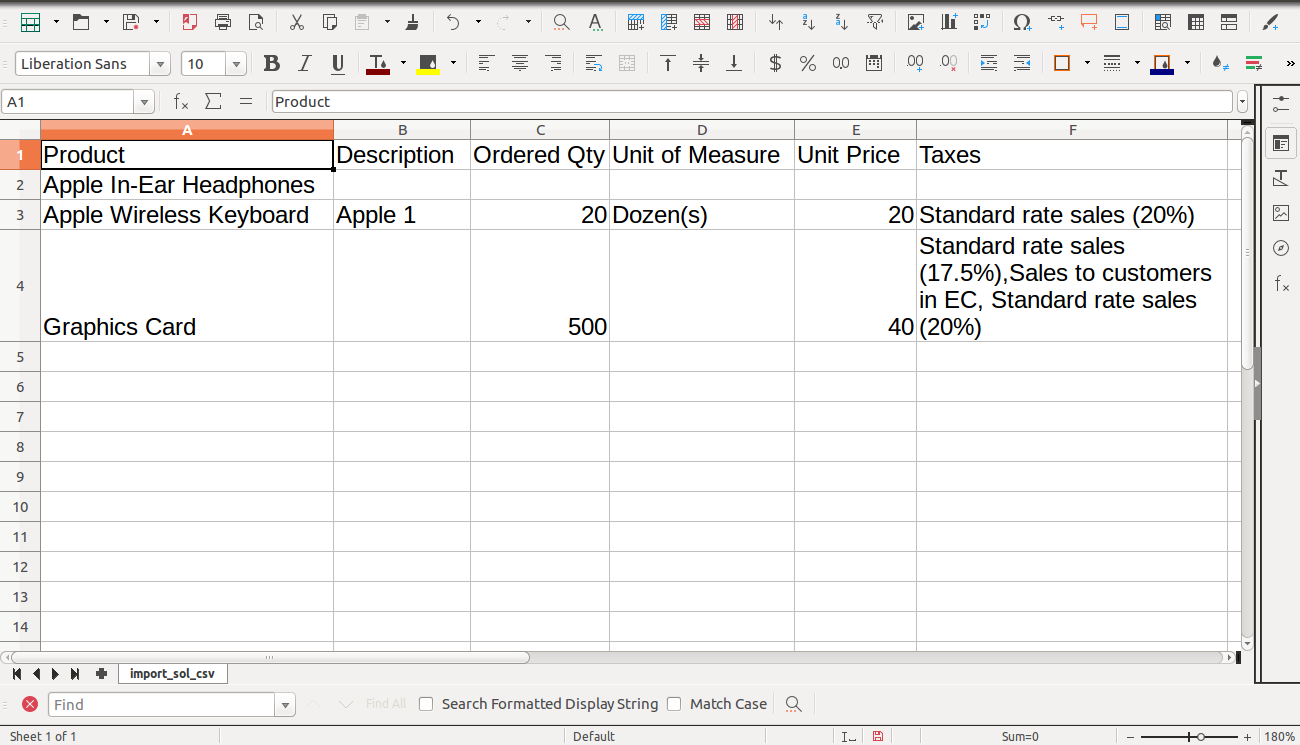
Your CSV file format.
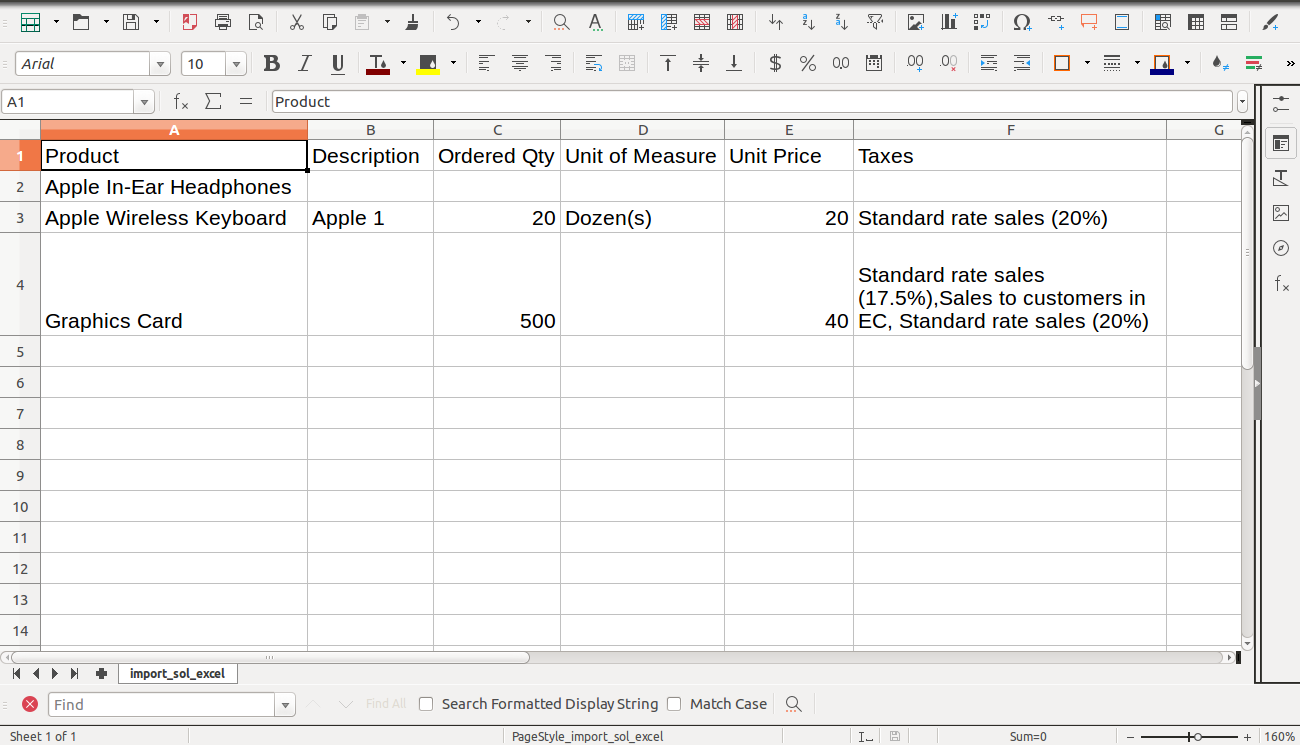
Your Excel file format.
The sale order lines can be imported from CSV sheets, including custom fields.
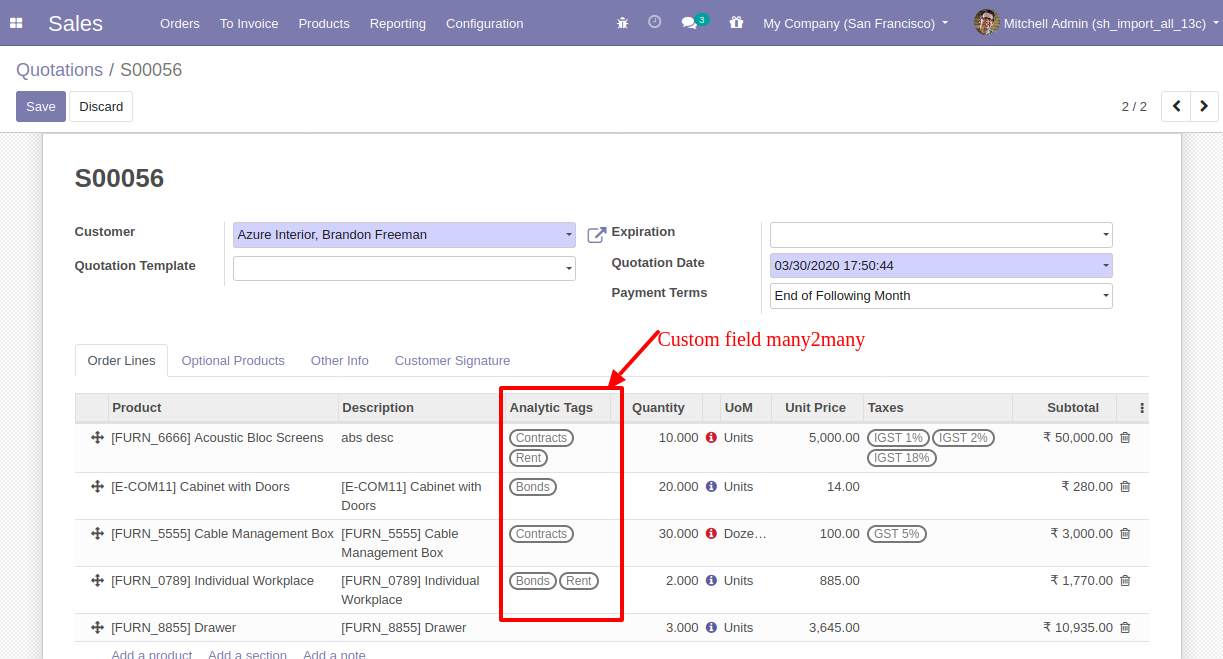
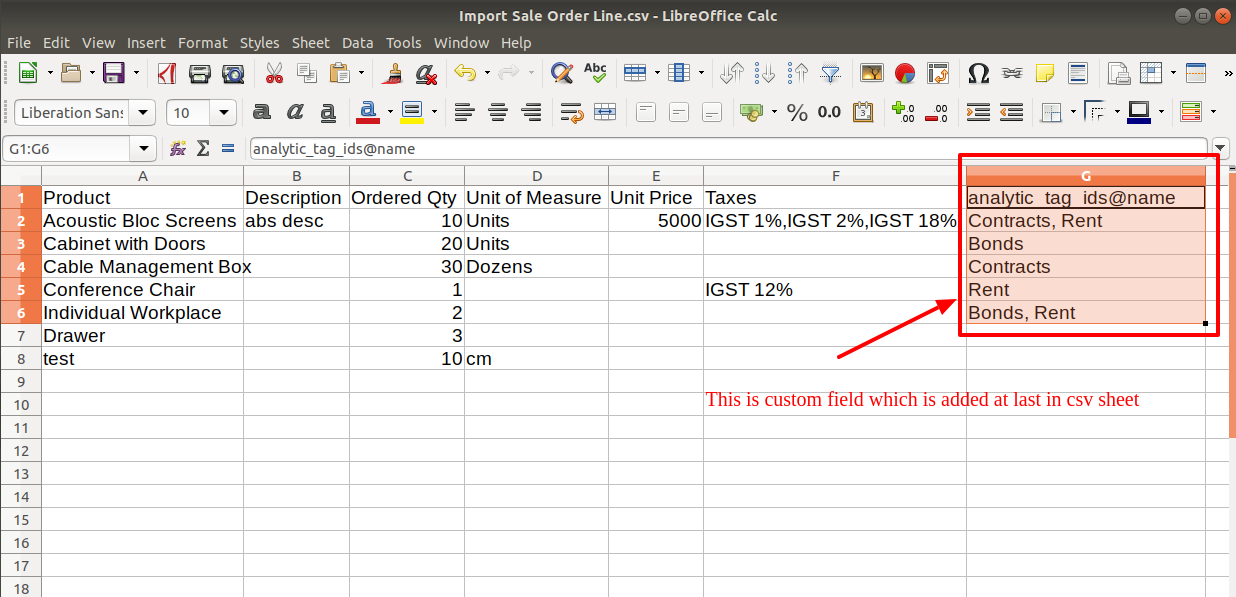
Your CSV file format and add custom fields after the last column.
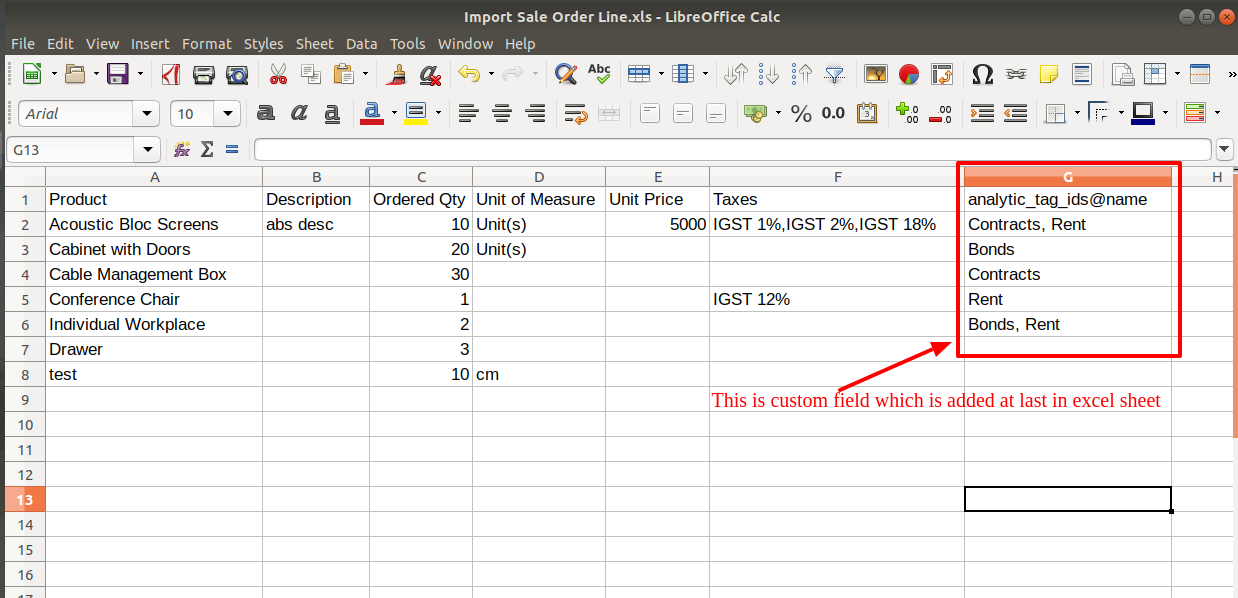
Your Excel file format and add custom fields after the last column.
Custom Fields / Non Existing Standard Fields
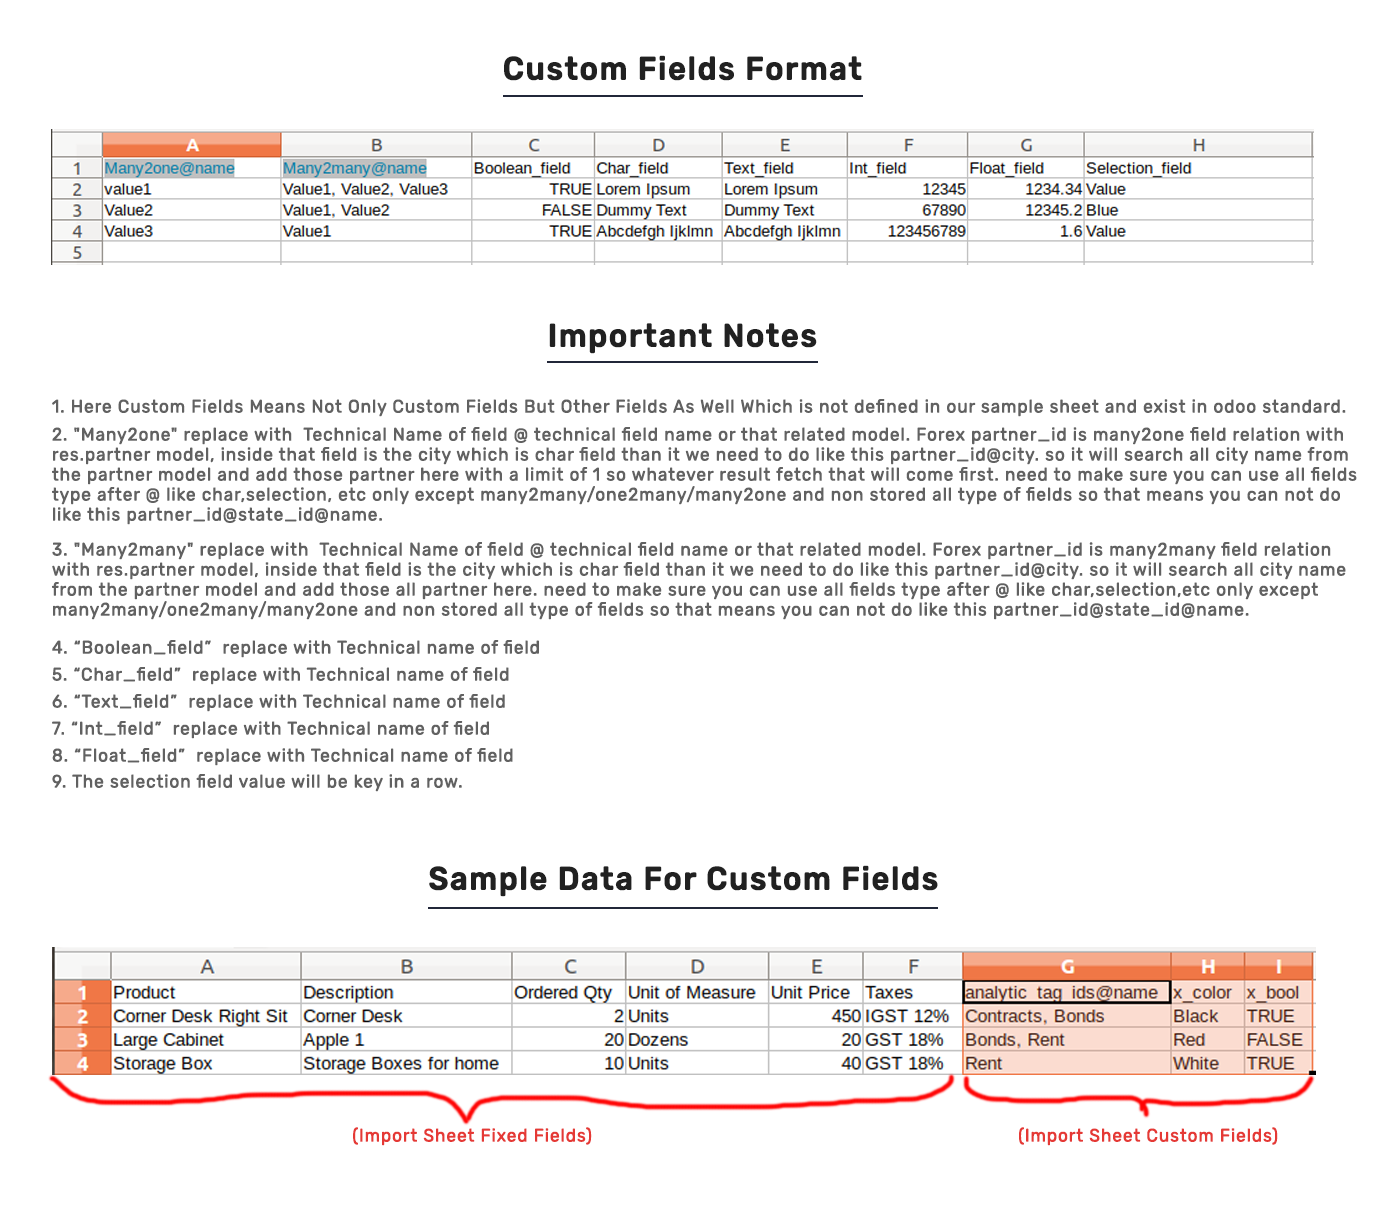
Do you want to import fields which is created by any custom modules, odoo studio, or standard odoo fields which are not present inside the sample sheet provided in the module? You can add all those kinds of fields in the sheet at the end after the sample sheet fields it means from column "G".
Videos
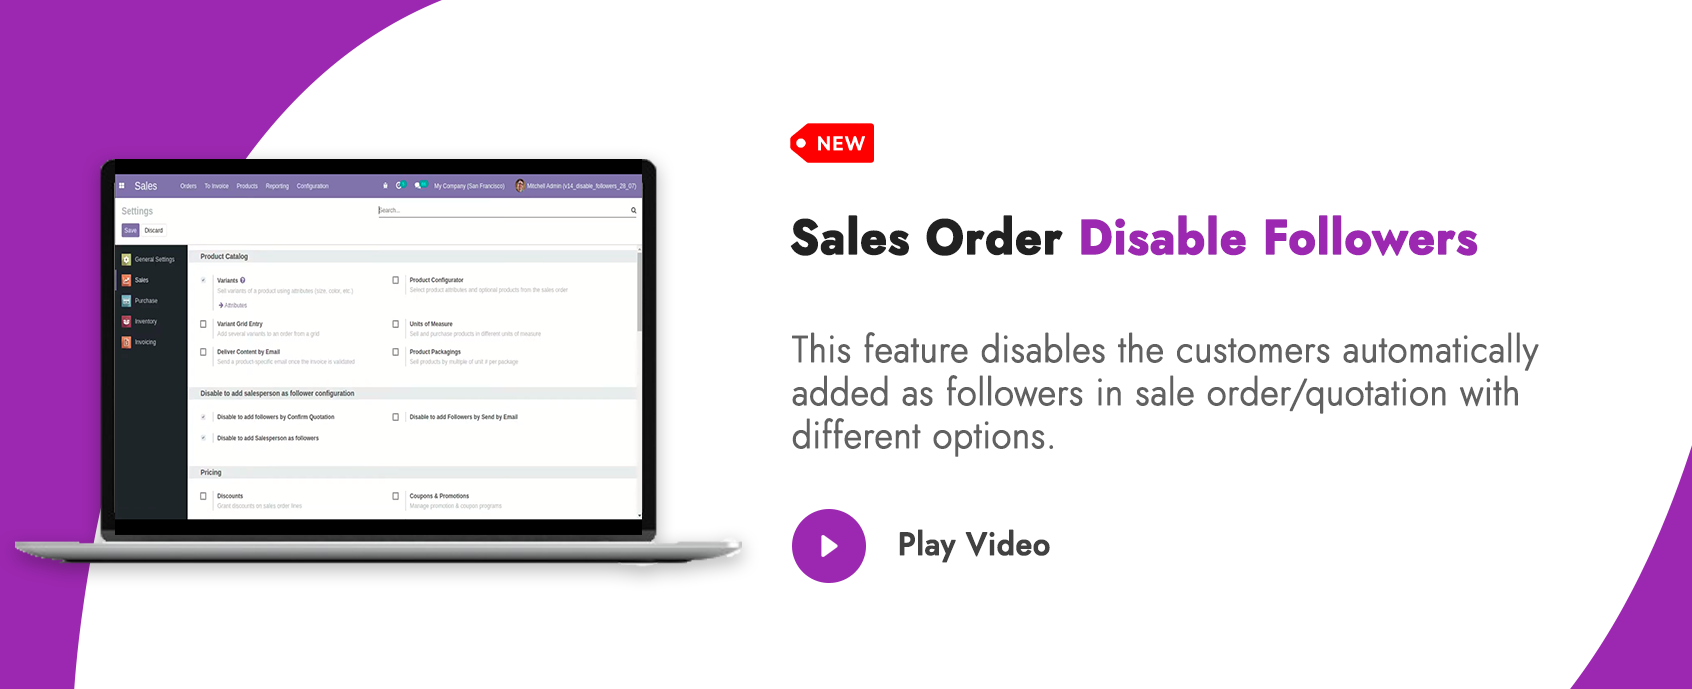
In the settings, tick the tickbox "Disable to add followers by confirm Quotation" to restrict the customers automatically added as followers.

Now, confirm the quotation and create sale order.

In the follower's list customers are not added as the followers in the sale order.

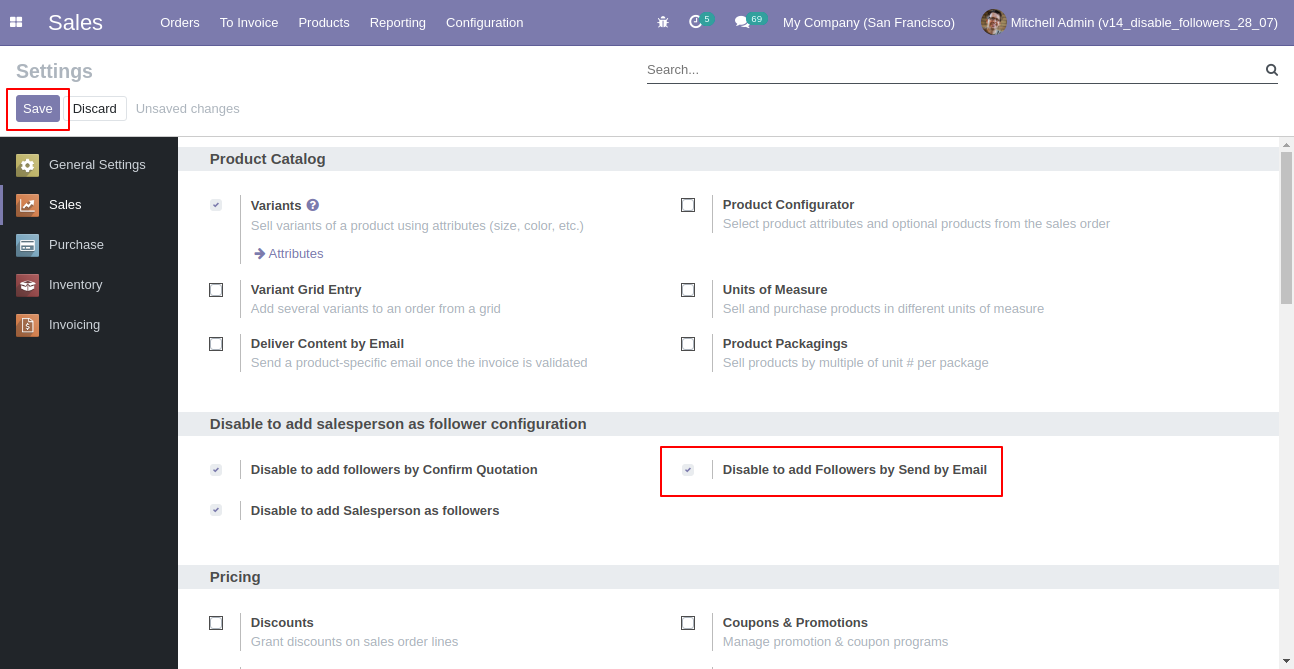
In the settings, tick the tickbox "Disable to add followers by send by email" to restrict the customers automatically added as followers.
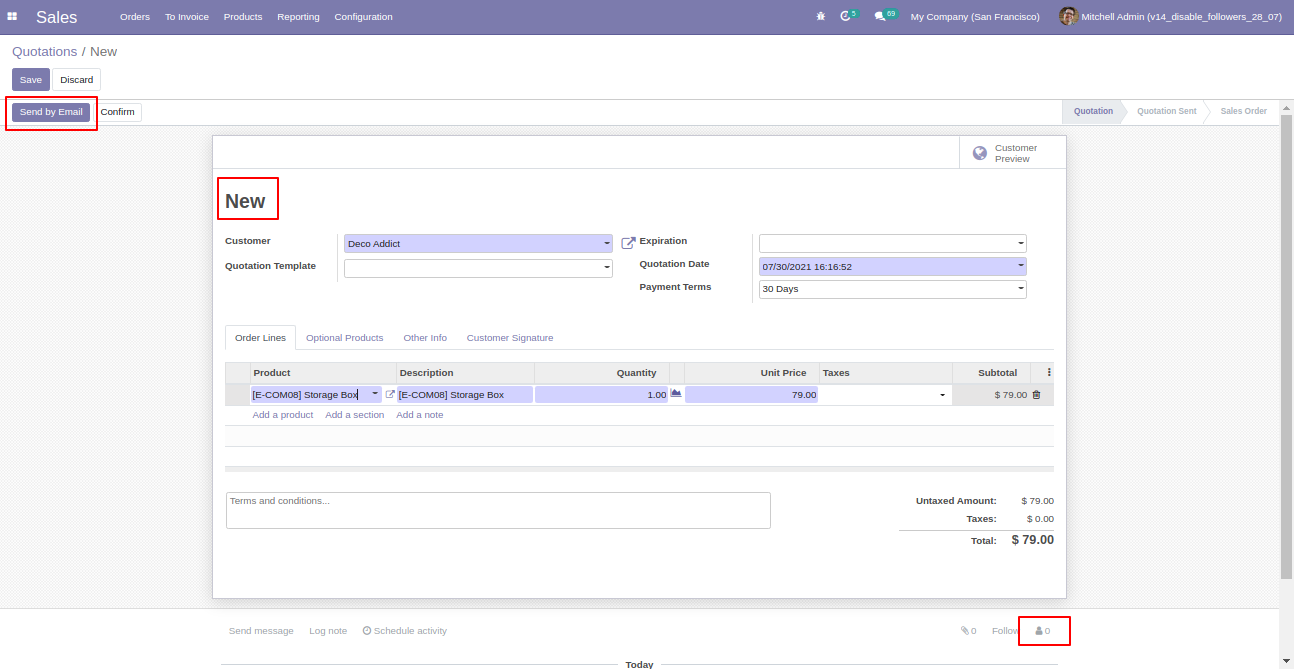
We press "Send By Email".
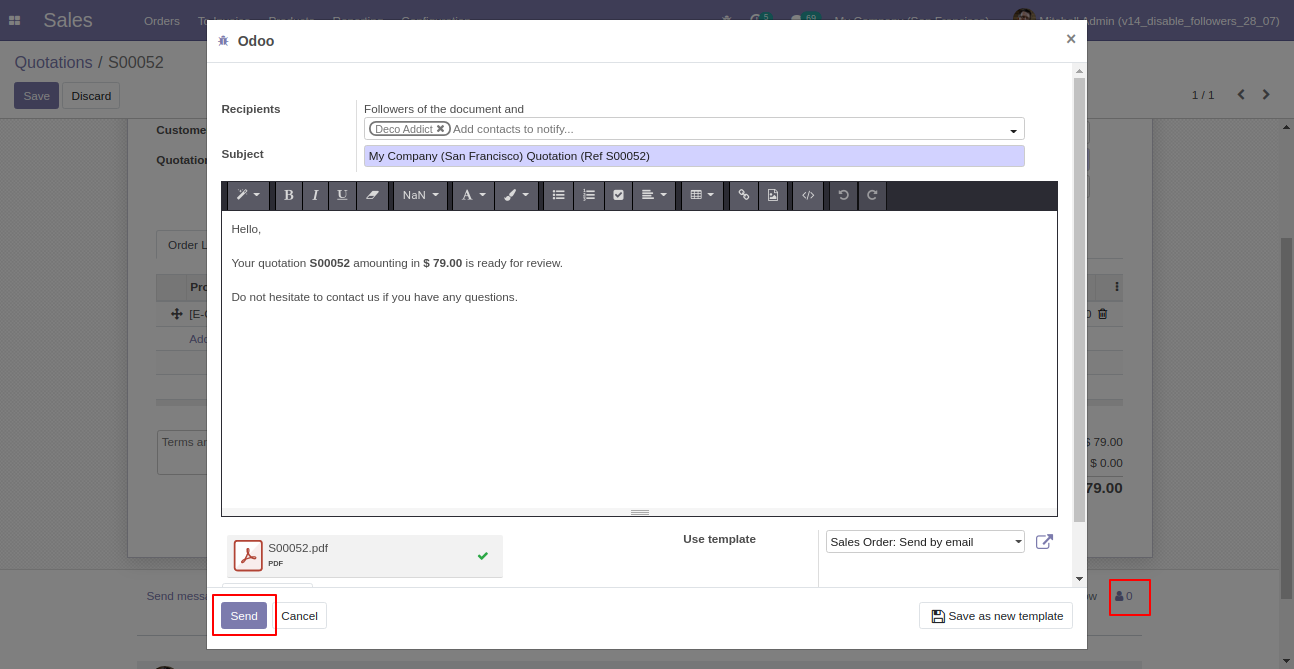
Now we send the email, you can see the recipient's/customer's name.
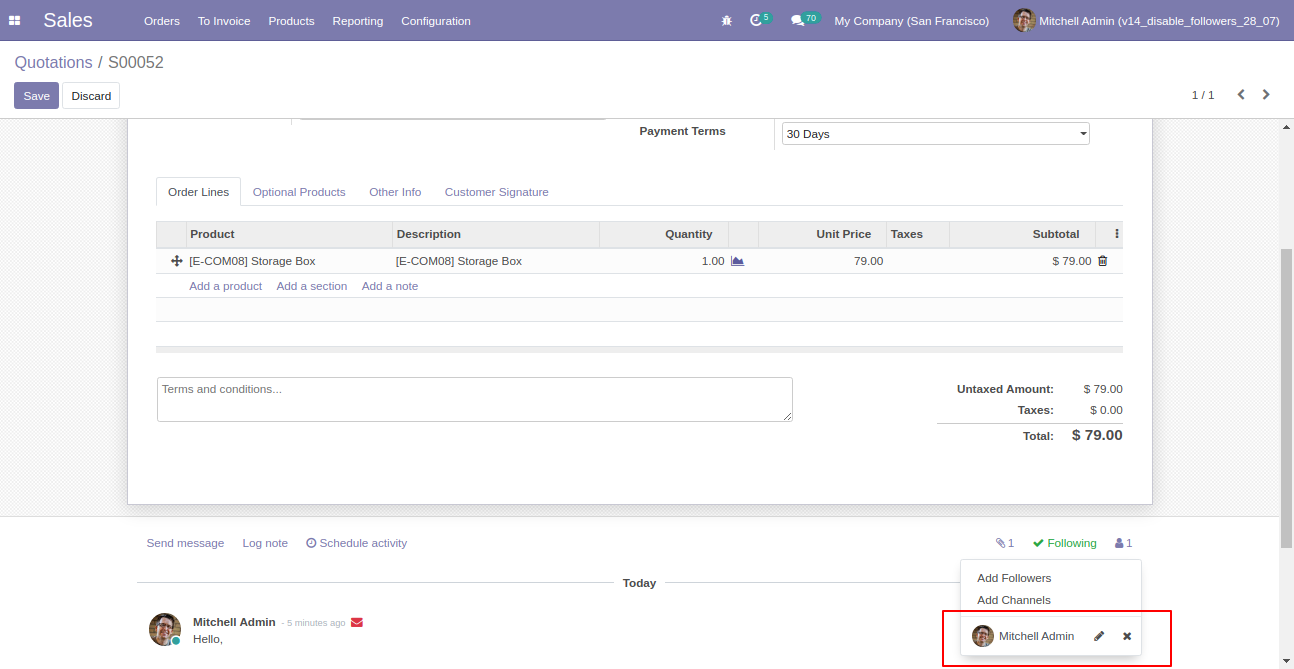
In the follower's list customers not add as the followers.
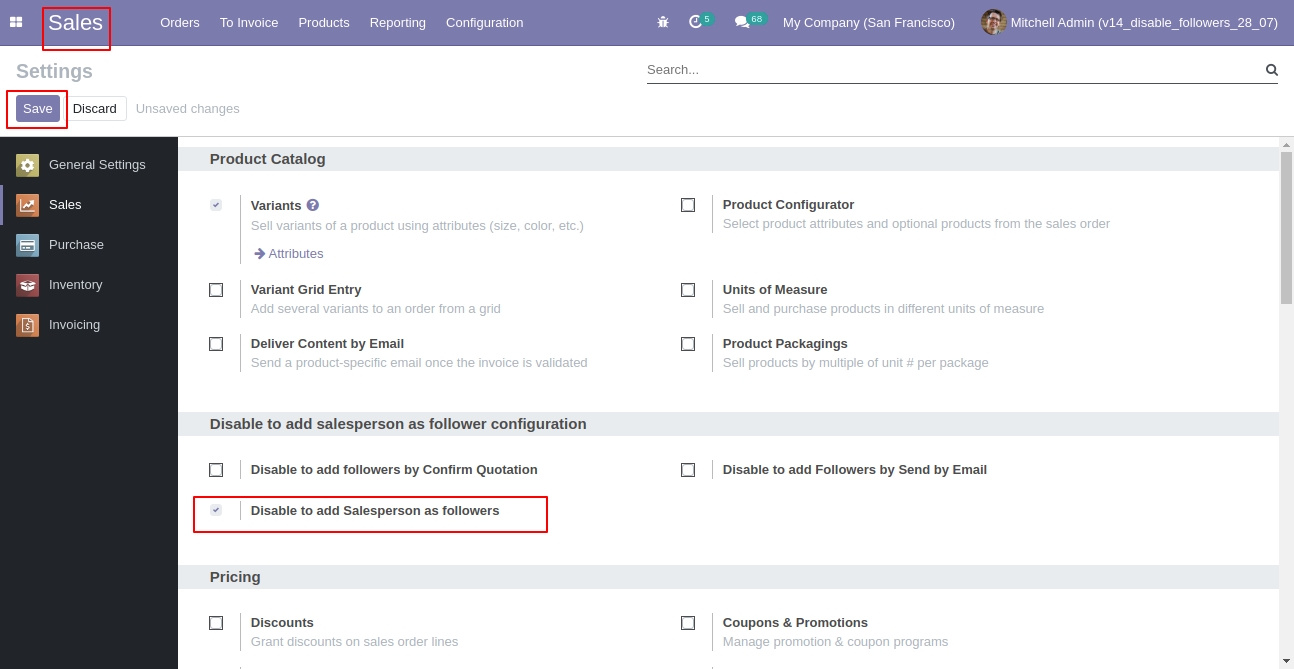
In the settings tick the tickbox "Disable to add salesperson as followers" to restrict the salesperson automatically added as followers.
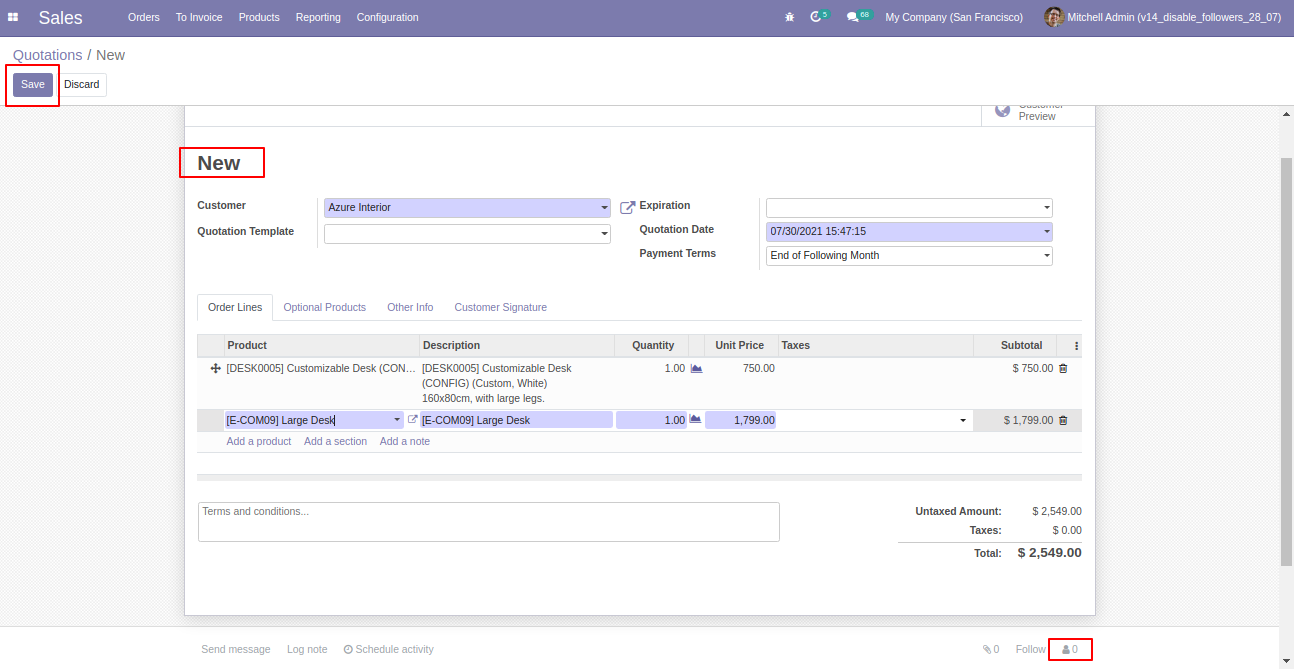
Now, create a sale order.
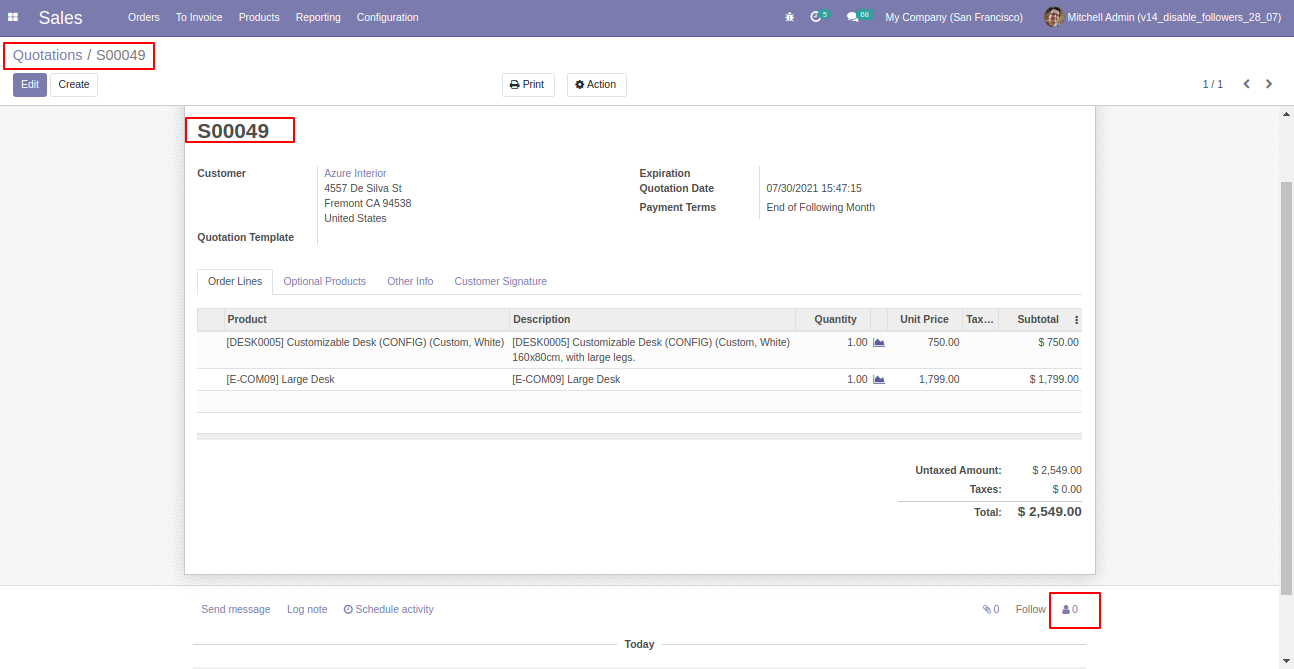
In the follower's list salesperson not add as the followers in the sale order.
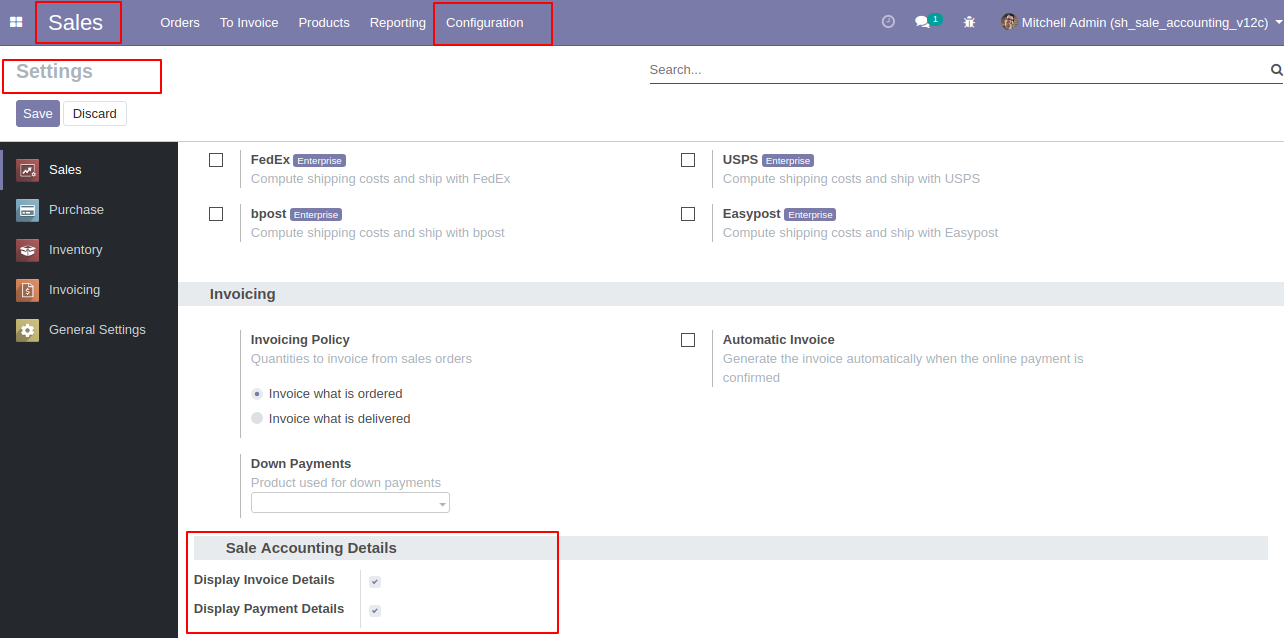
In settings click "Display Invoice Details" & "Display Payment Details" tickbox.
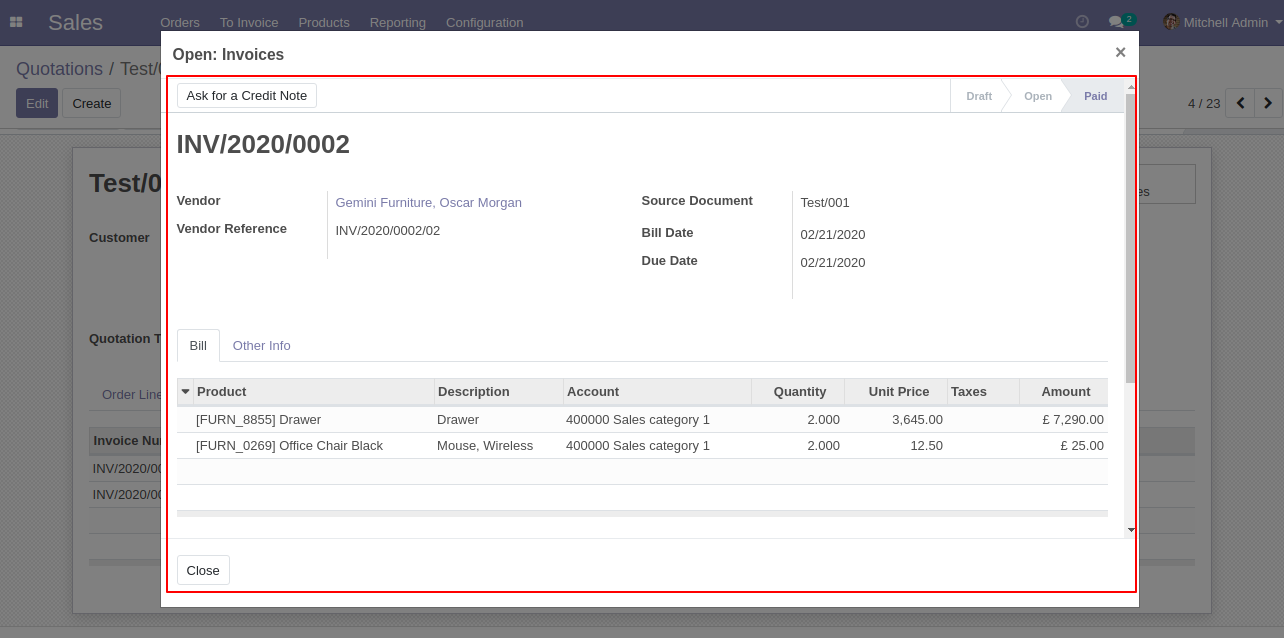
Invoice detail in the sale order.
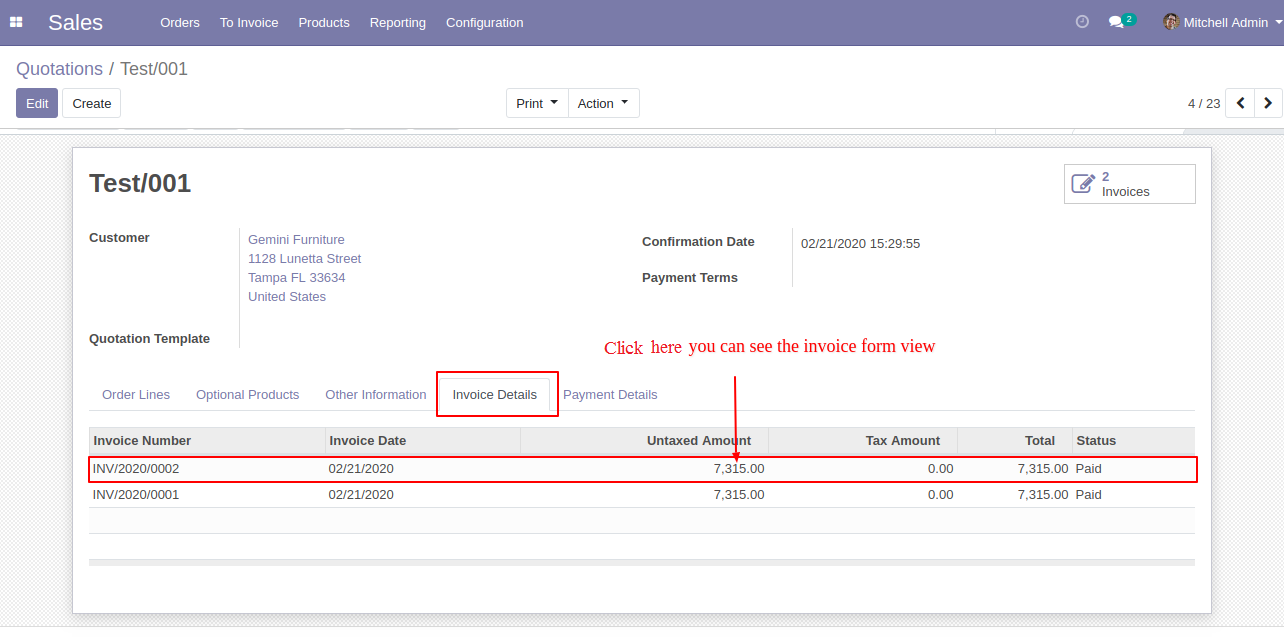
The invoice detail form view looks like below.
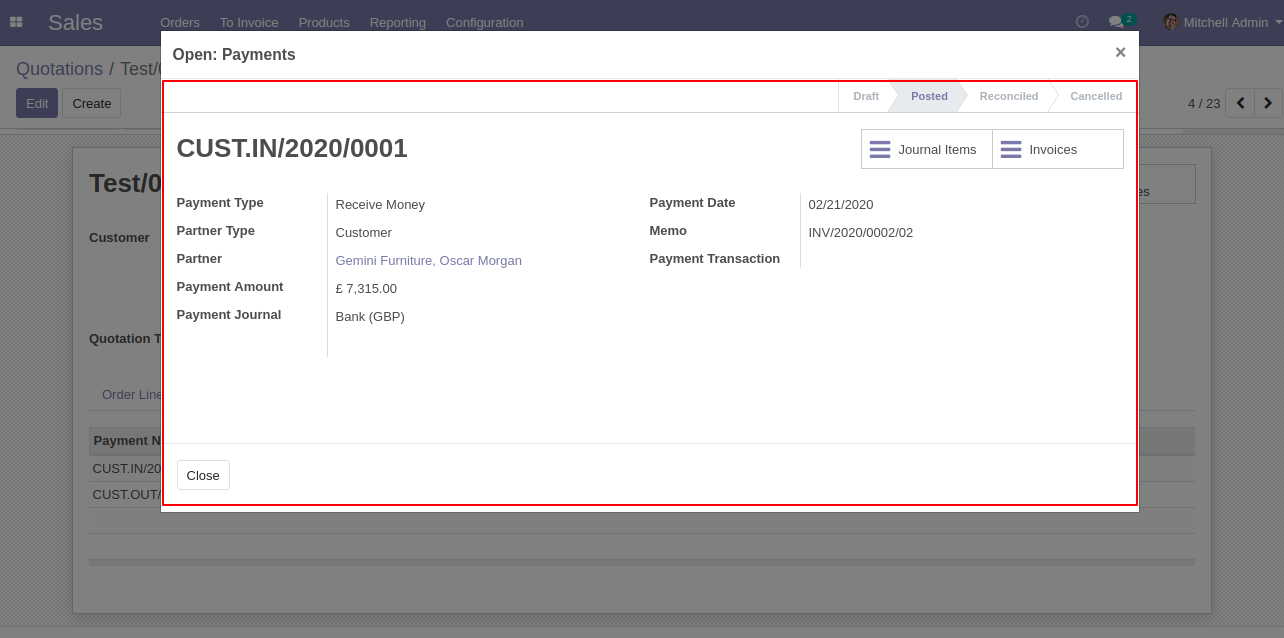
Payment details in the sale order.
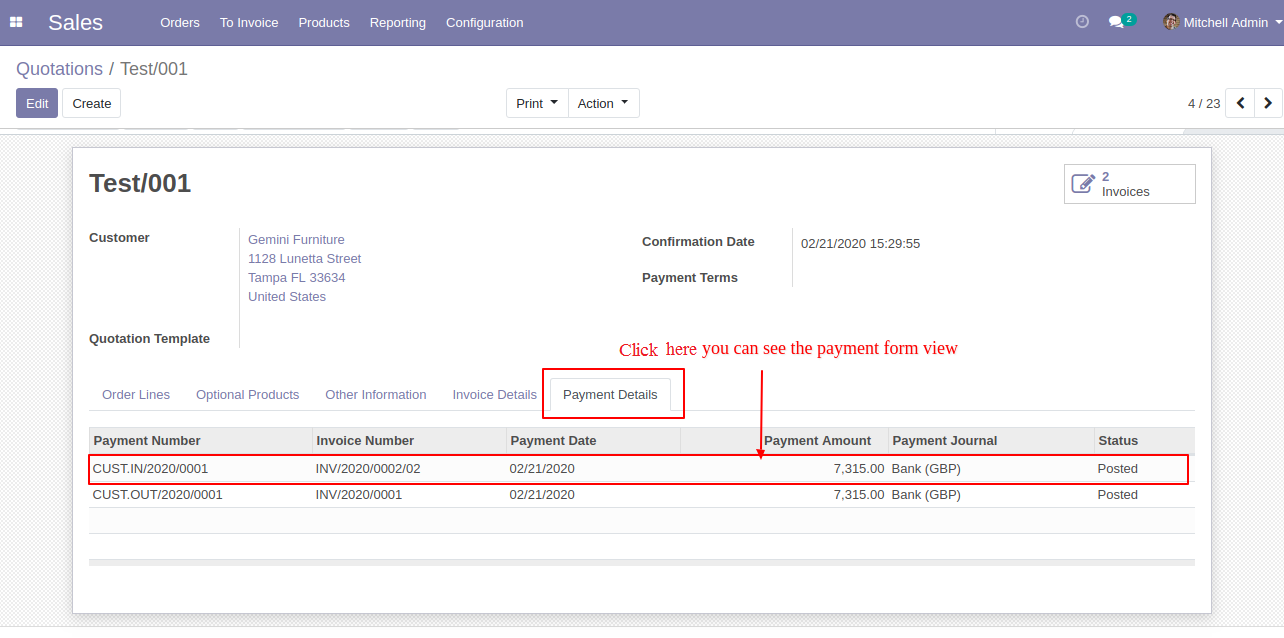
The payment detail form view looks like below.
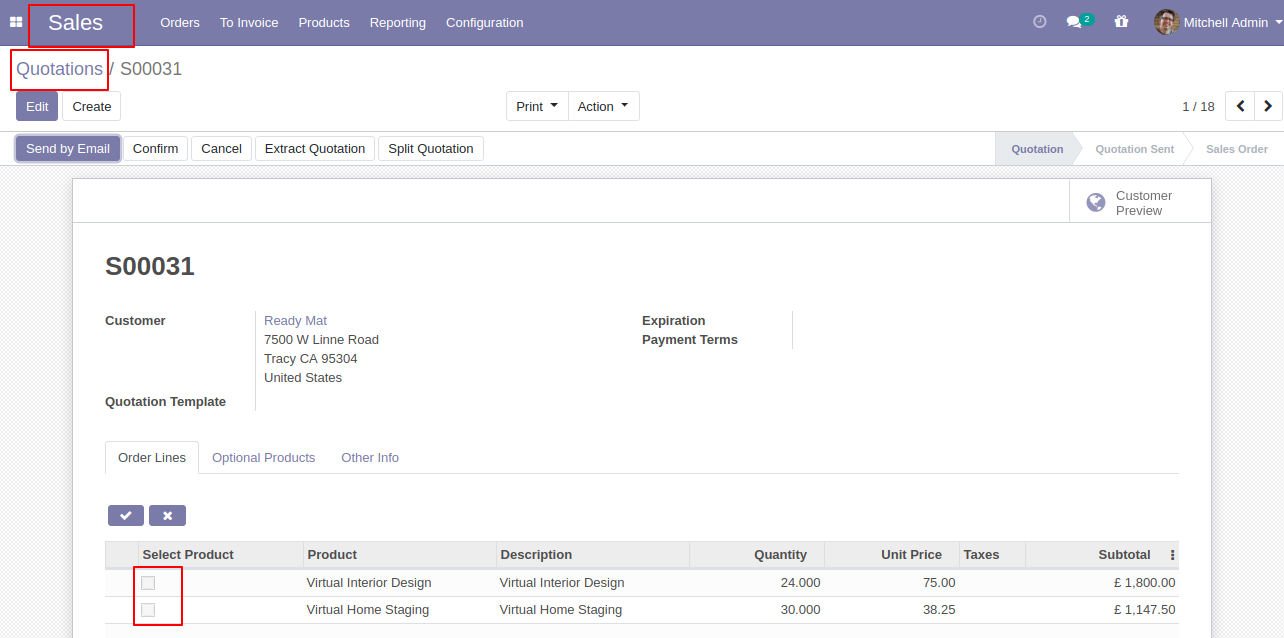
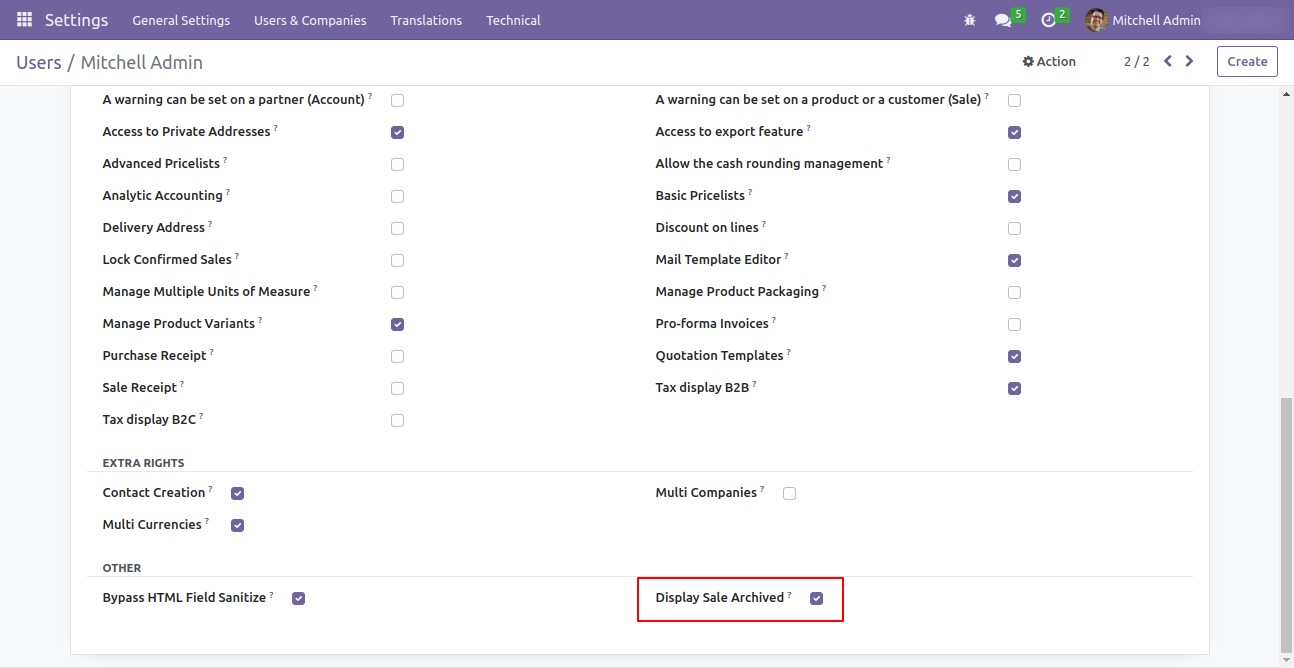
Set user rights to enable this functionality.
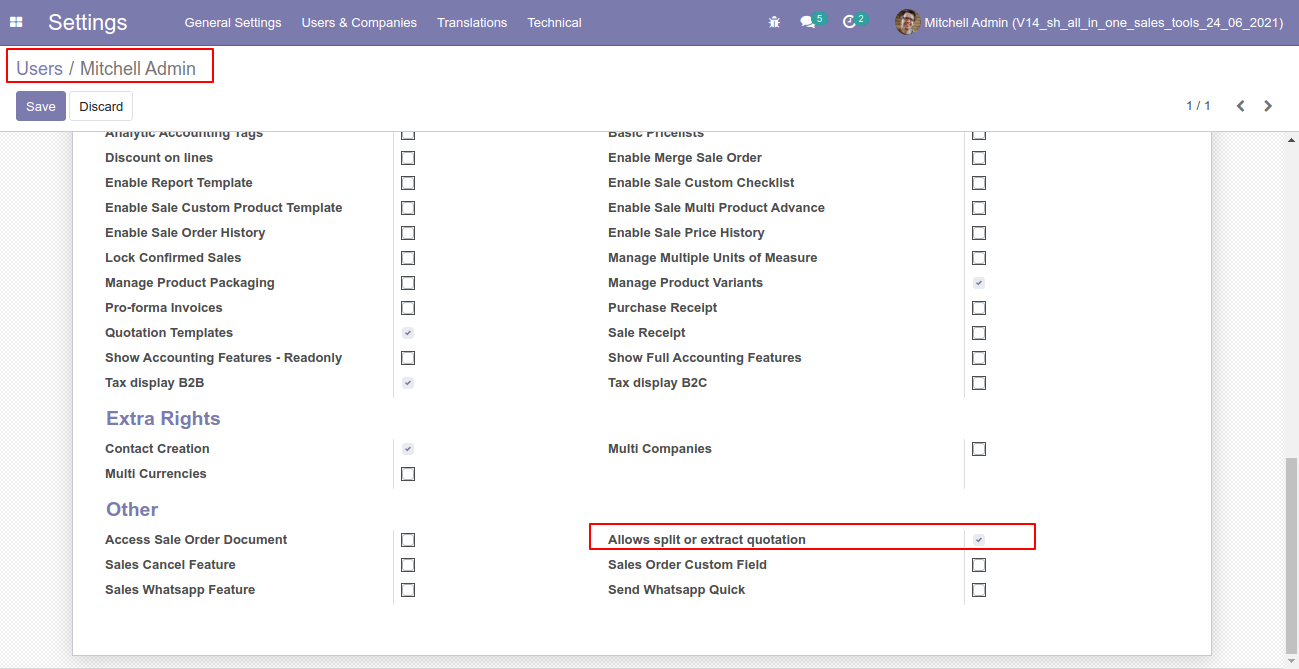
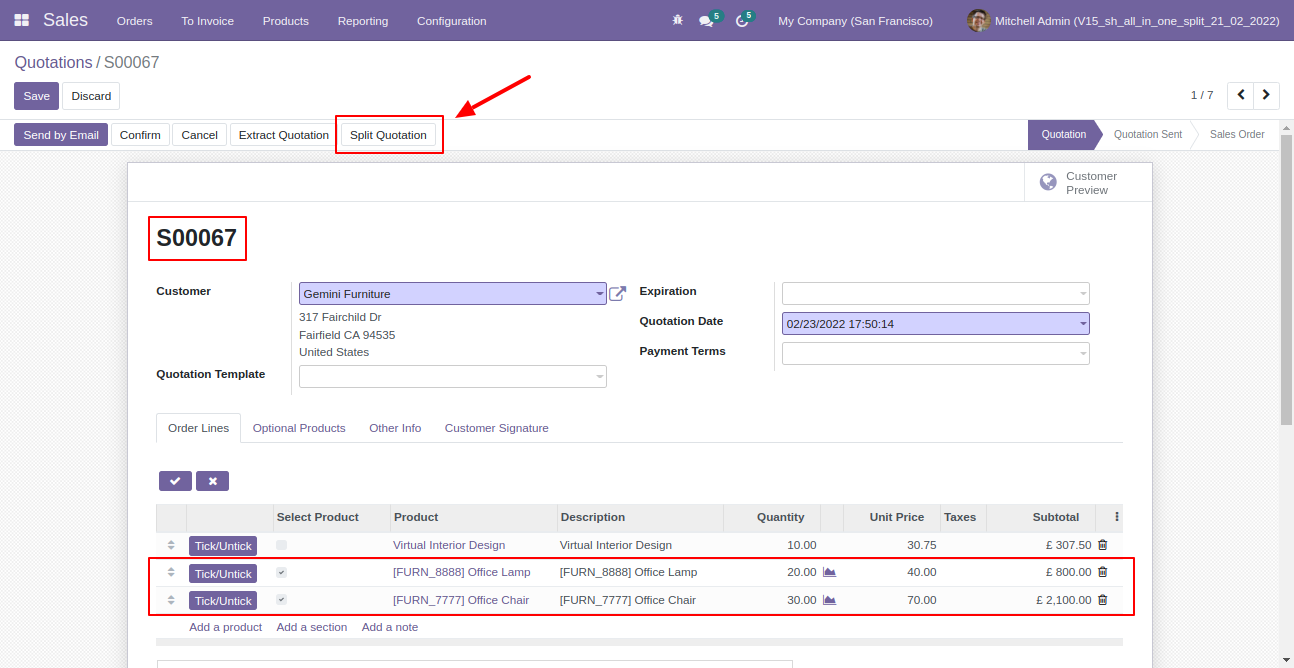
The "Tick/Untick" button display only in the draft state.

The "Tick/Untick" button does not display in the other state.
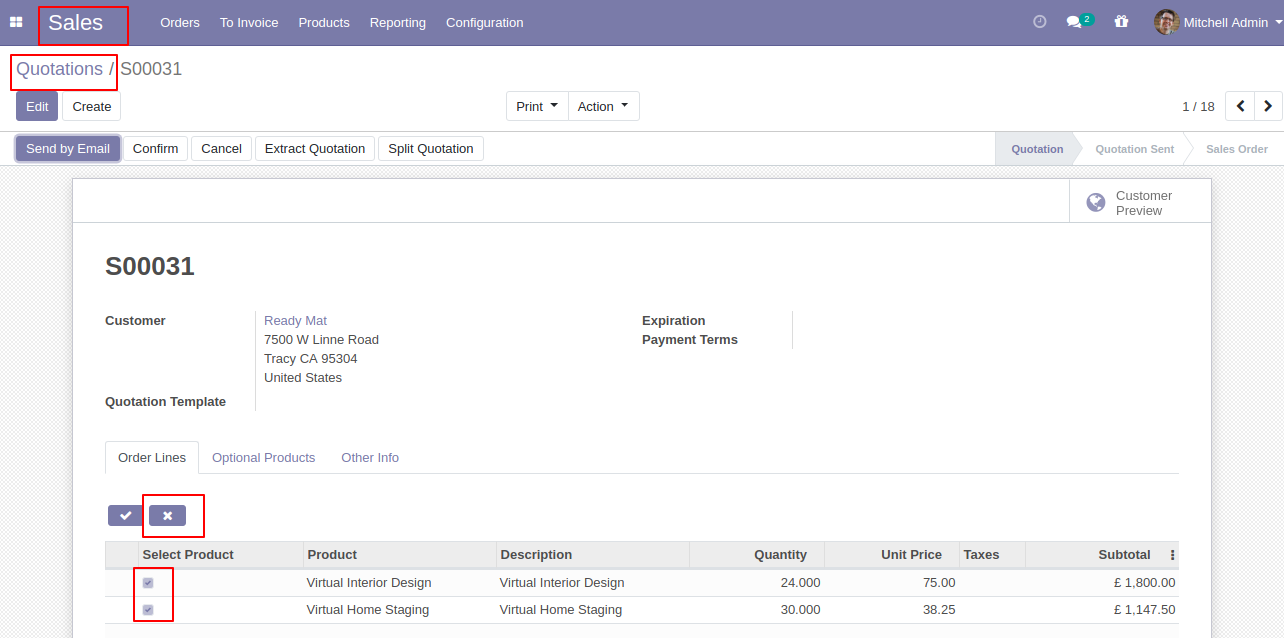
When you press the check button all products will go for split/extract.
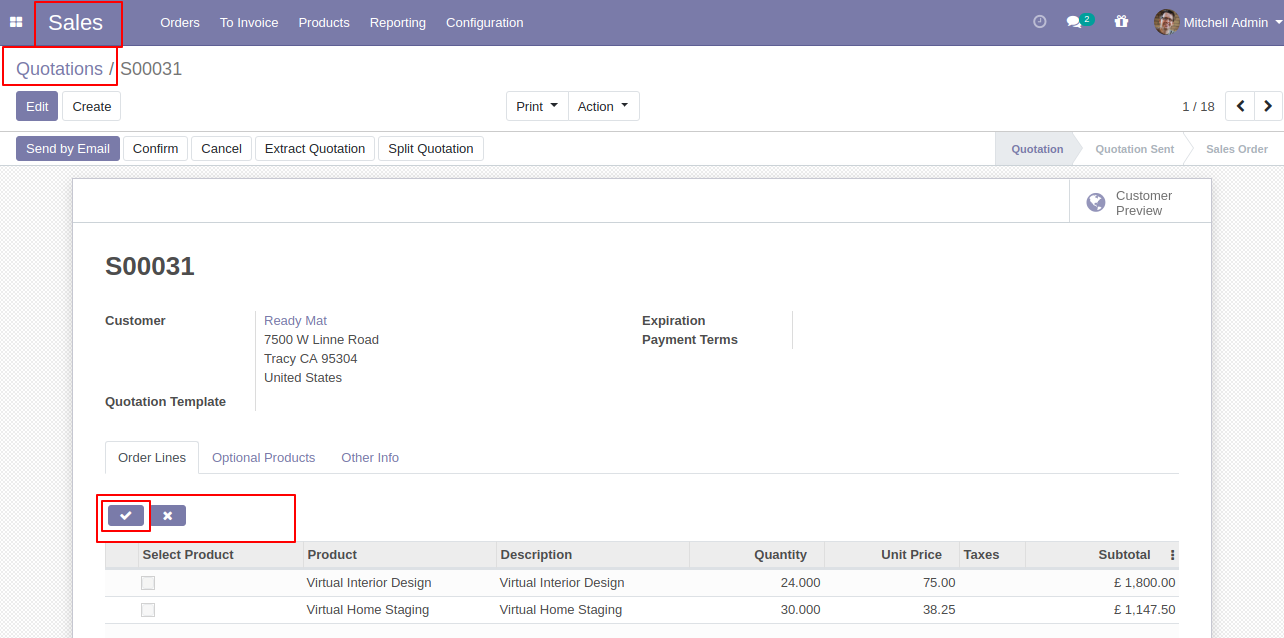
If you don't tick than it will add all items in the wizard.
You can choose products randomly.
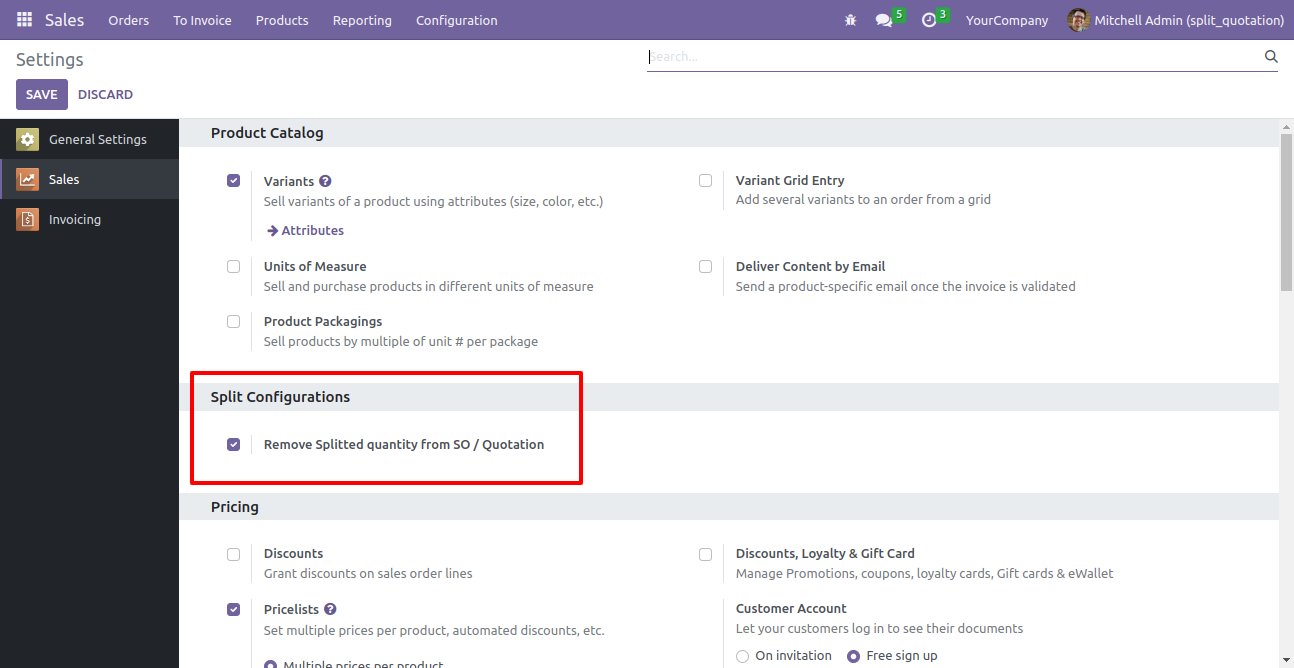
Enable this functionality to remove splited qty from SO also.
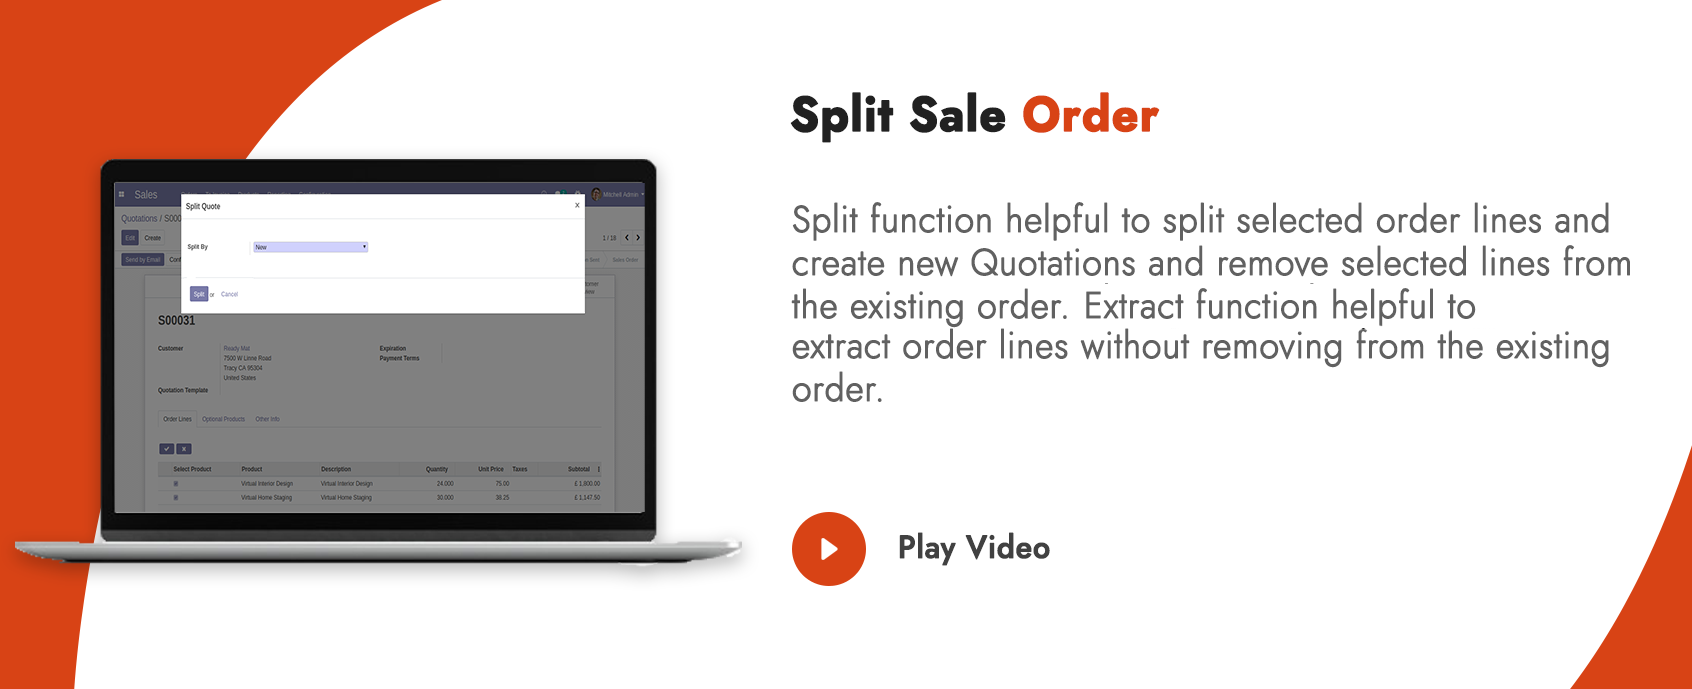
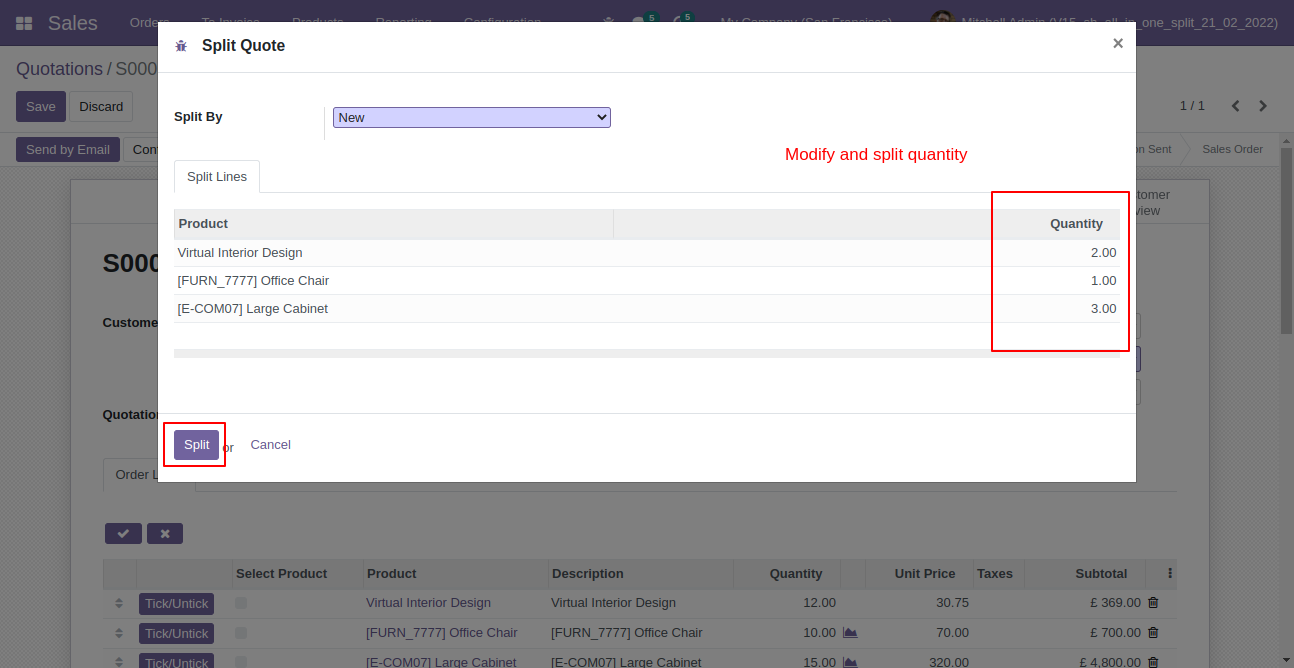
After selecting products press "Split Quotation".
Split/extract wizard with selected products and quantity.

You can modify products quantity from the wizard.
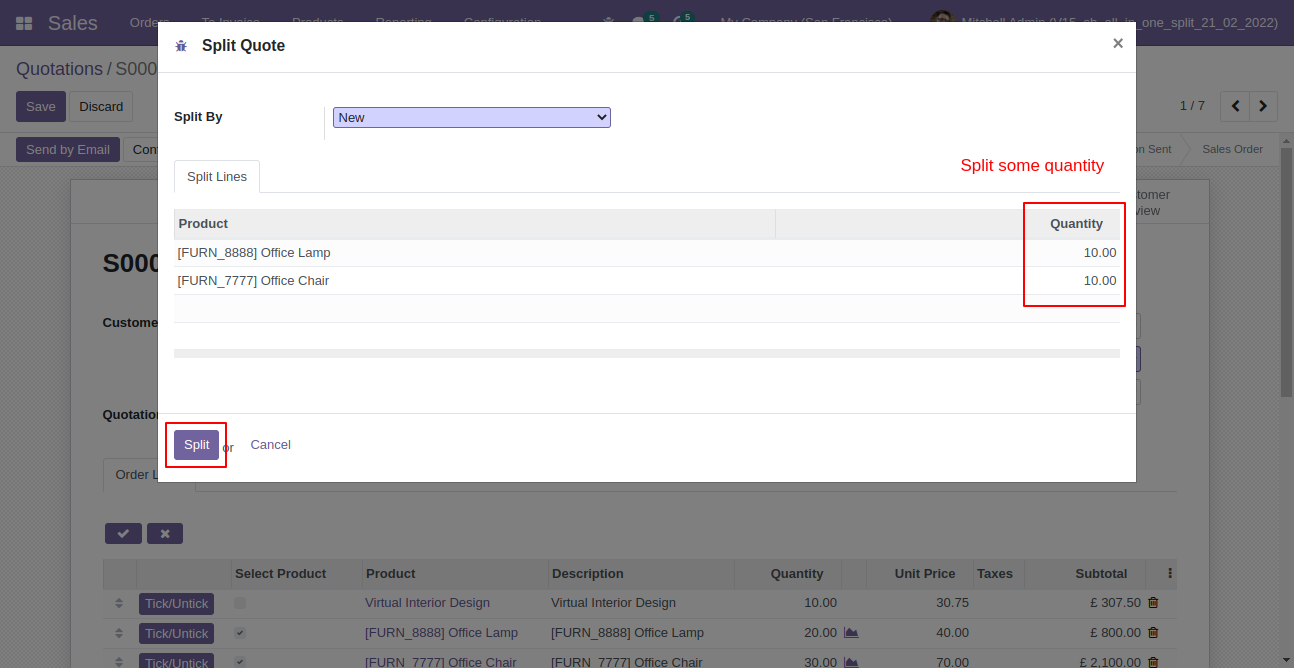
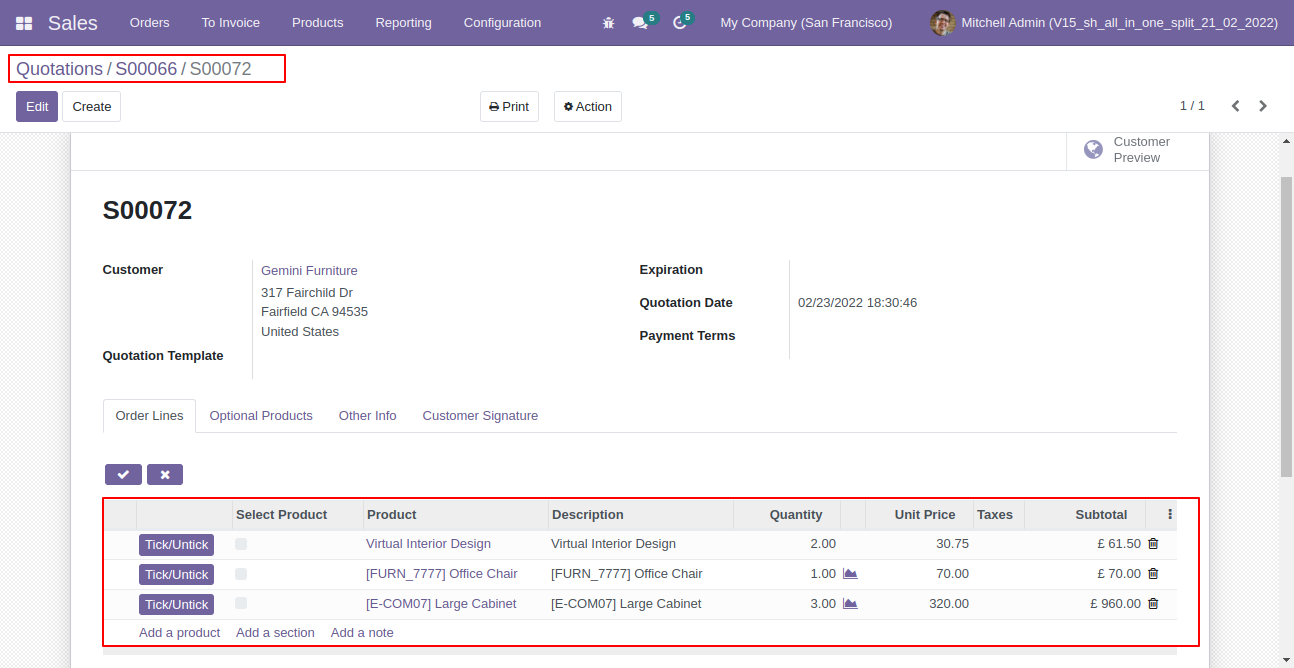
After split new quotation is generated with a selected quantity
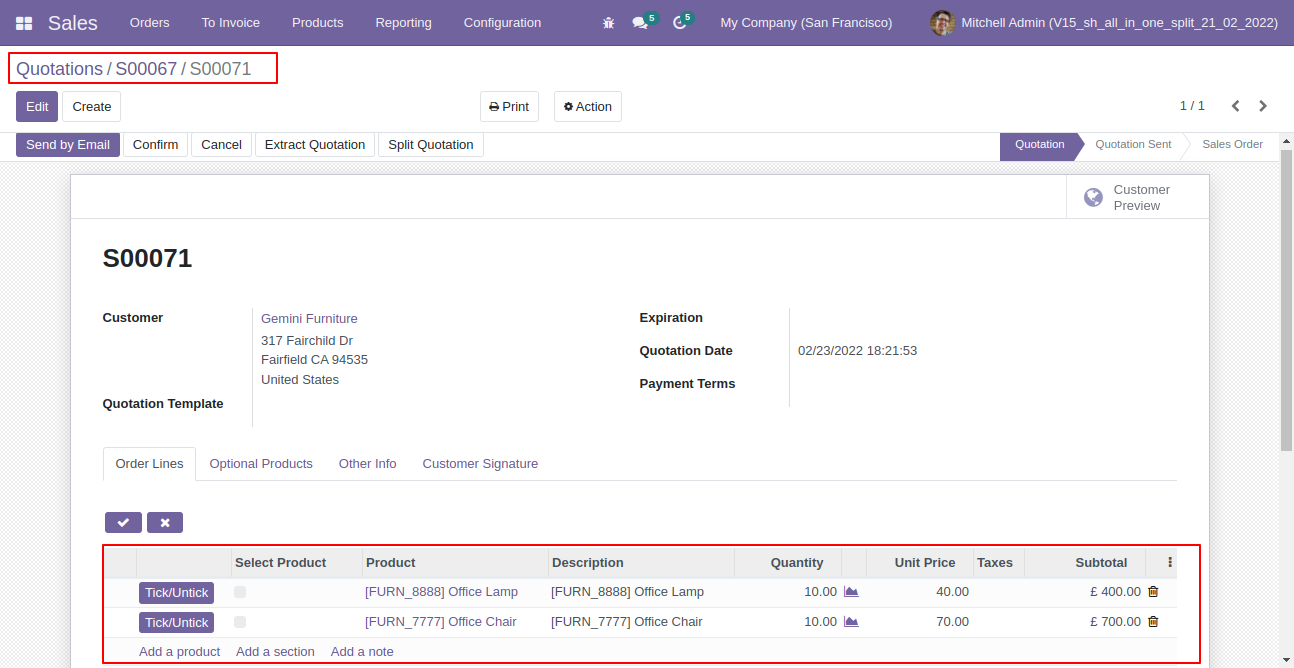
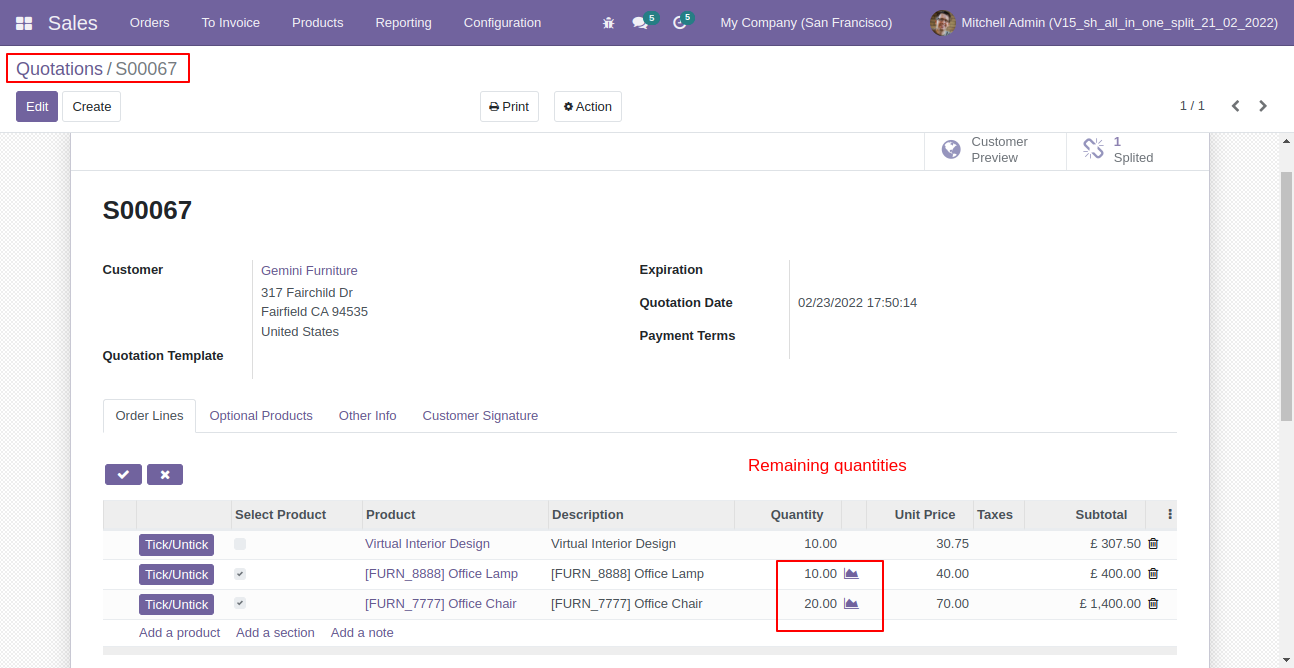
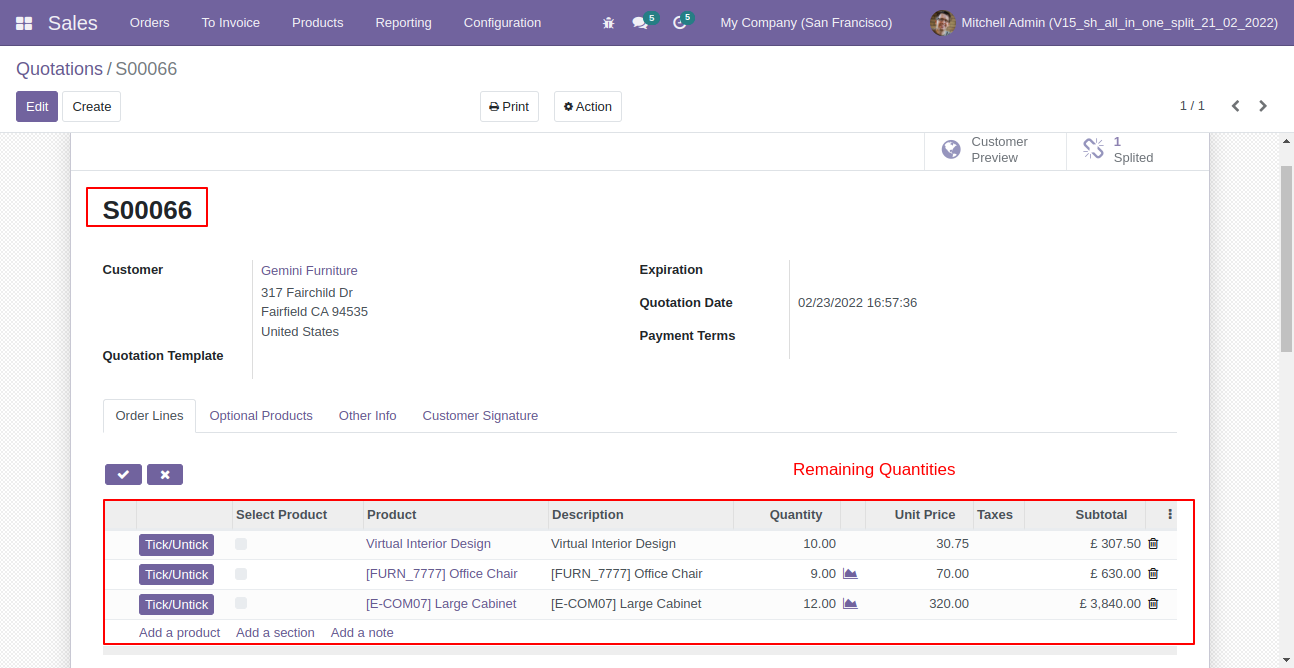
Old quotation with remaining quantity.
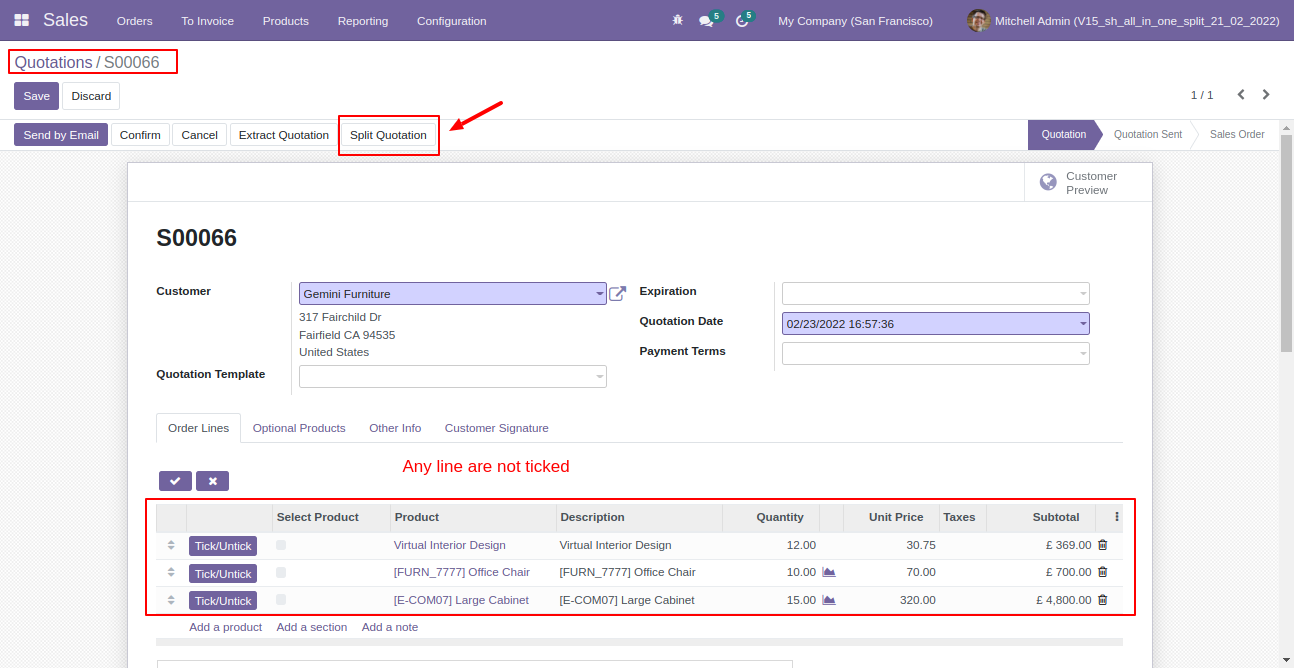
Now all order lines are unticked and press "Split Quotation".
In the split/extract wizard all lines are added.
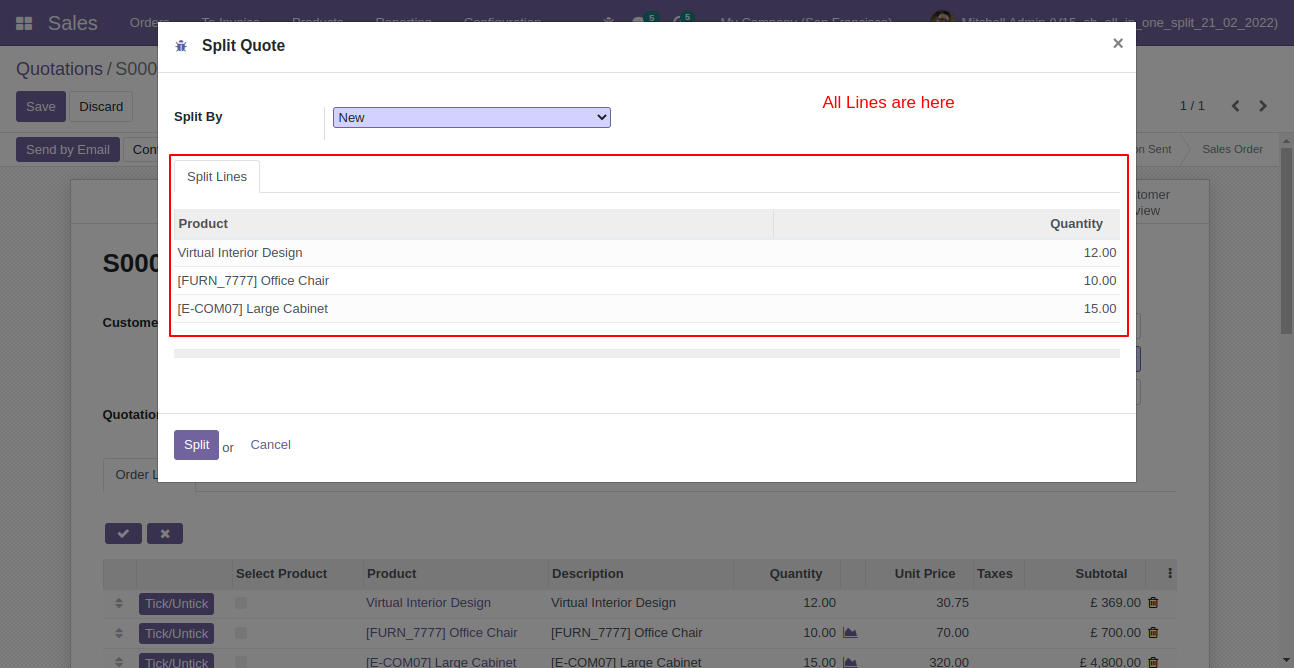
You can modify products quantity from the wizard.
After split new quotation is generated with a selected quantity
Old quotation with remaining quantity.
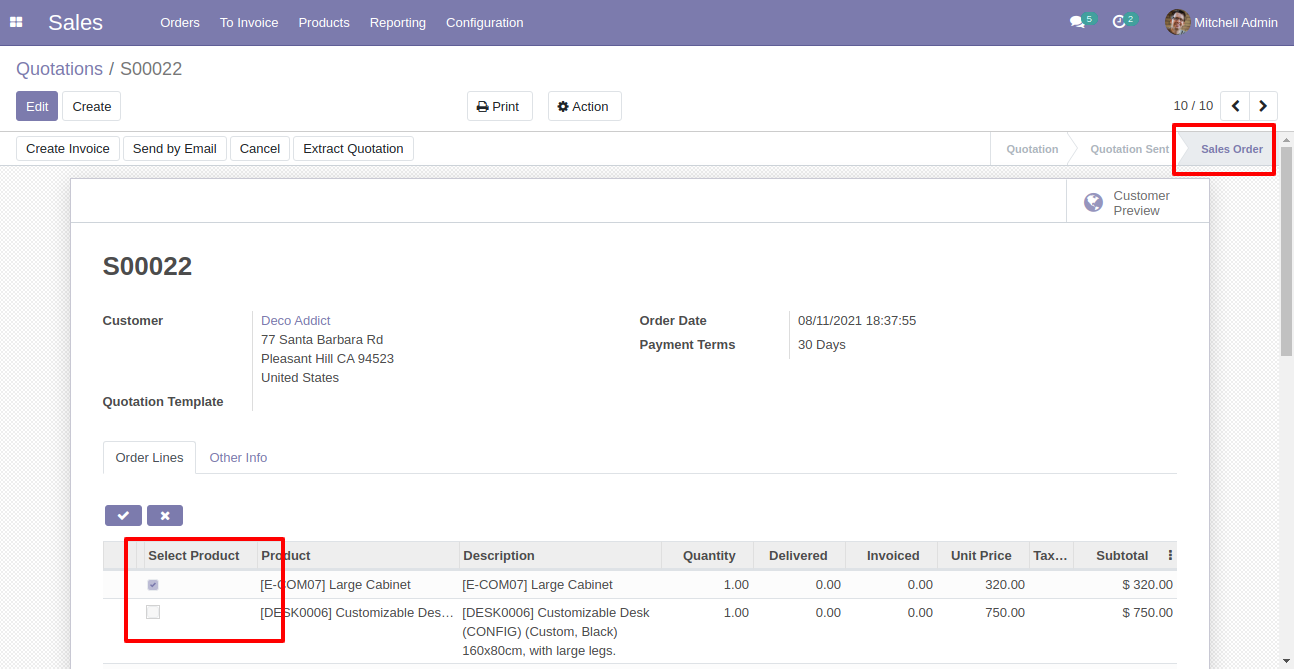
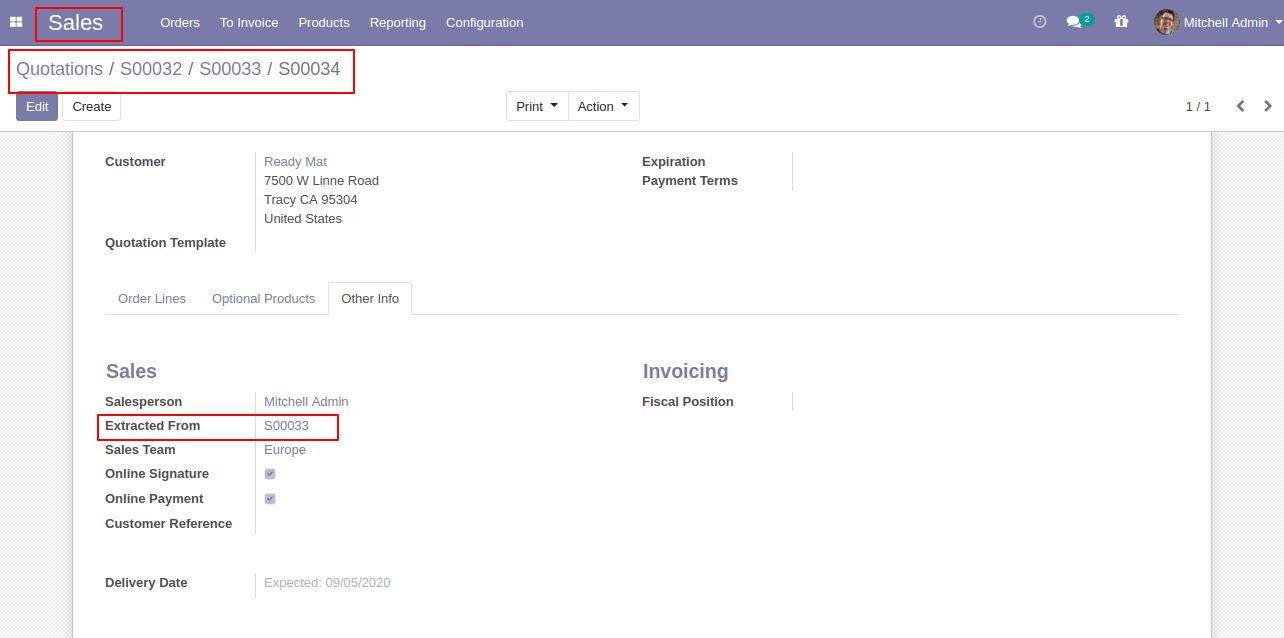
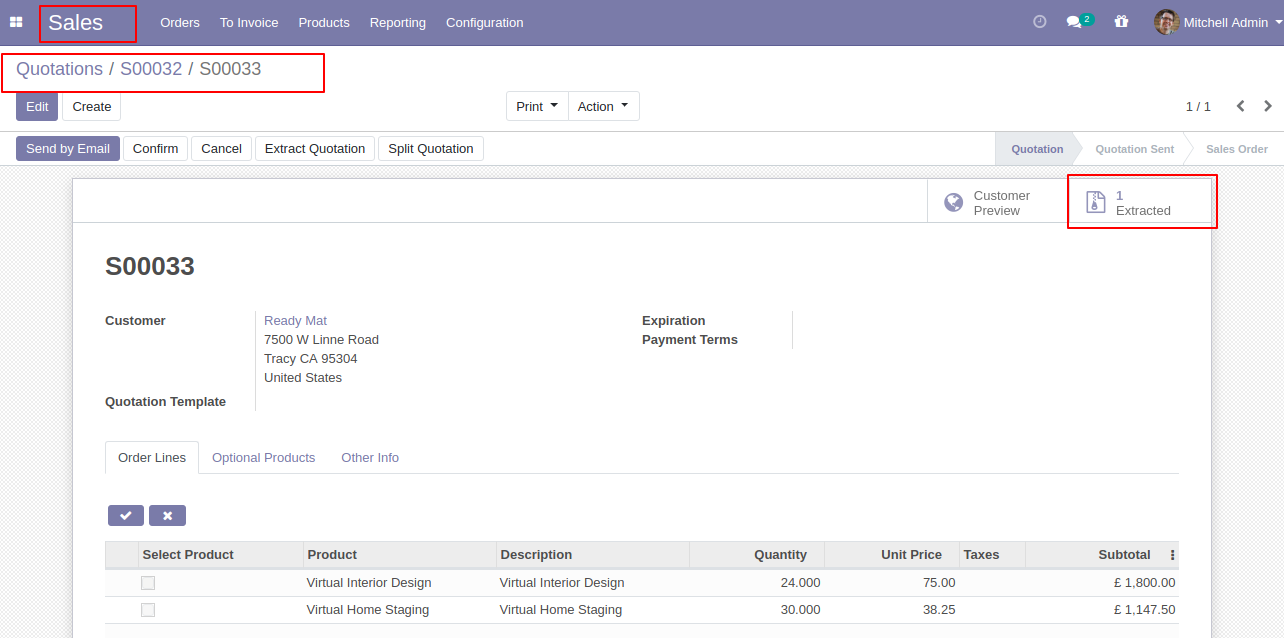
After selecting products press "Extract Quotation".

After that quotation extracted.
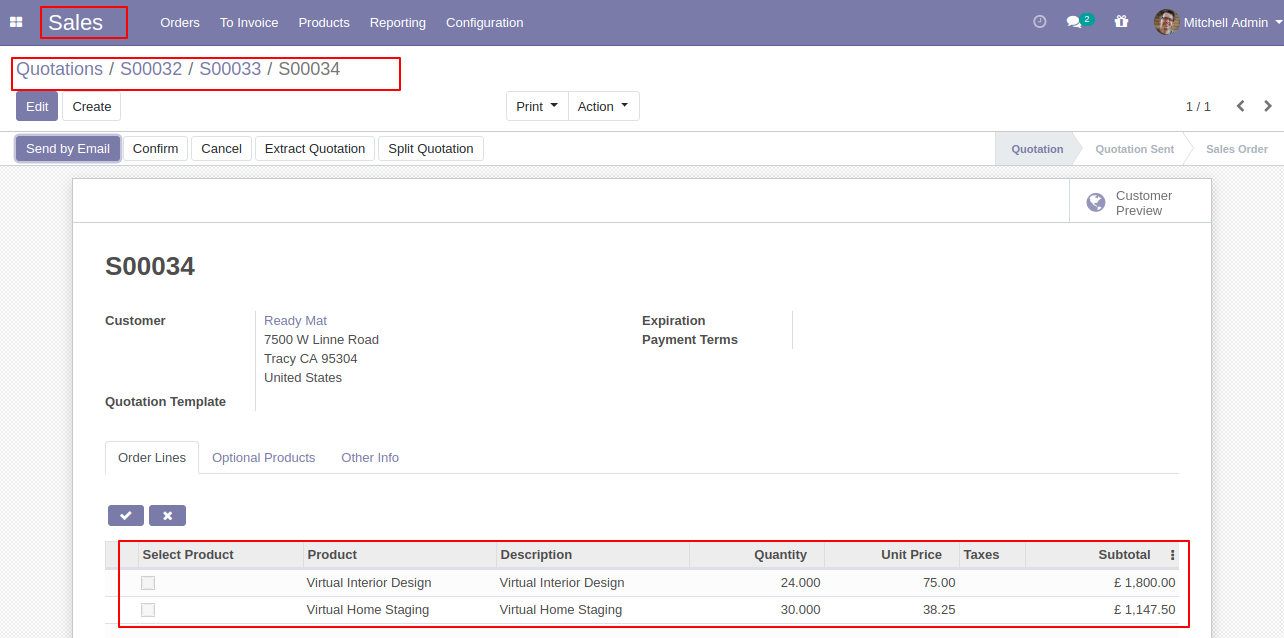
After the extract, you can see the extracted quotation number.
In the extract quotation, you can see the "Extracted" button in the quotation.
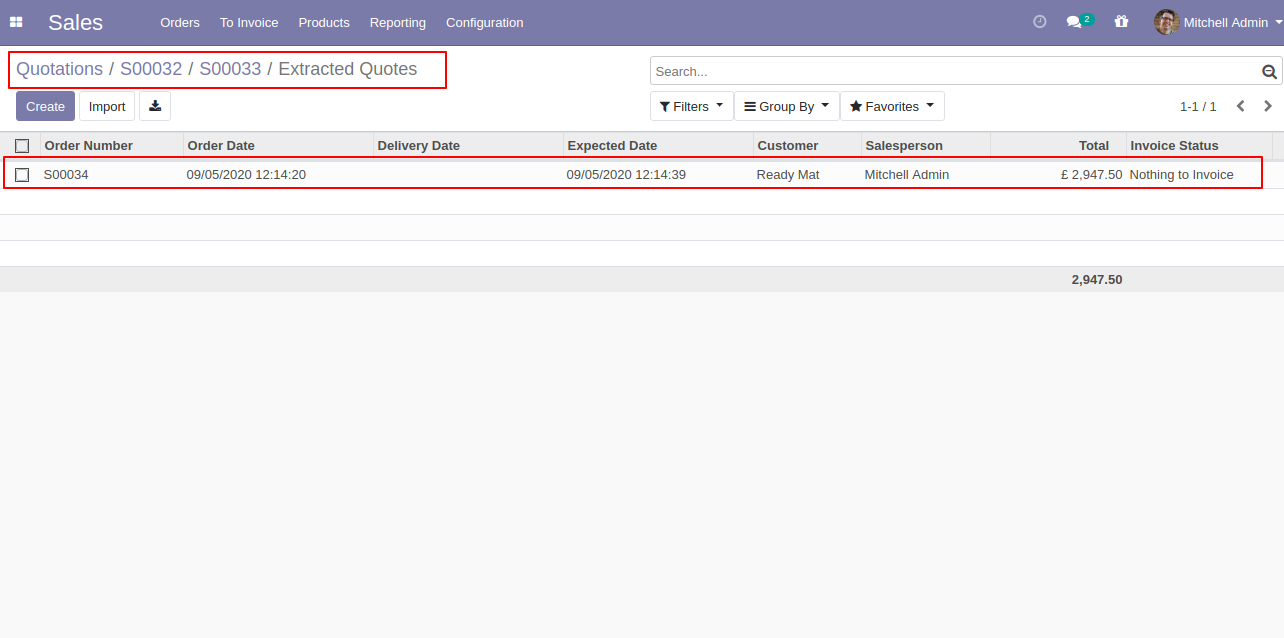
Extracted quotes list view.
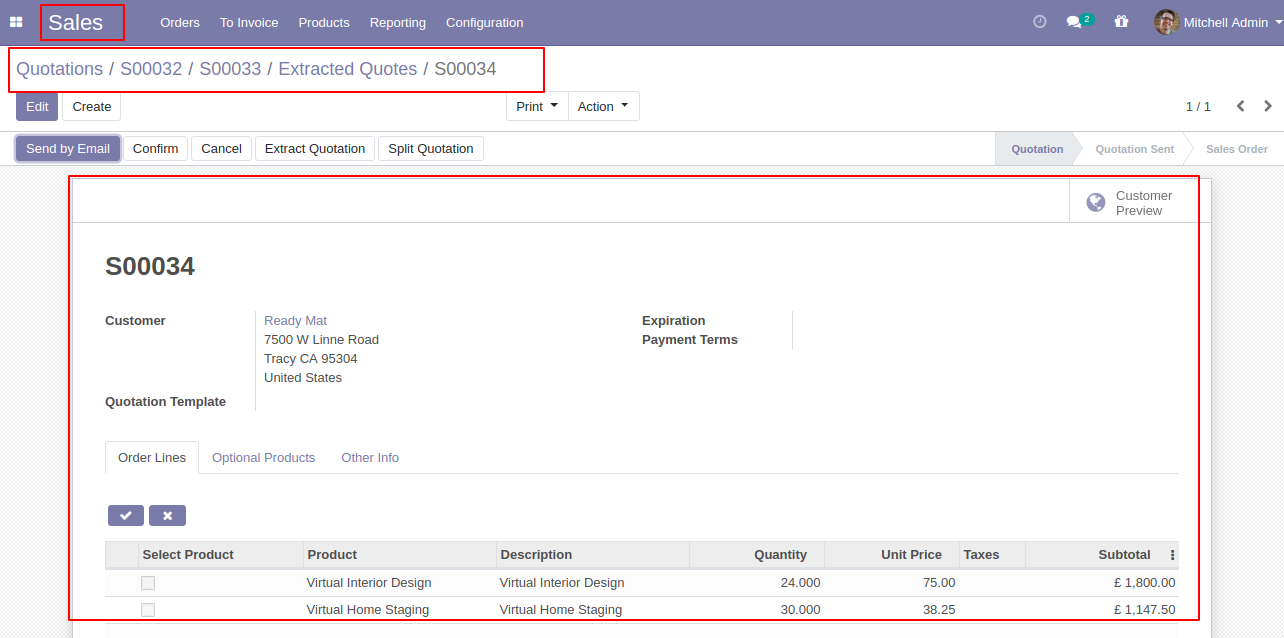
Extracted quotes form view.
Set user rights to enable this functionality.
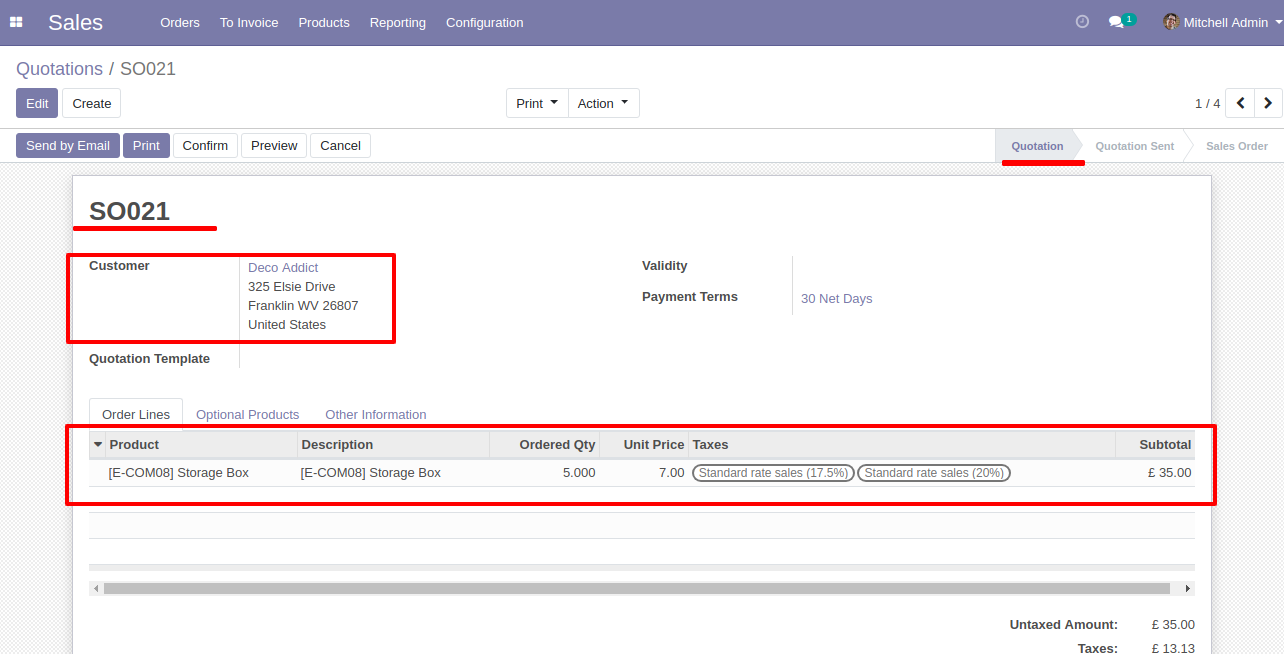
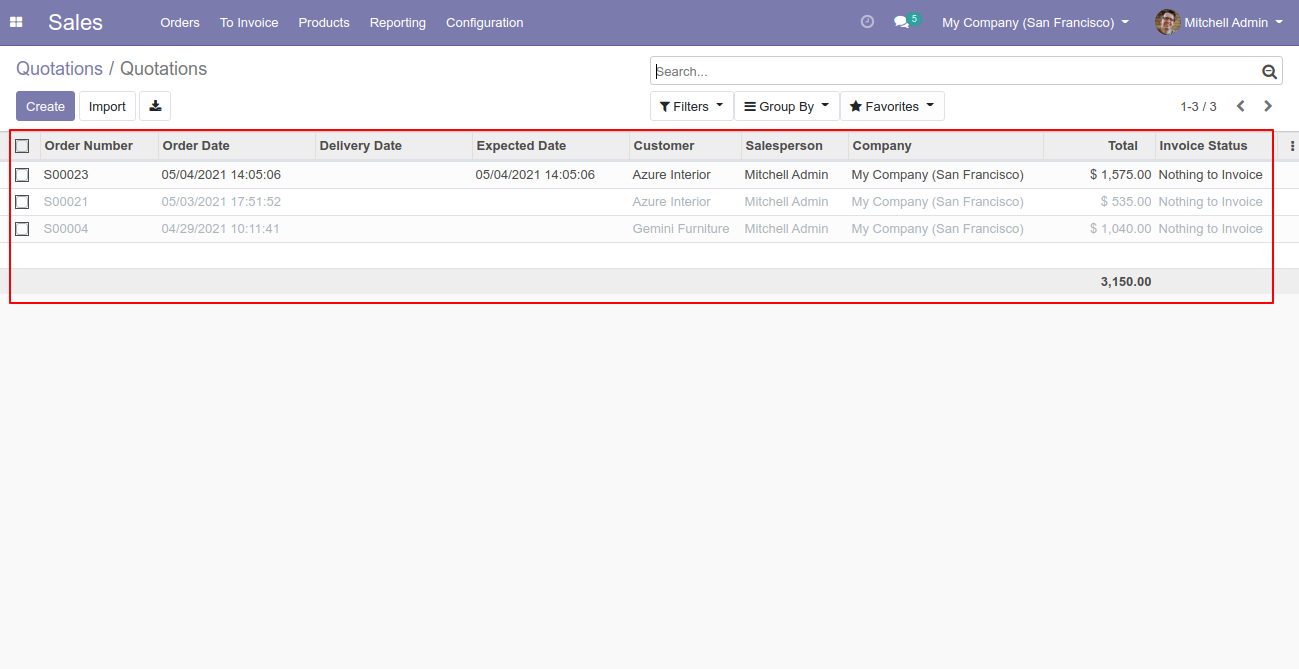
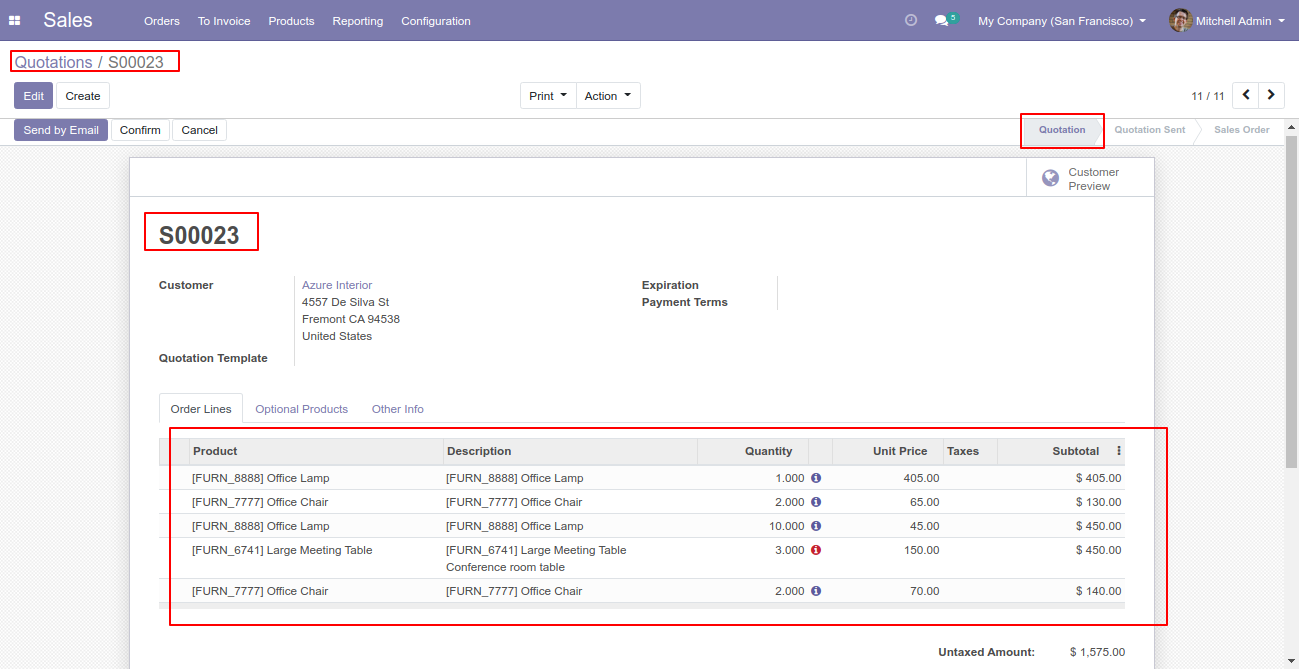
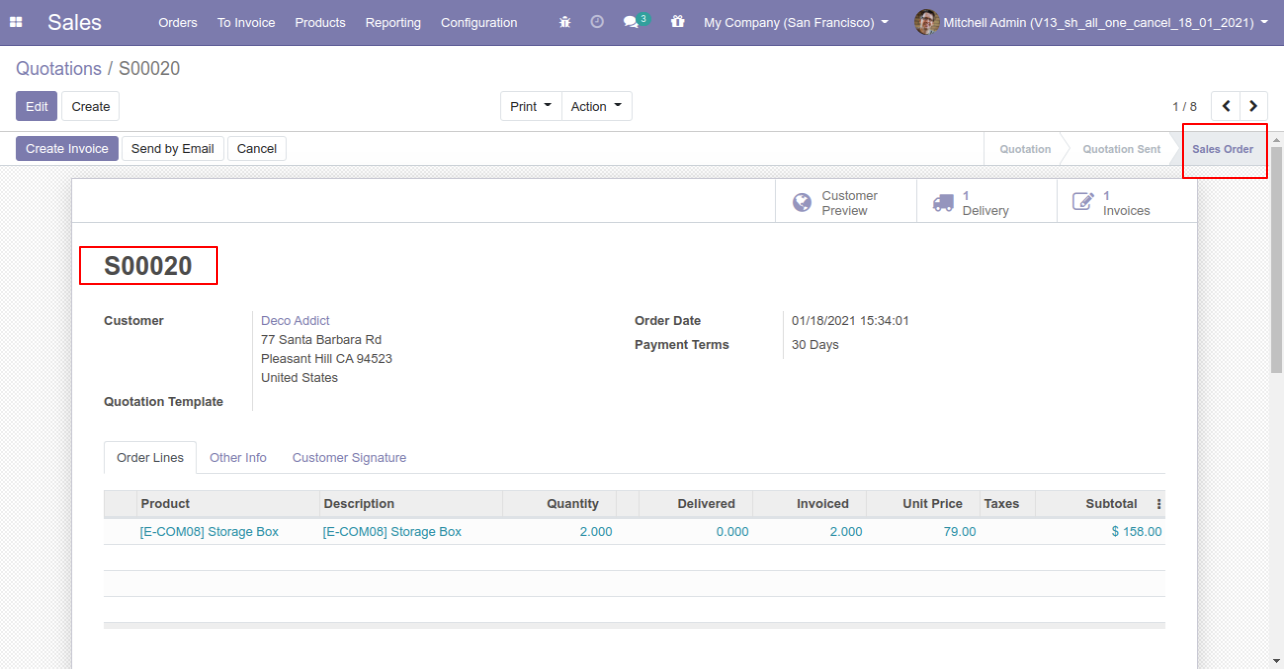
Quotation (SO021) with one order line.
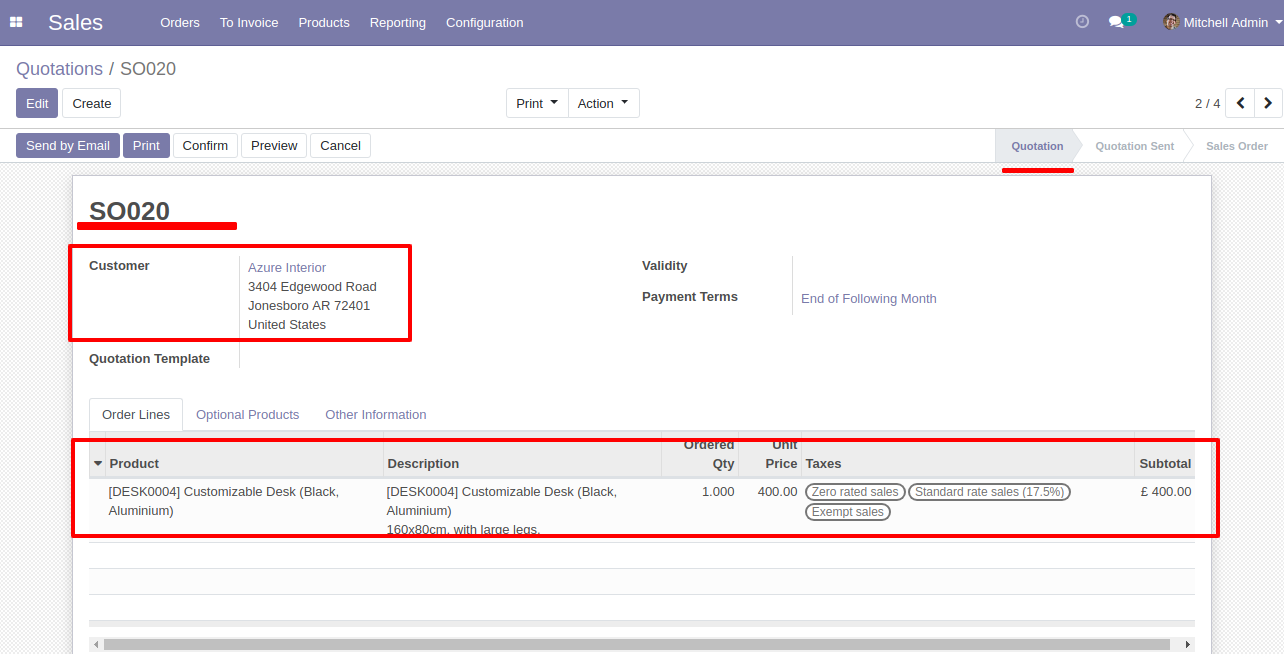
Quotation (SO020) with one order line.
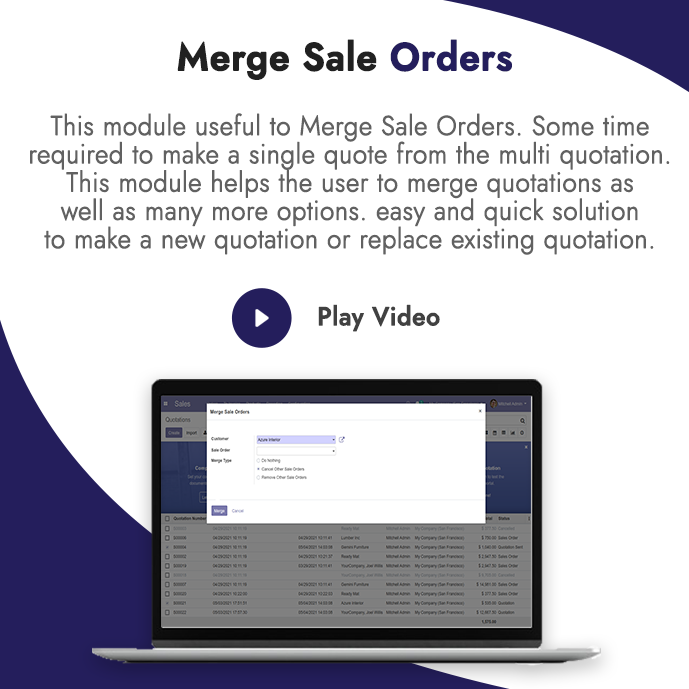
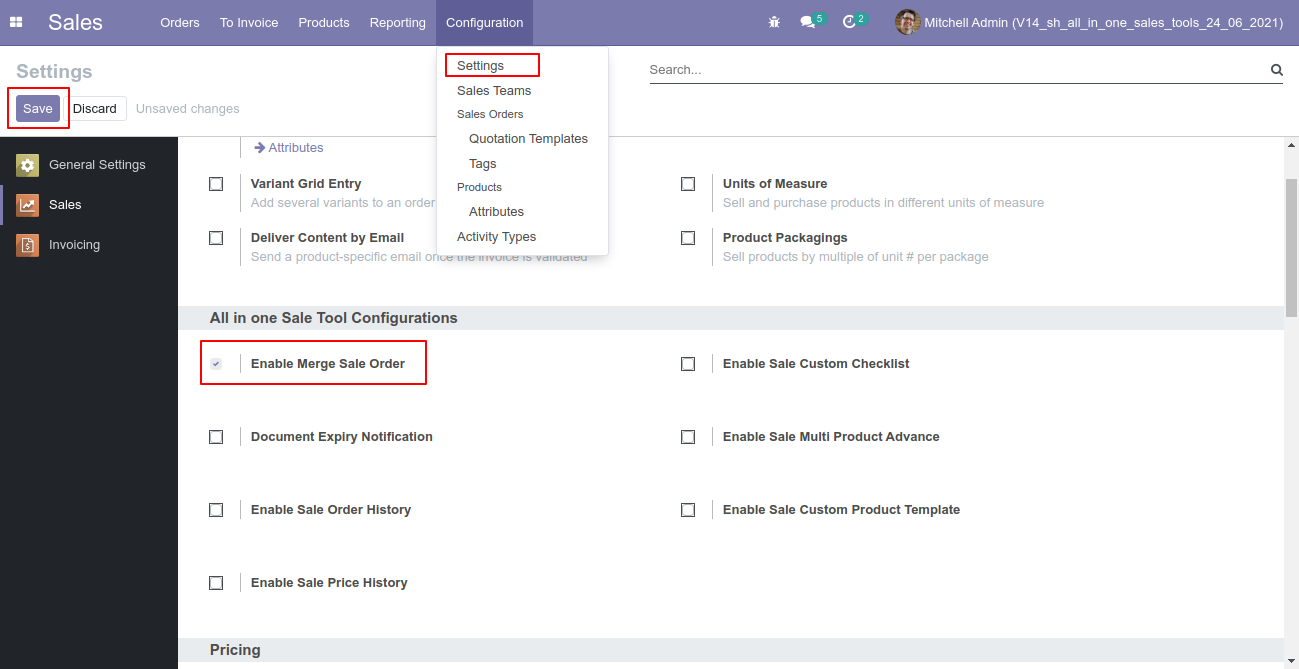
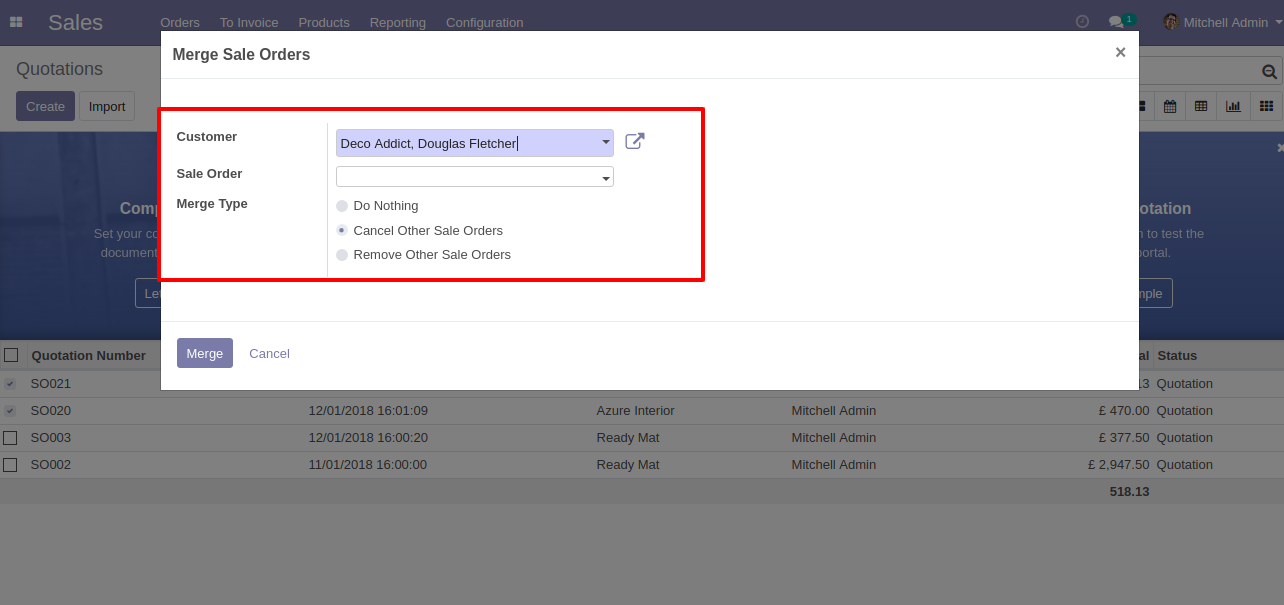
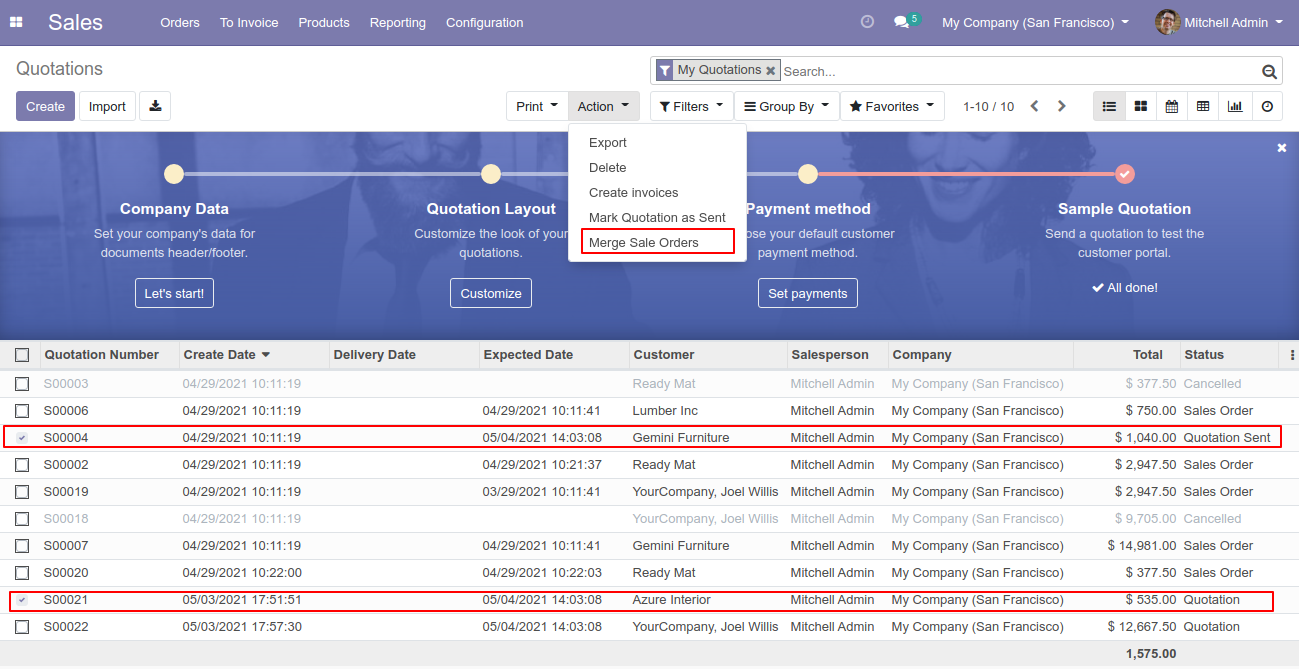
Select Two or More Quotation and click Merge Sale Orders
In Merge Sale Orders wizard, Select customer and if you want to create new sale order then don't select sale order. if you want to merge in existing sale order then select sale order. and choose cancel, remove or do nothing options.if you choose cancel then other sale orders cancelled, if you choose remove then other sale orders deleted and if you choose do nothing then other sale orders stay as it is..
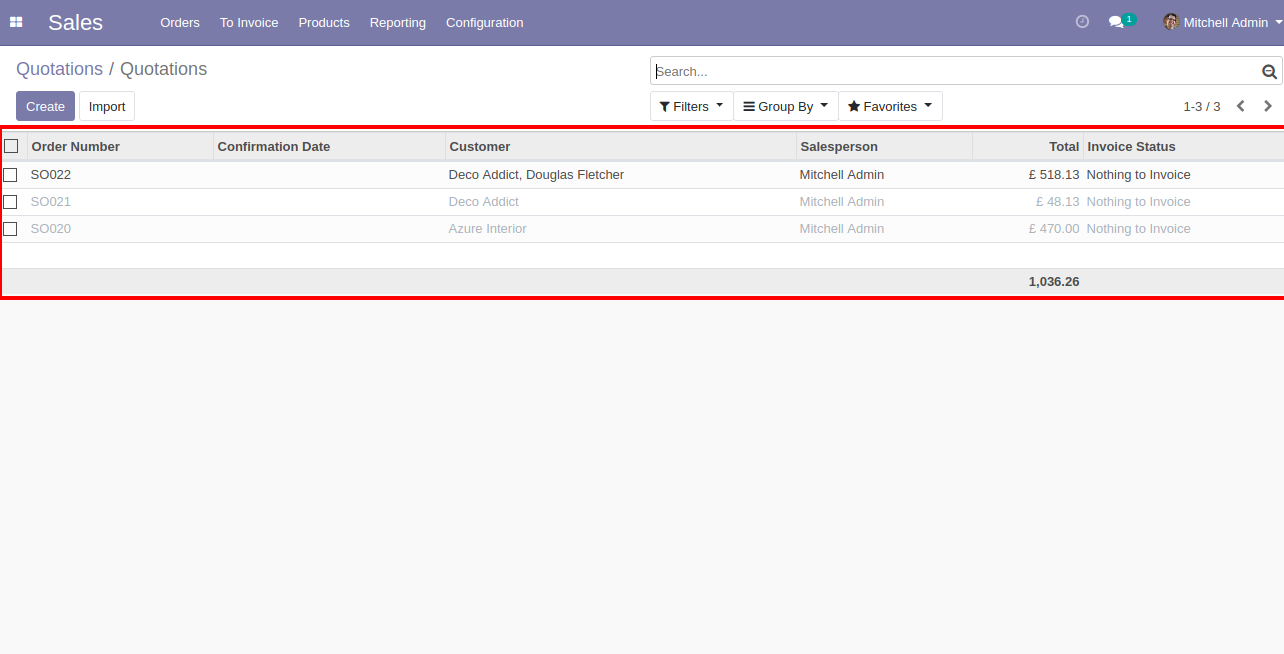
new and cancelled sale order shown in tree view.
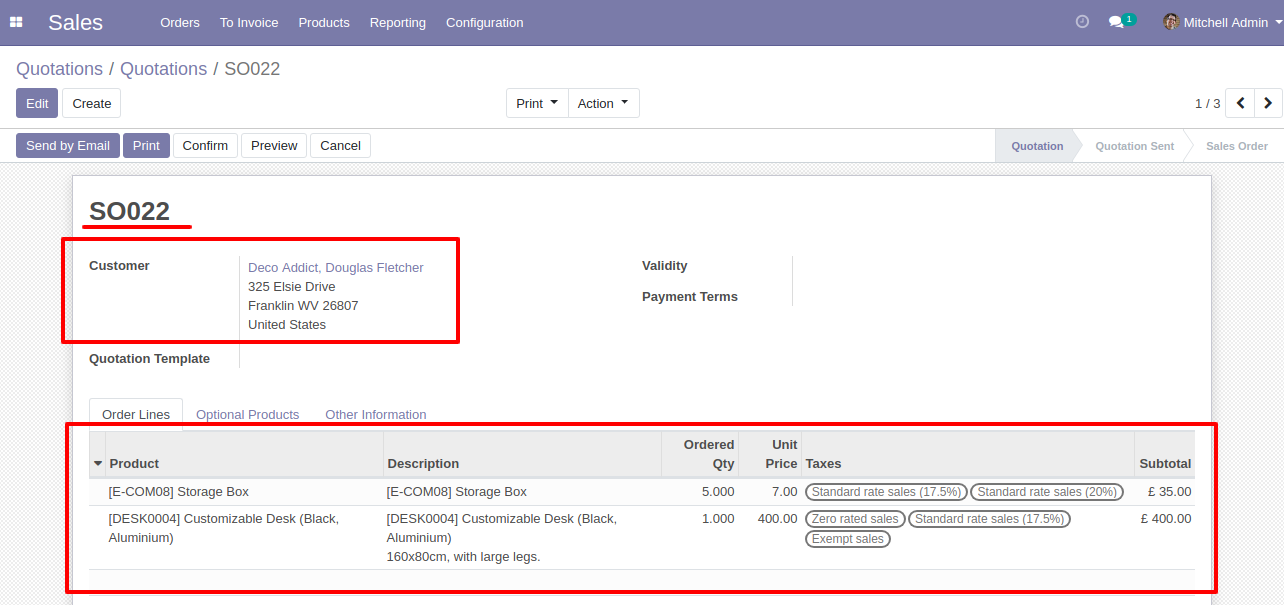
New generated sale order looks like below.
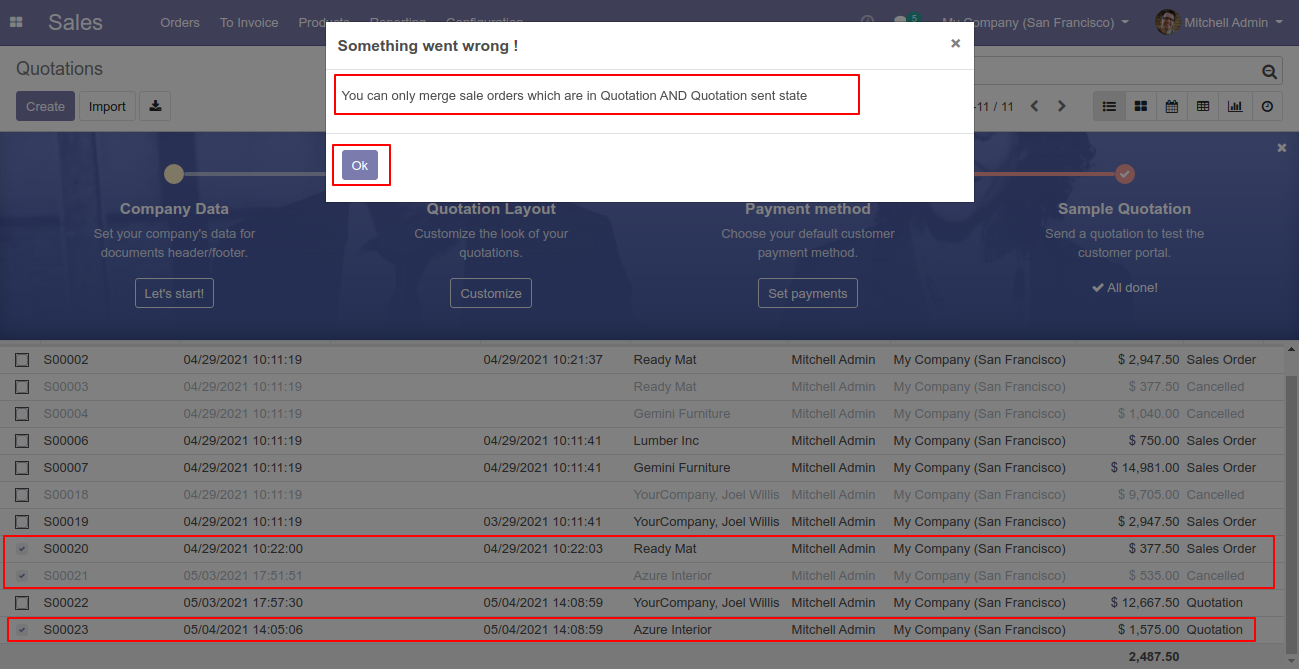
Error Message gived if your select any sale order which are not in Quotation State.

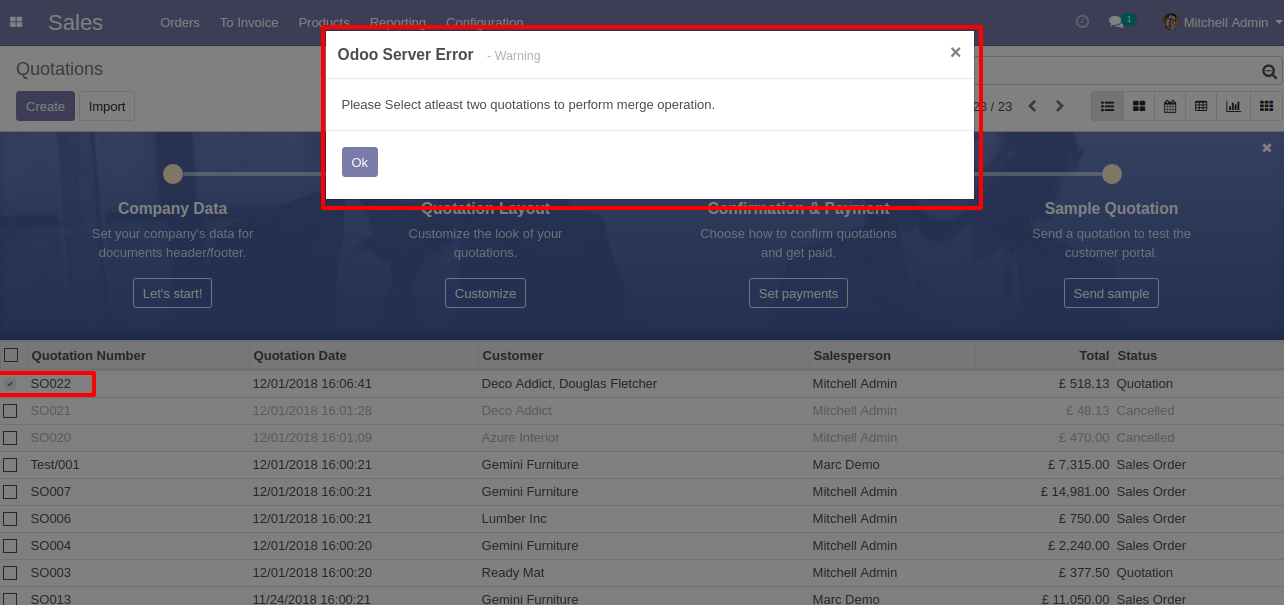
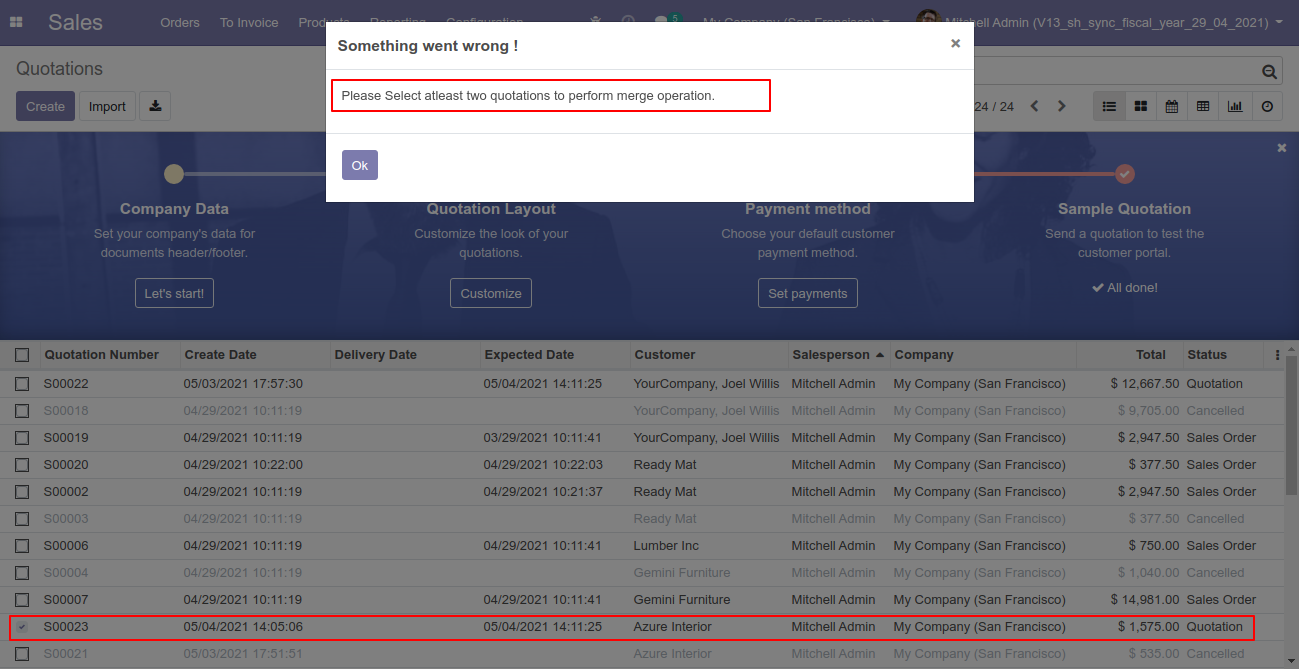
Error Message gived if you select only one Quotation.
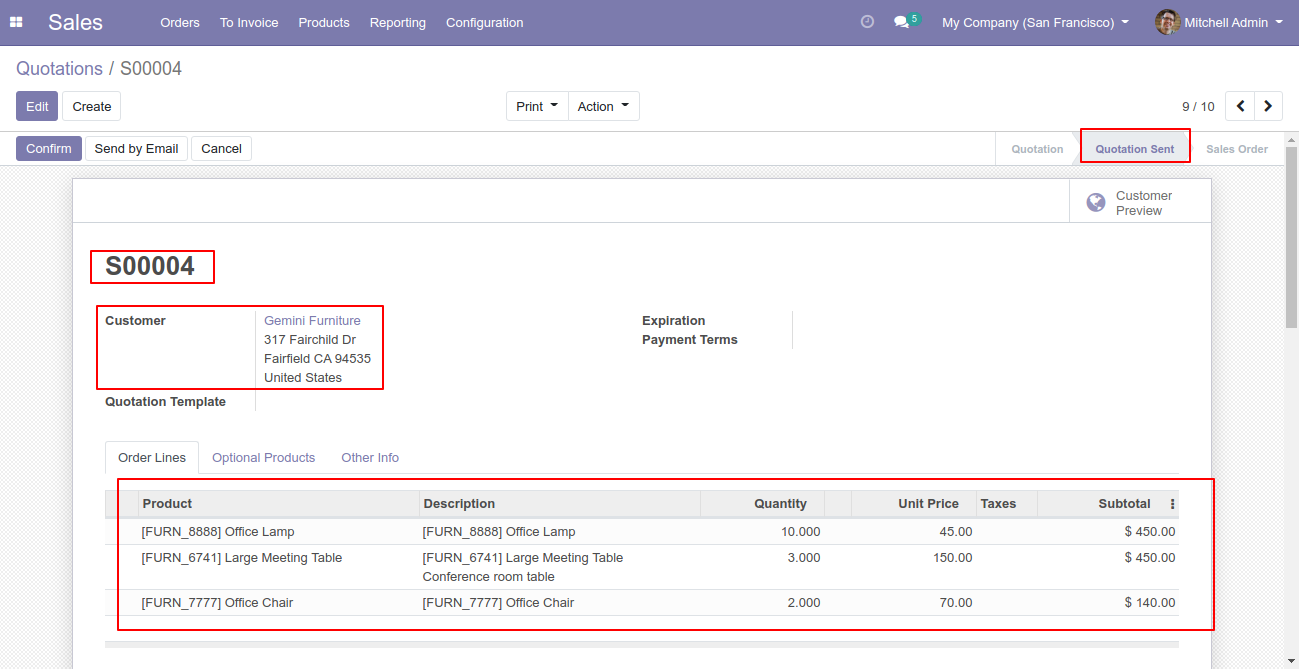
Our sale order/quotation in the "Quotation Sent" State.
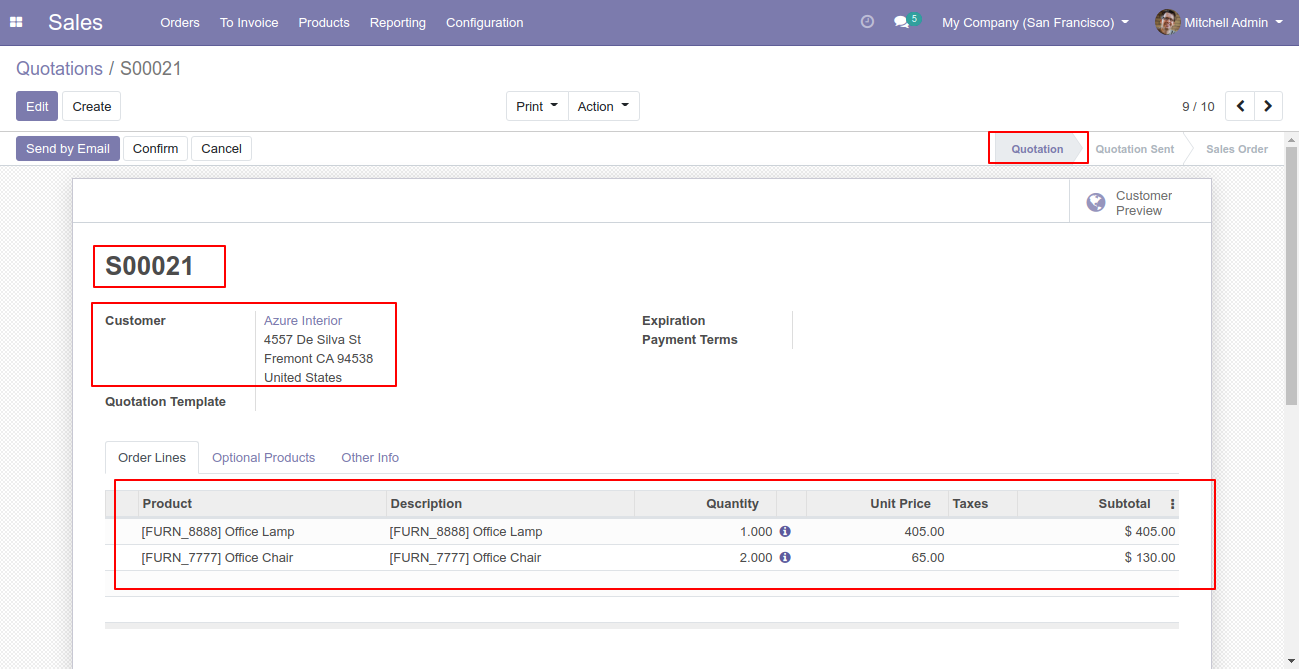
Our other sale order/quotation in the "Quotation" State.
Now we merge sale order/quotation that state is the "Quotation" & "Quotation Sent" State.
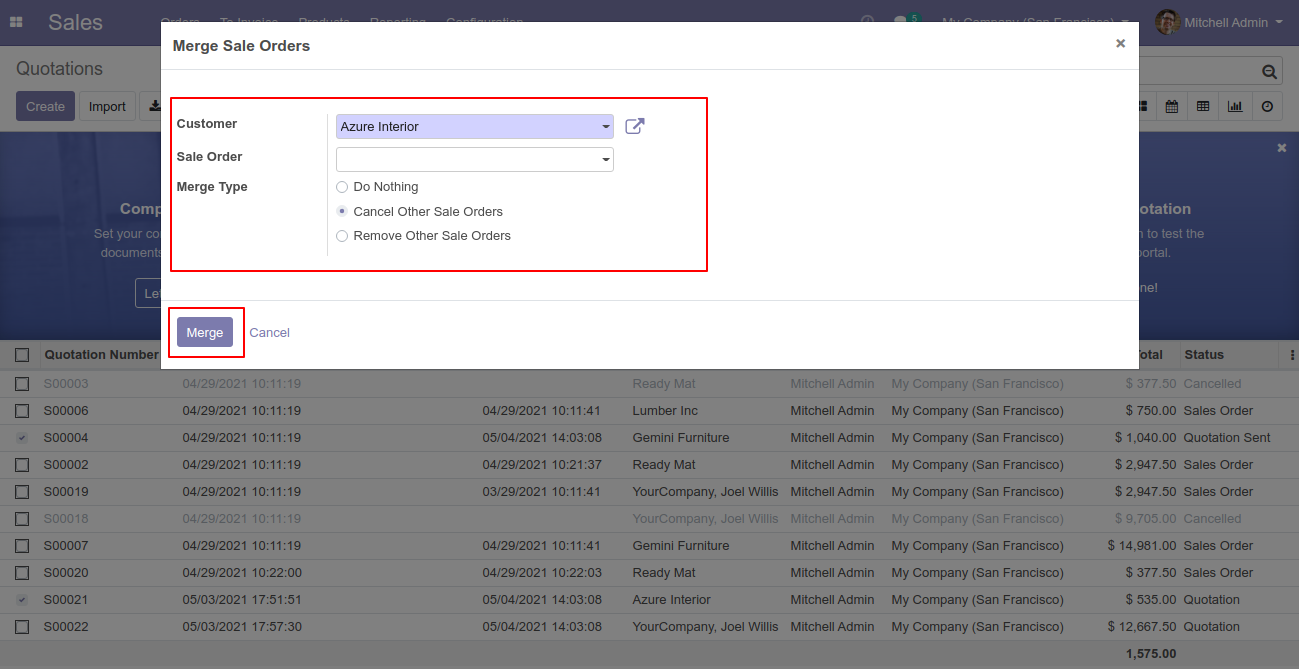
In Merge Sale Orders wizard, Select customer and if you want to create new sale order then don't select sale order. if you want to merge in existing sale order then select sale order. and choose cancel, remove or do nothing options.if you choose cancel then other sale orders cancelled, if you choose remove then other sale orders deleted and if you choose do nothing then other sale orders stay as it is..
Merge sale order with selected option, list view of new and cancelled sale order.
New generated sale order looks like below.
It shows an alert if your selected sale order/quotation that state is not the "Quotation" & "Quotation Sent" State.
It shows an alert if you try to merge a single sale order/quotation.
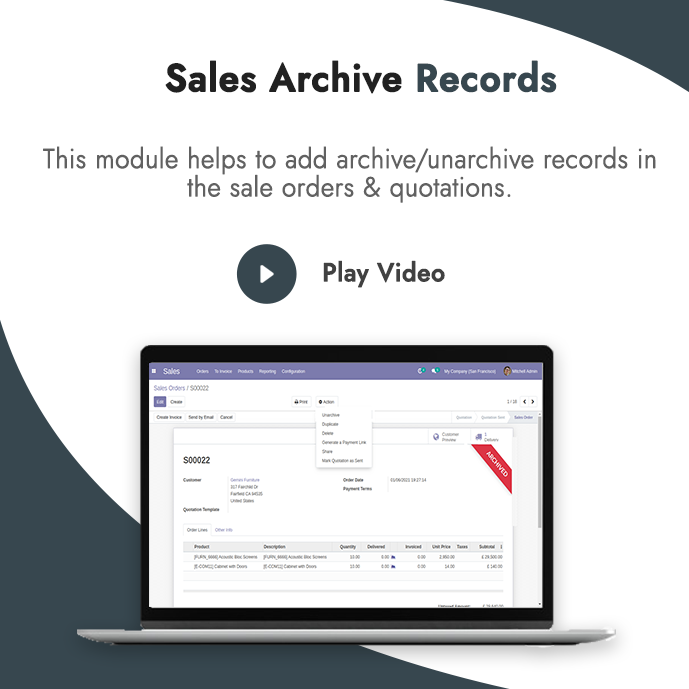
Enable this functionallity.
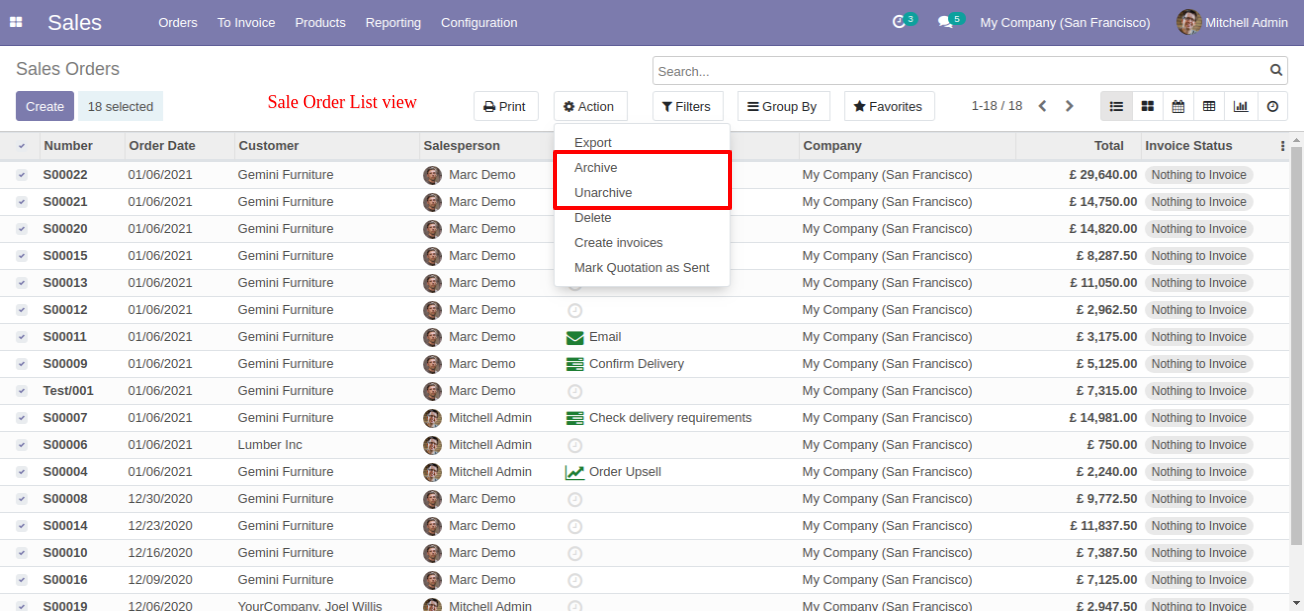
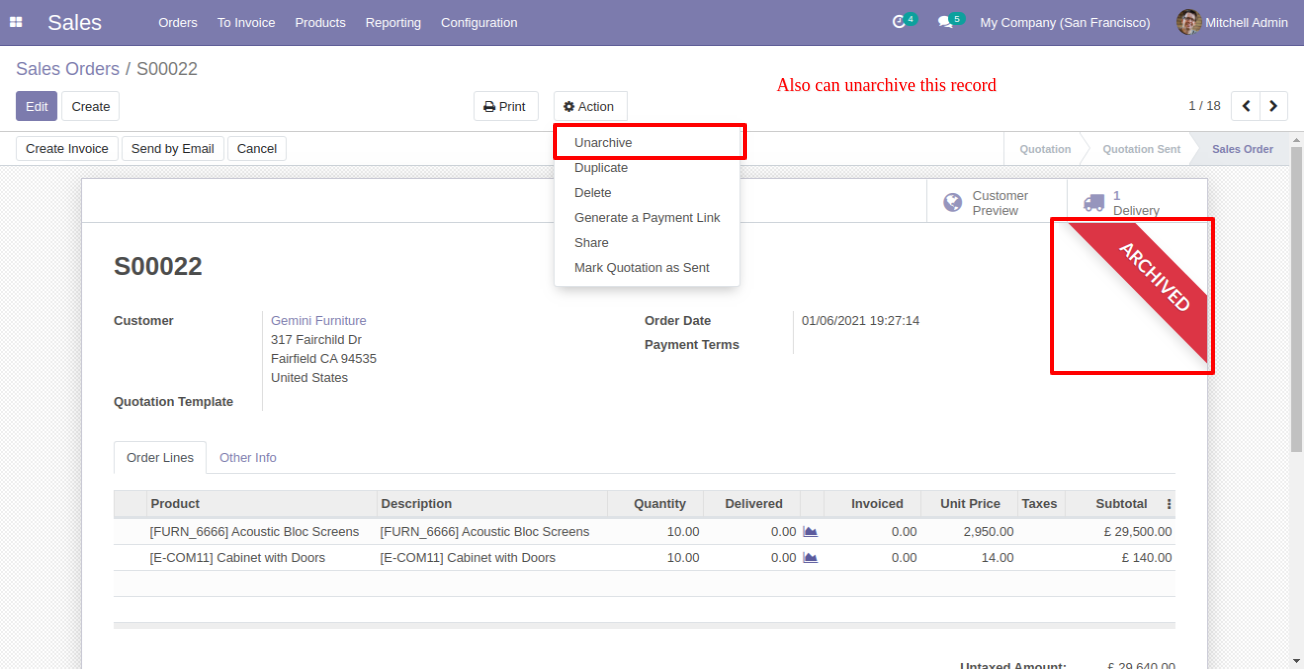
Select the records from the list view and then archive/unarchive from "Action".
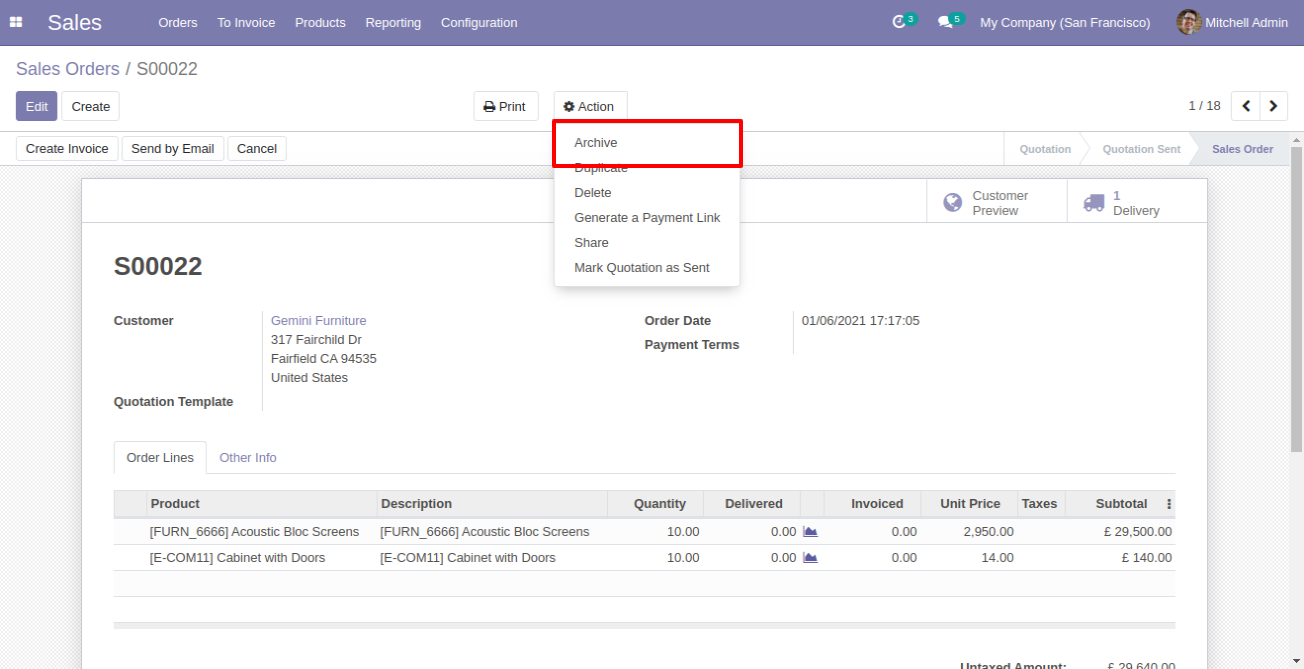
Now we archive record from the form view.
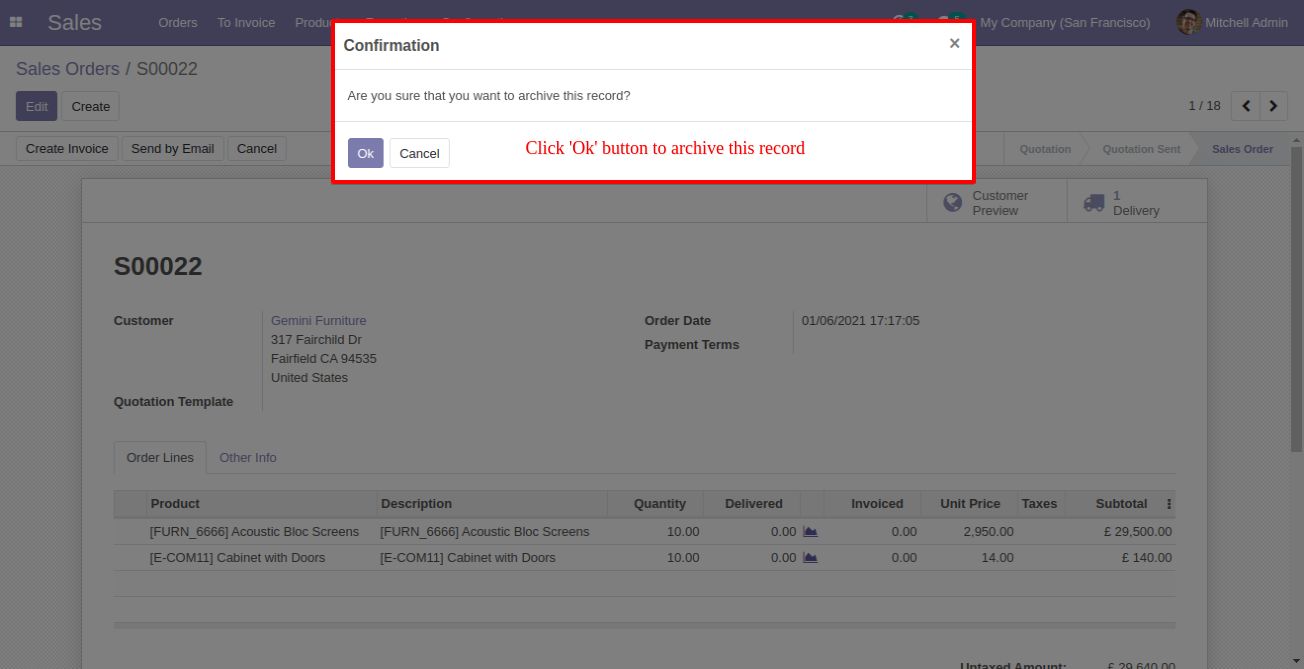
It generates a popup for that, click "Ok" to archive the record.
You can unarchive that archived record from the form view.
If you have not enablled functionality then you can't archive/unarchive.

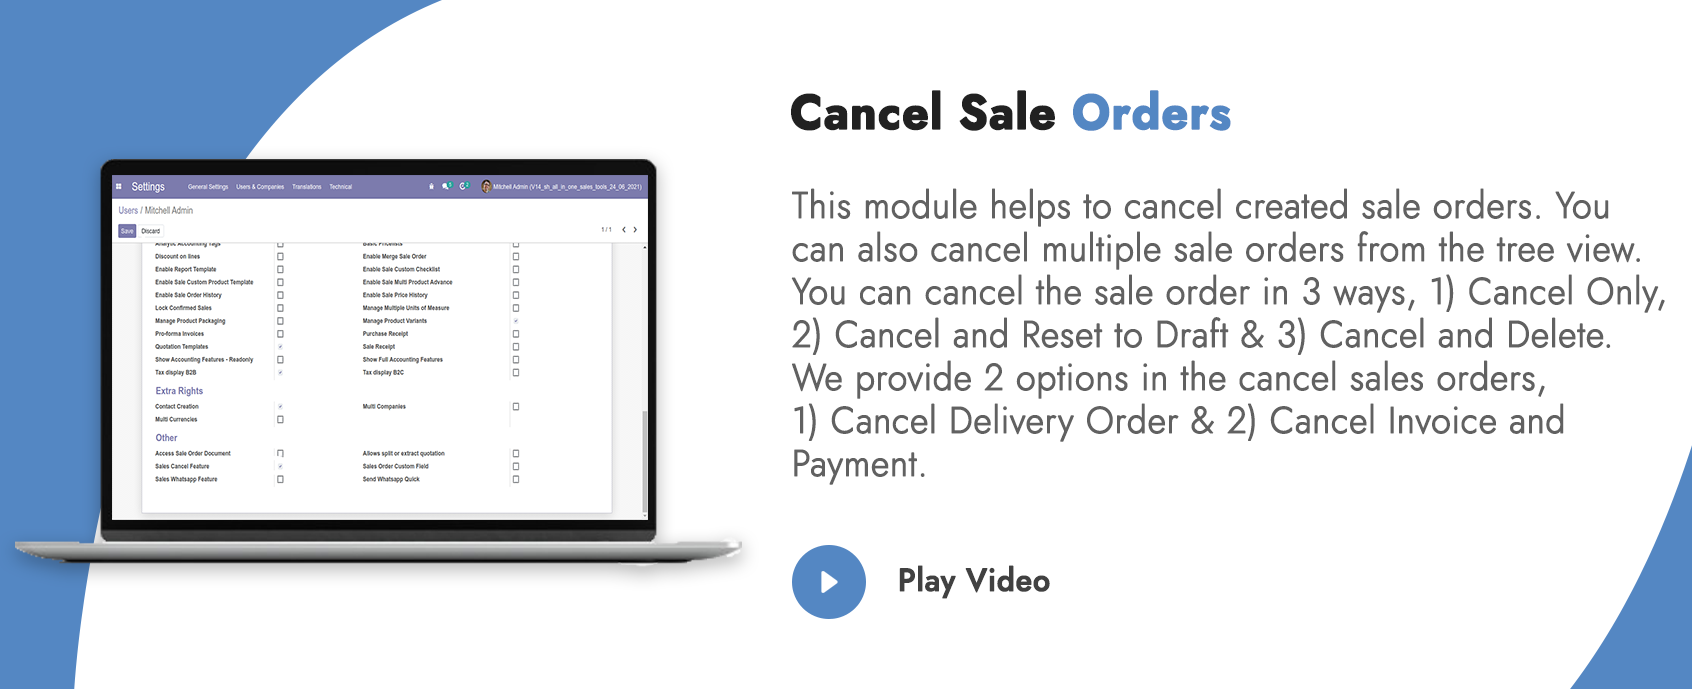
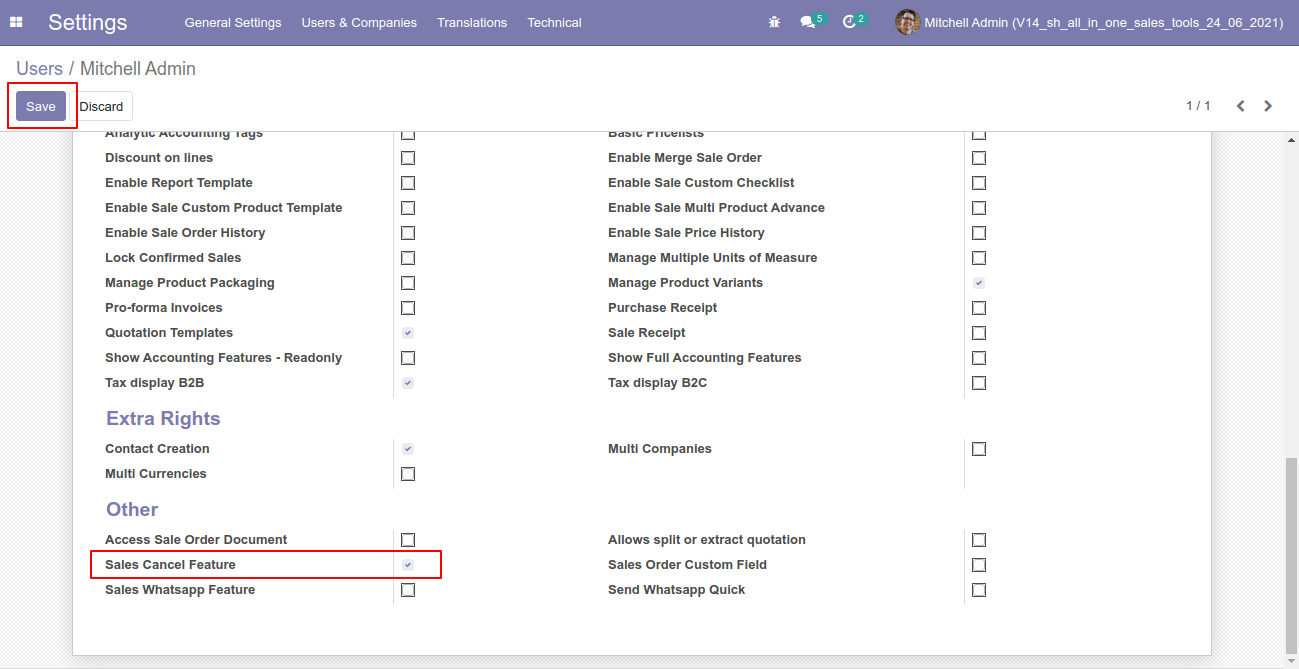
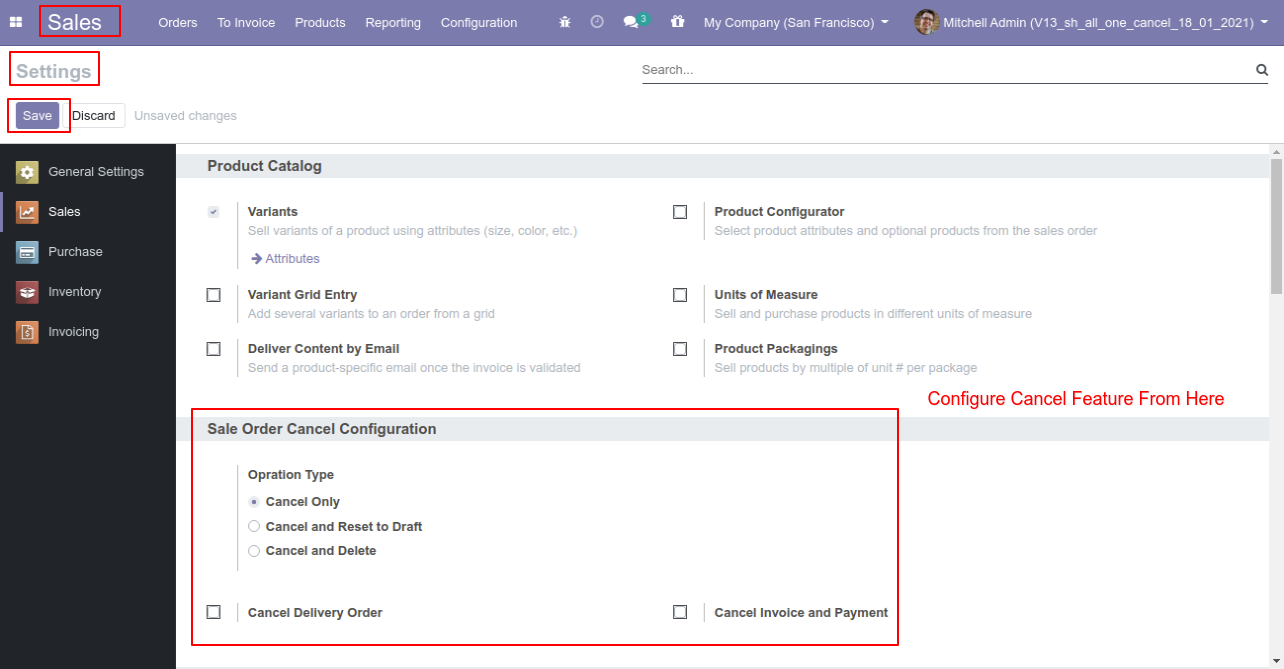
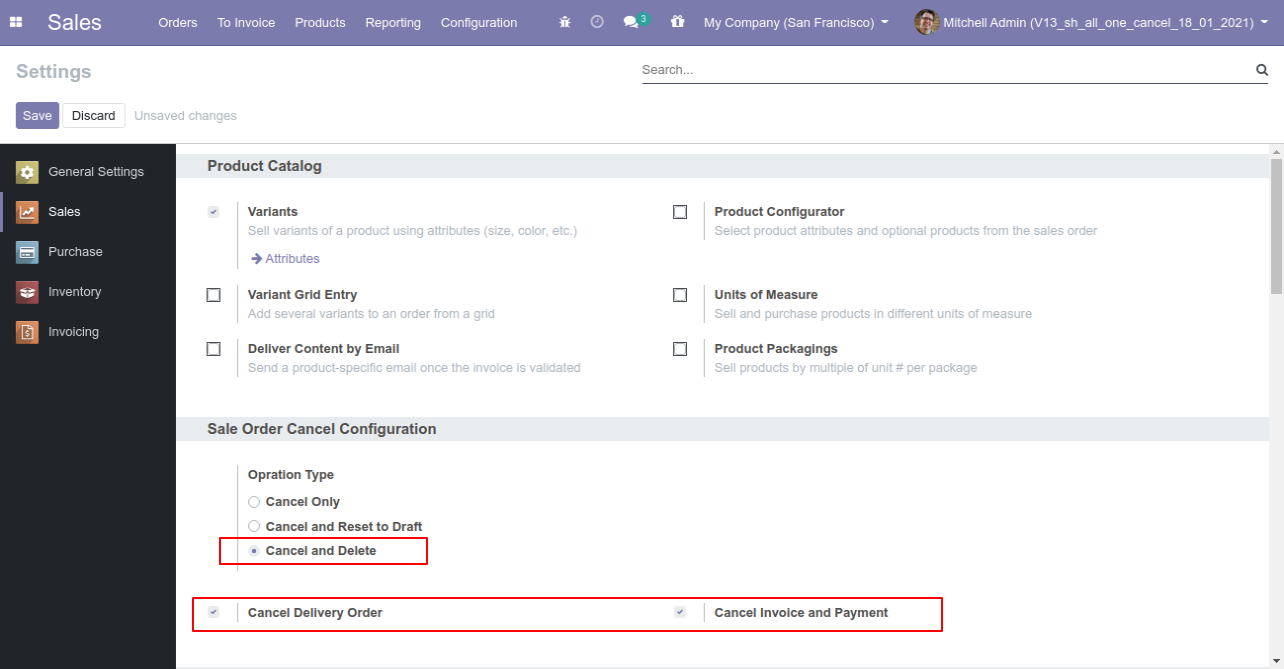
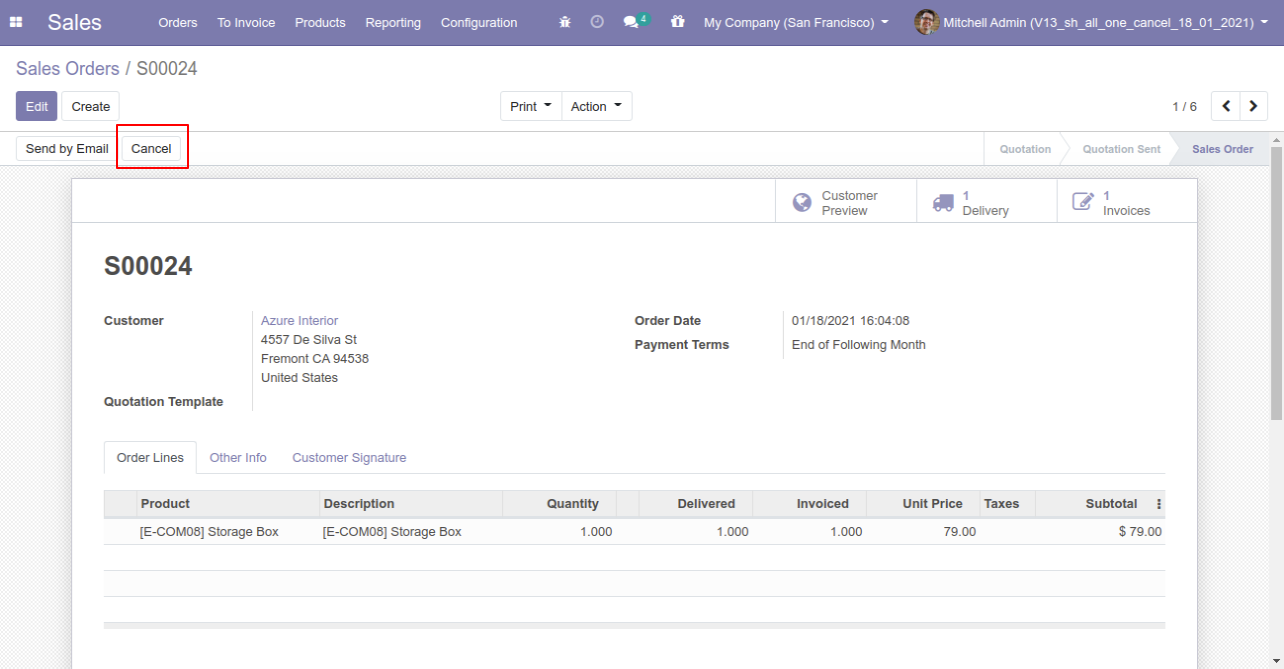
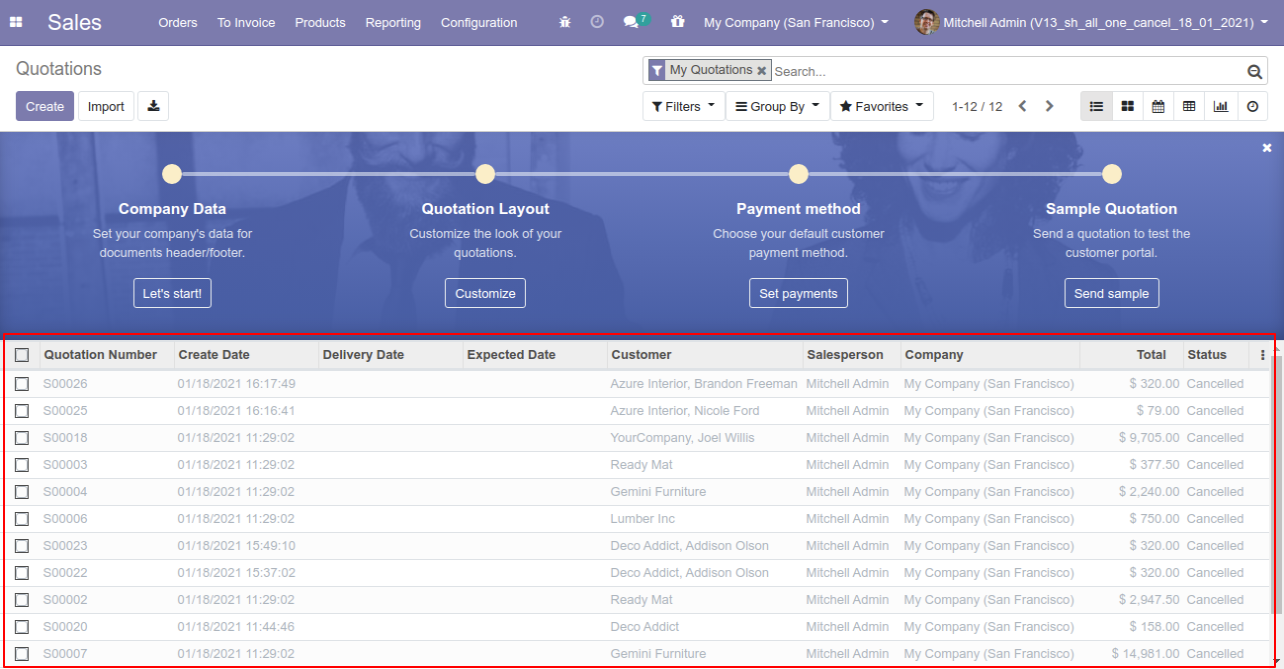
Tick the "Sales Cancel Feature" to cancel created sale orders.
Flow-1
When you want to cancel a sale order only then choose the "Cancel Only" option.
We confirm the quotation and create a sale order.
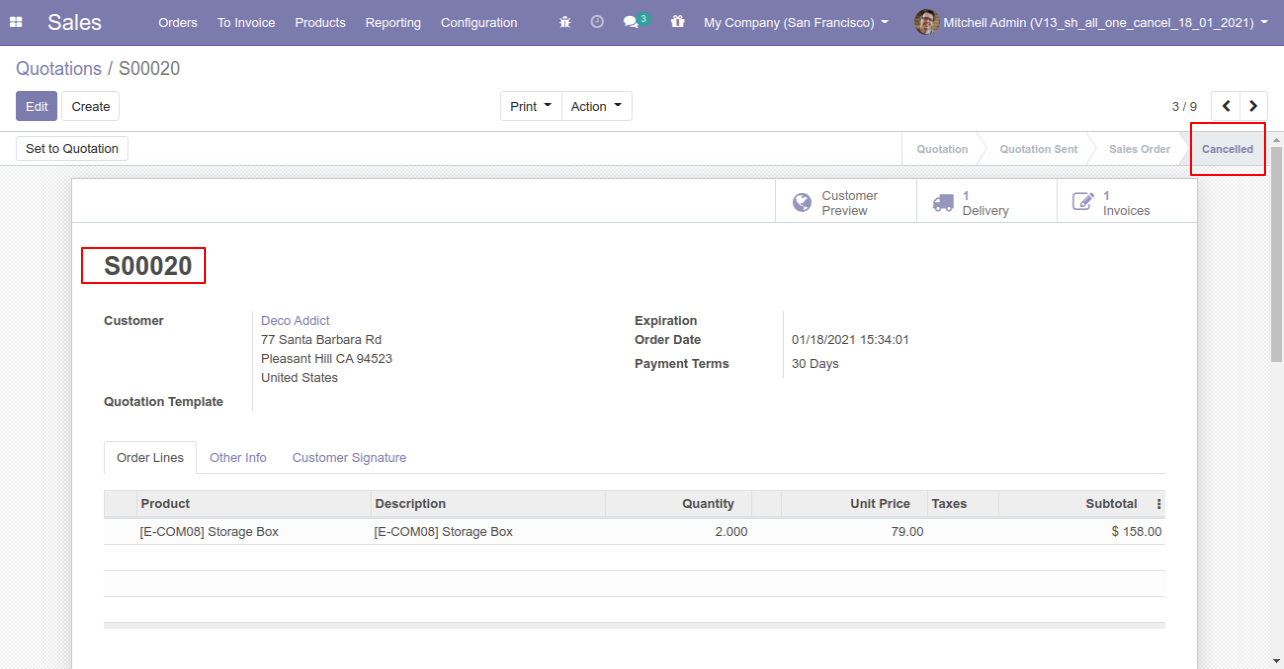
Press the "Cancel" button to cancel created sale order.
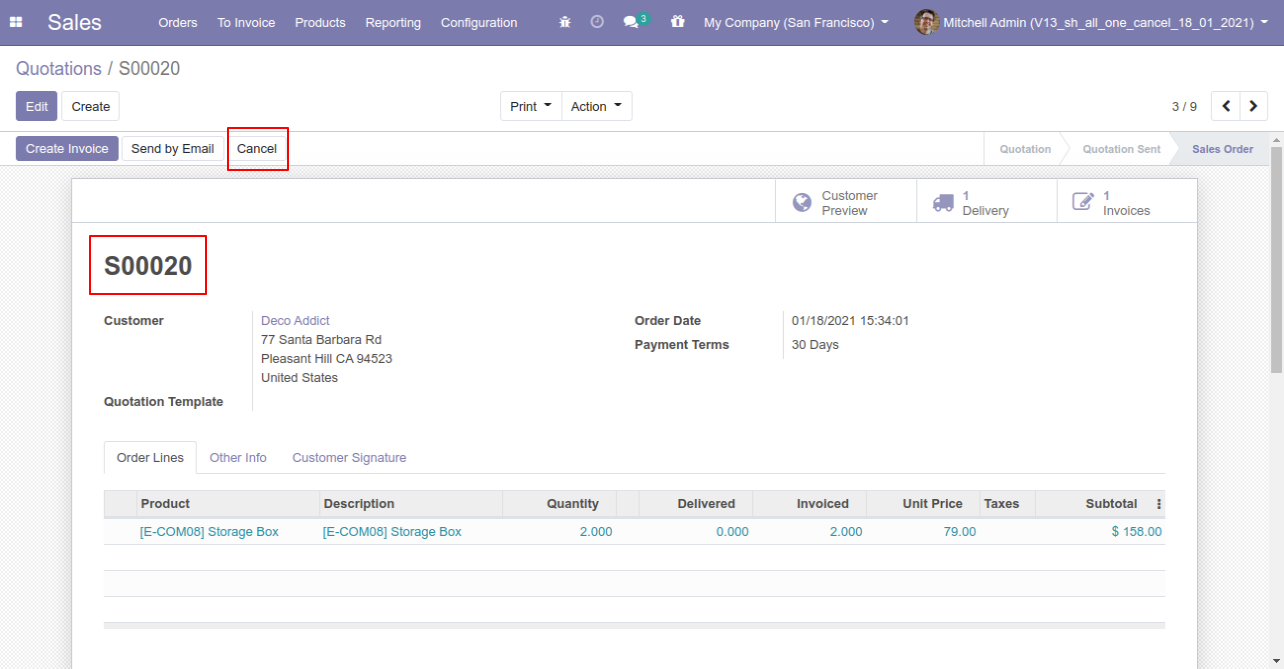
When you cancel a sale order then the sale order is cancelled and the state is changed to "cancelled".
Flow-2
When
you
want
to
cancel
a
sale
order
and
reset
to
the
draft
state
tick
"Cancel
and
Reset
to
Draft".
If
you
want
to
cancel
sale
orders,
delivery
orders
&
invoice
then
you
can
choose
both
options
"Cancel
Delivery
Order"
&
"Cancel
Invoice
and
Payment".

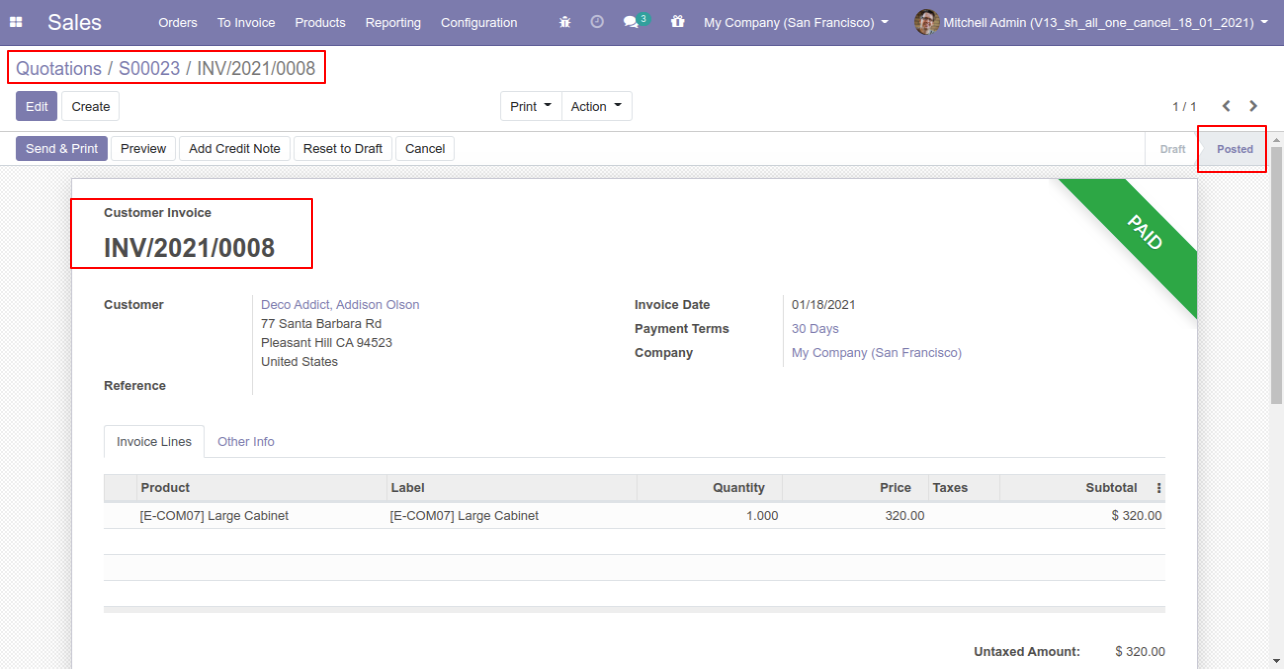
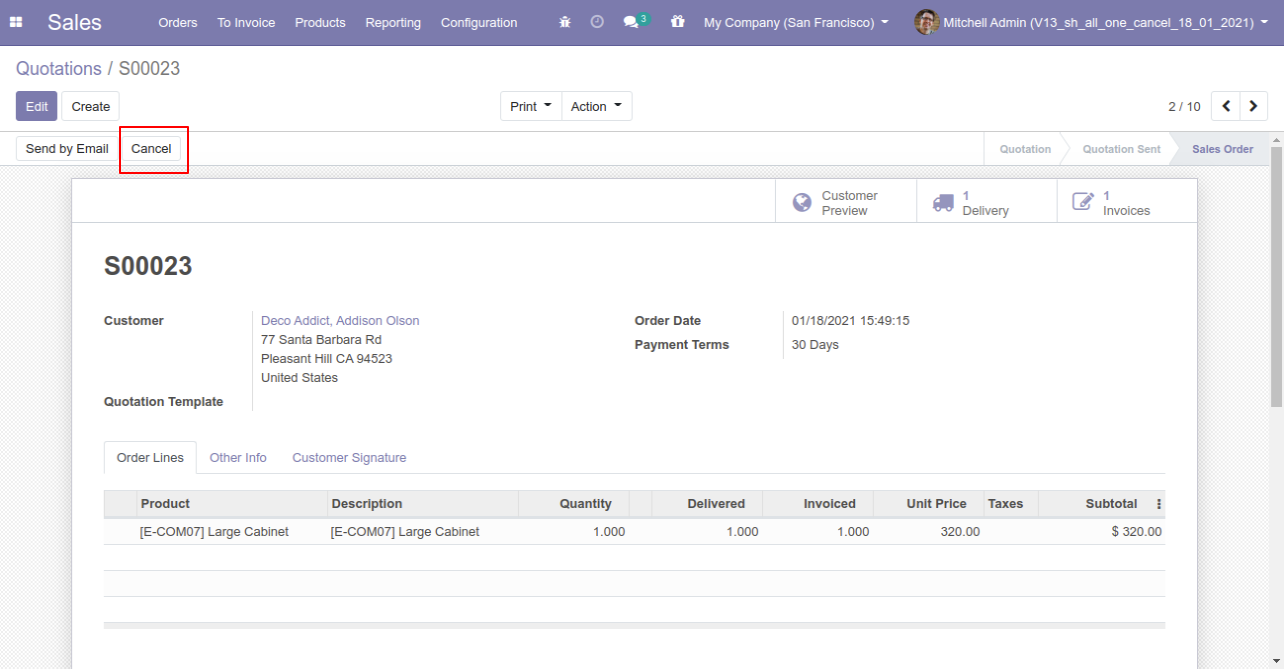
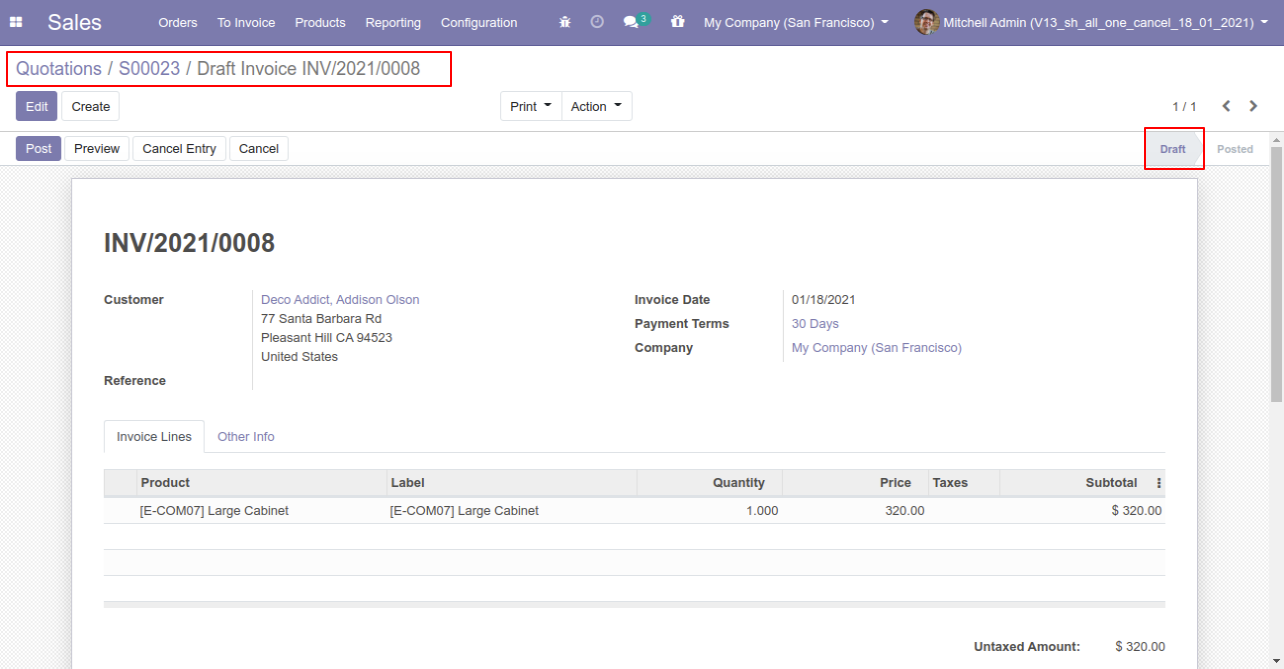
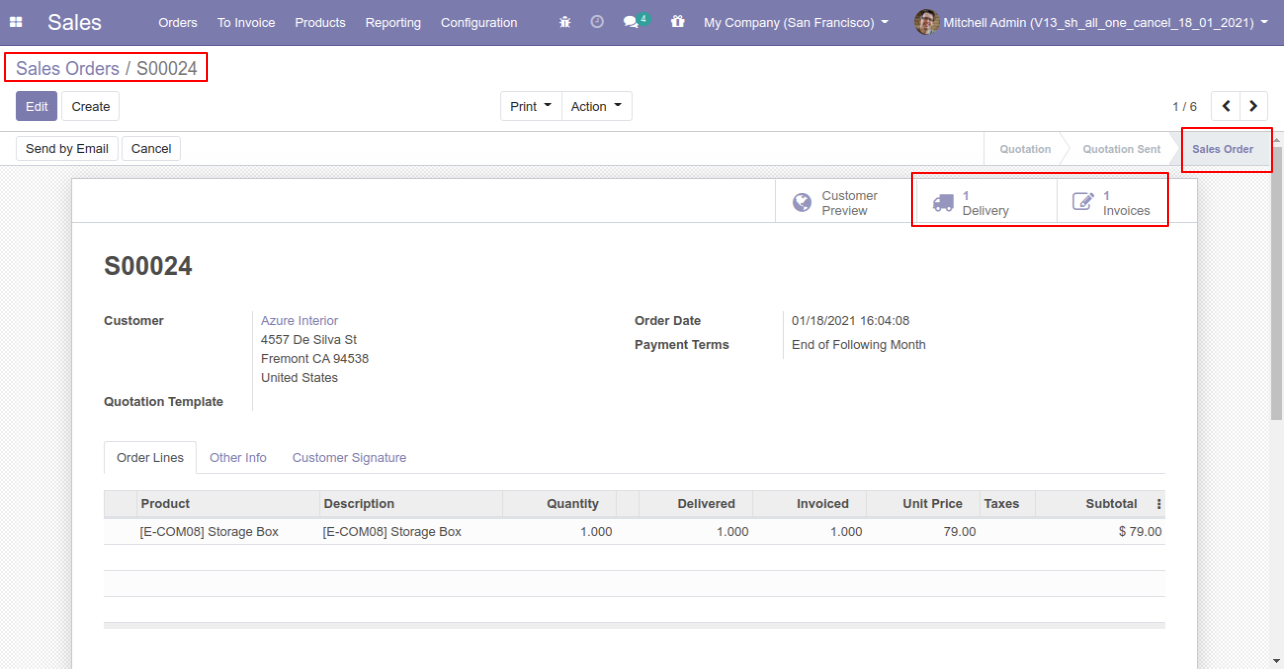
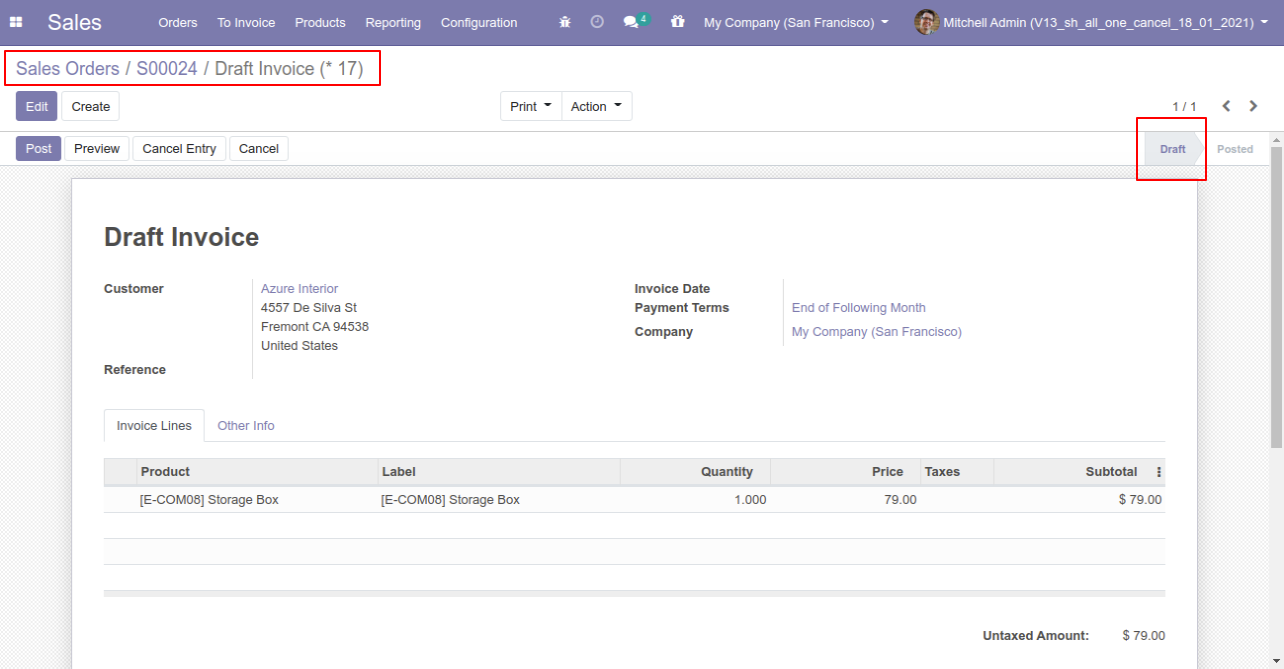
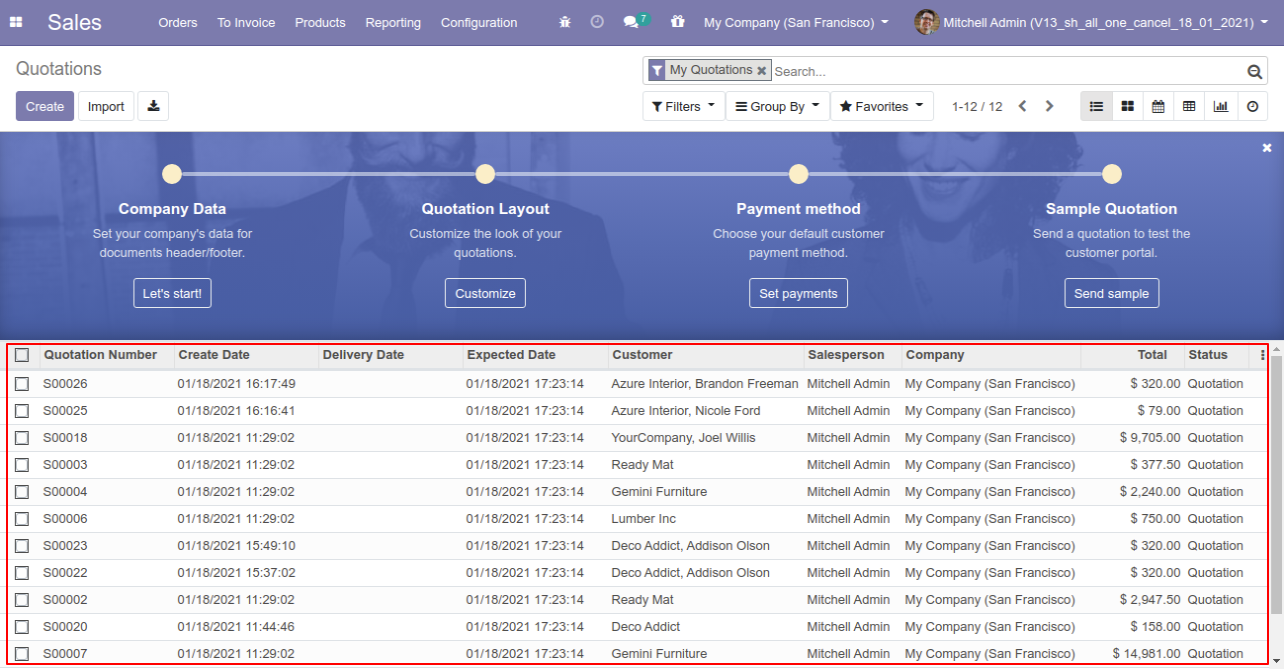
Now we create sale order, delivery orders & invoice.
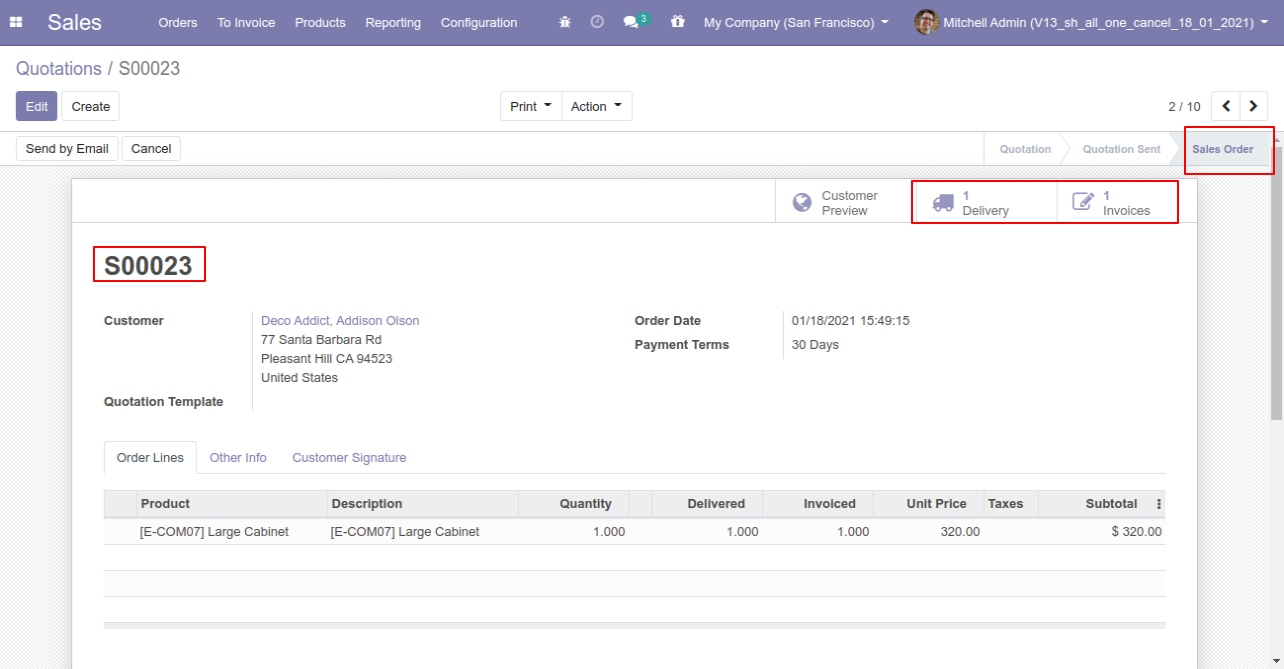
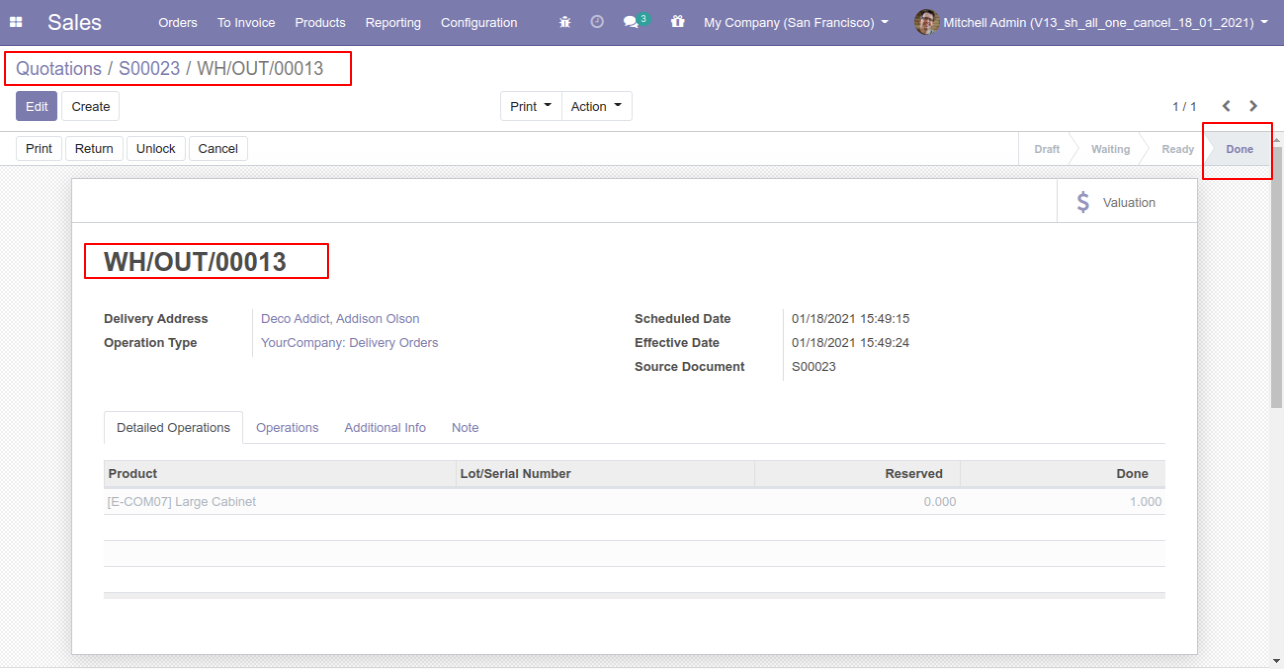
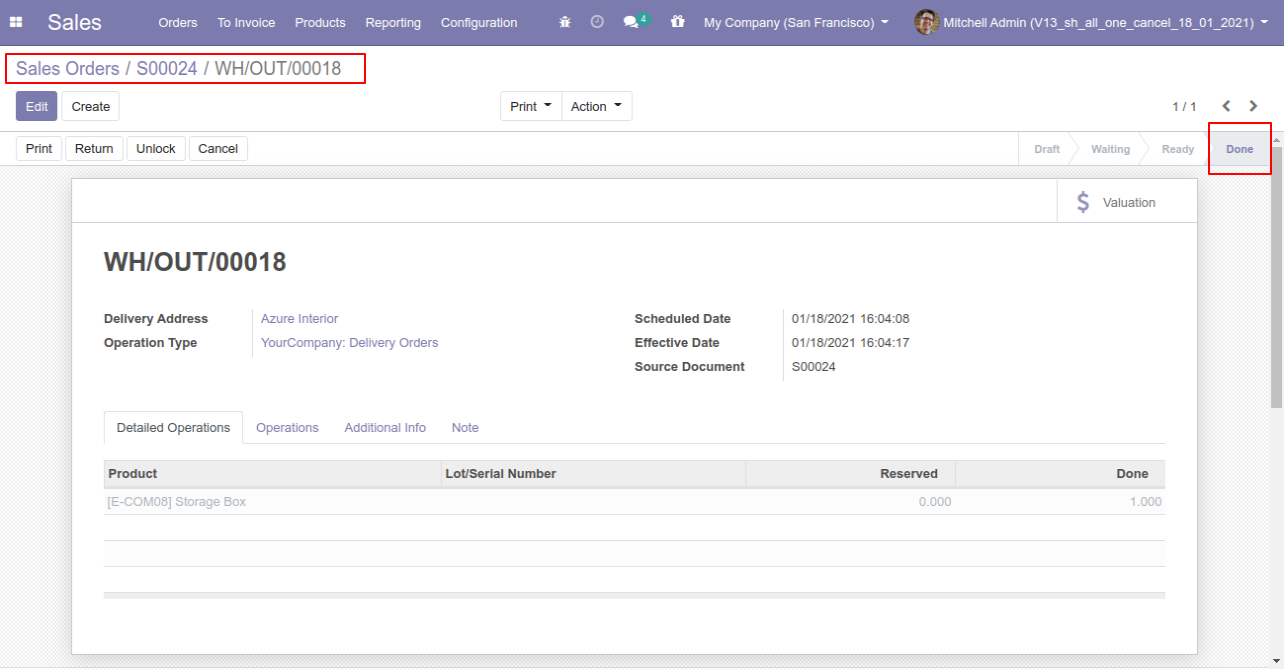
Our delivery order is in the done state.
Our invoice is paid.
Press the "Cancel" button to cancel created sale order.
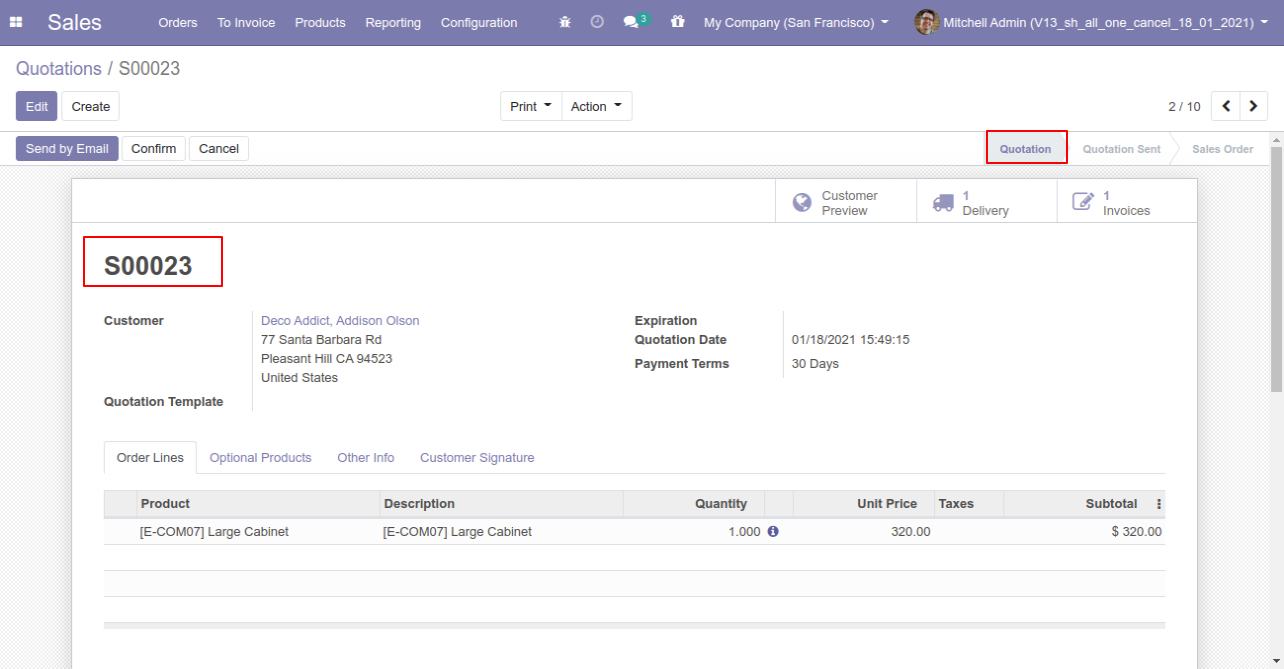
After canceling the sale order it reset to the draft.
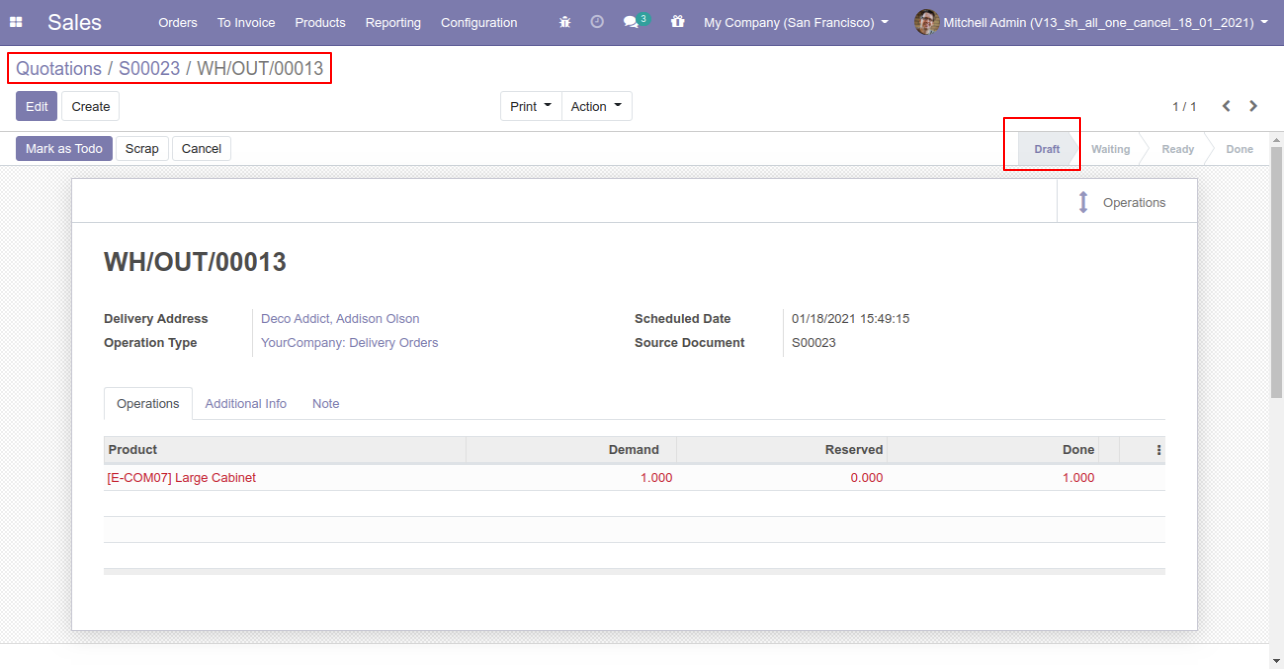
Our delivery order is also reset to the draft.
Our invoice is also reset to the draft.
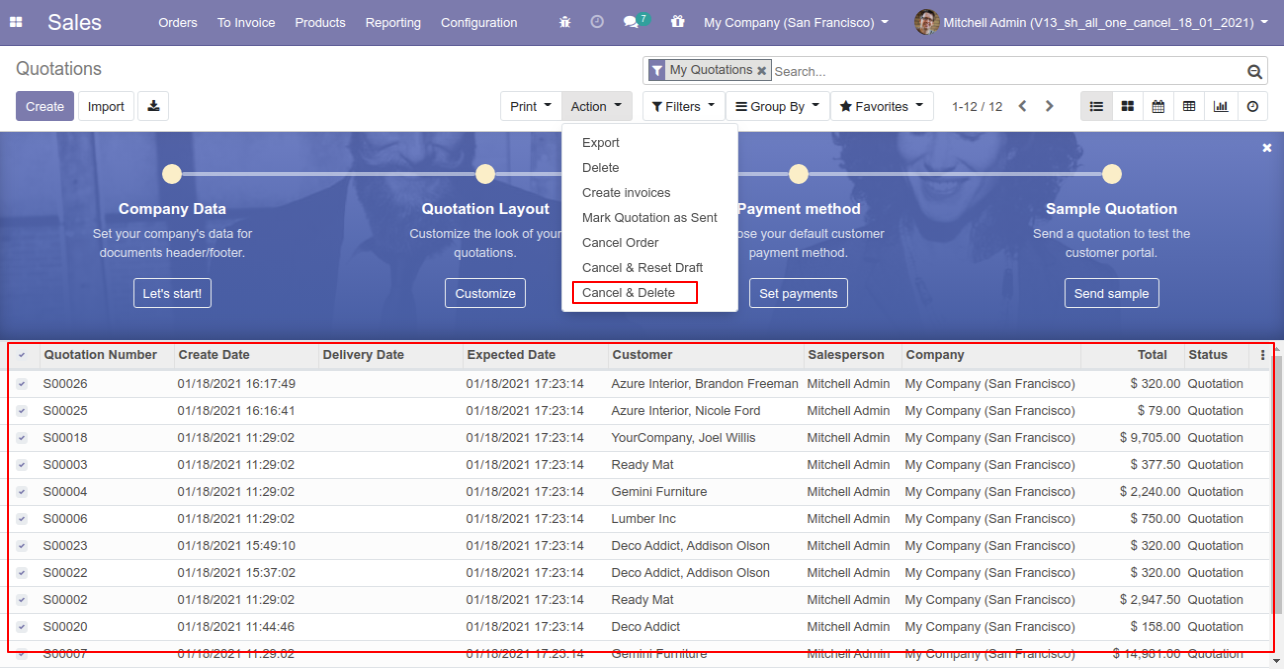
Flow-3
When
you
want
to
cancel
&
delete
a
sale
order
then
choose
the
"Cancel
and
Delete"
option.
If
you
want
to
cancel
sale
orders,
delivery
orders
&
invoice
then
you
can
choose
both
options
"Cancel
Delivery
Order"
&
"Cancel
Invoice
and
Payment".
Now we create sale order, delivery orders & invoice.
Our delivery order is in the done state.
Our invoice is in the draft state.
Press the "Cancel" button to cancel created sale order.
After the "Cancel" the sale order our sale order will be deleted.
Flow-4
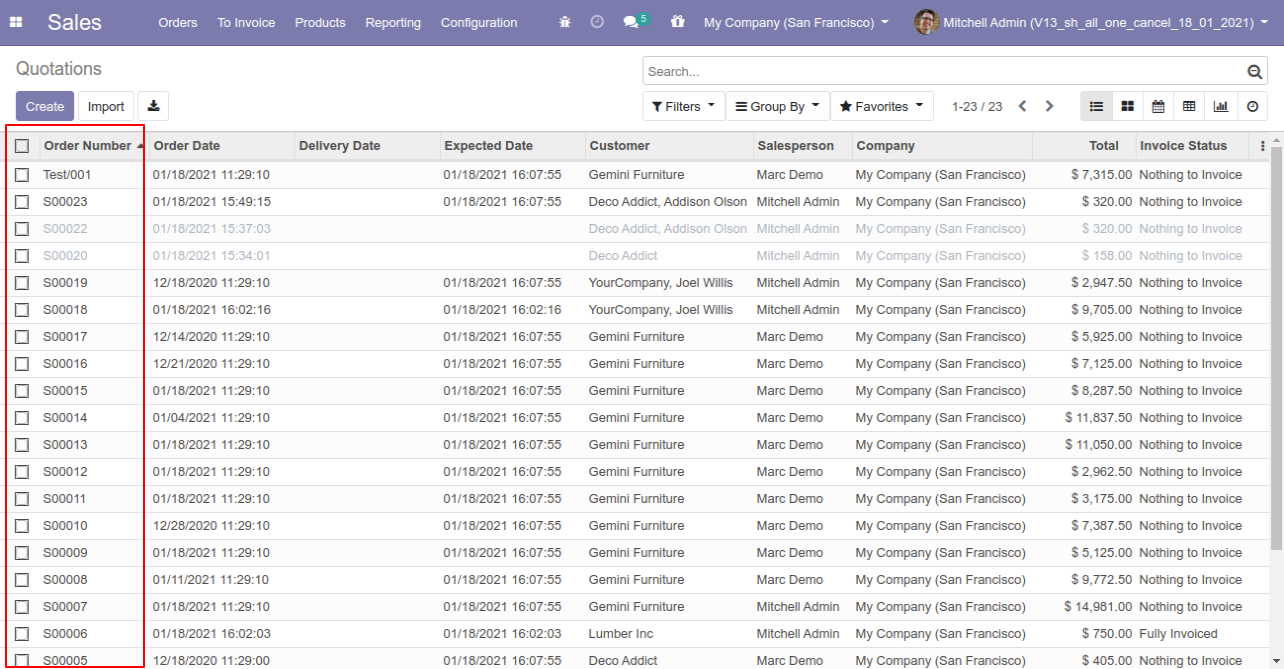
Now we cancel multiple sale orders from the tree view.
All selected sale orders are cancelled.
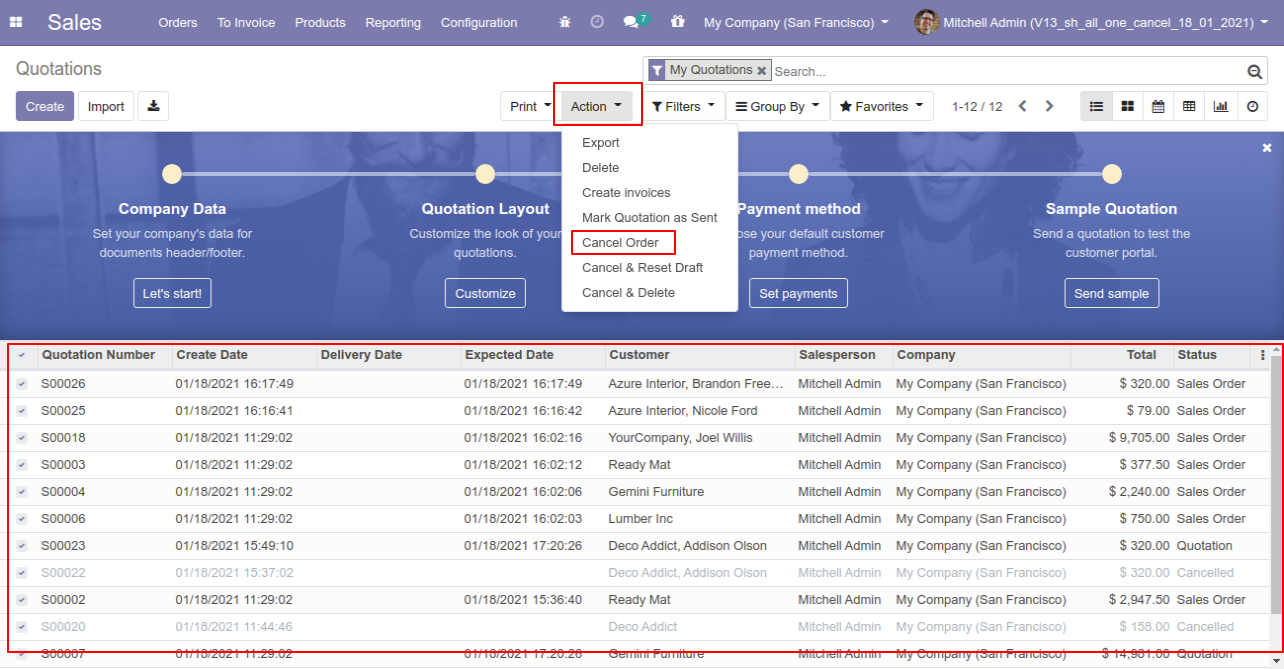
Now we "cancel & reset draft" multiple sale orders from the tree view.

All selected sale orders are cancelled and reset to the draft.
Now we "cancel & delete" multiple sale orders from the tree view, so all sale orders will be deleted after cancelled.
Set user rights to enable this functionality.
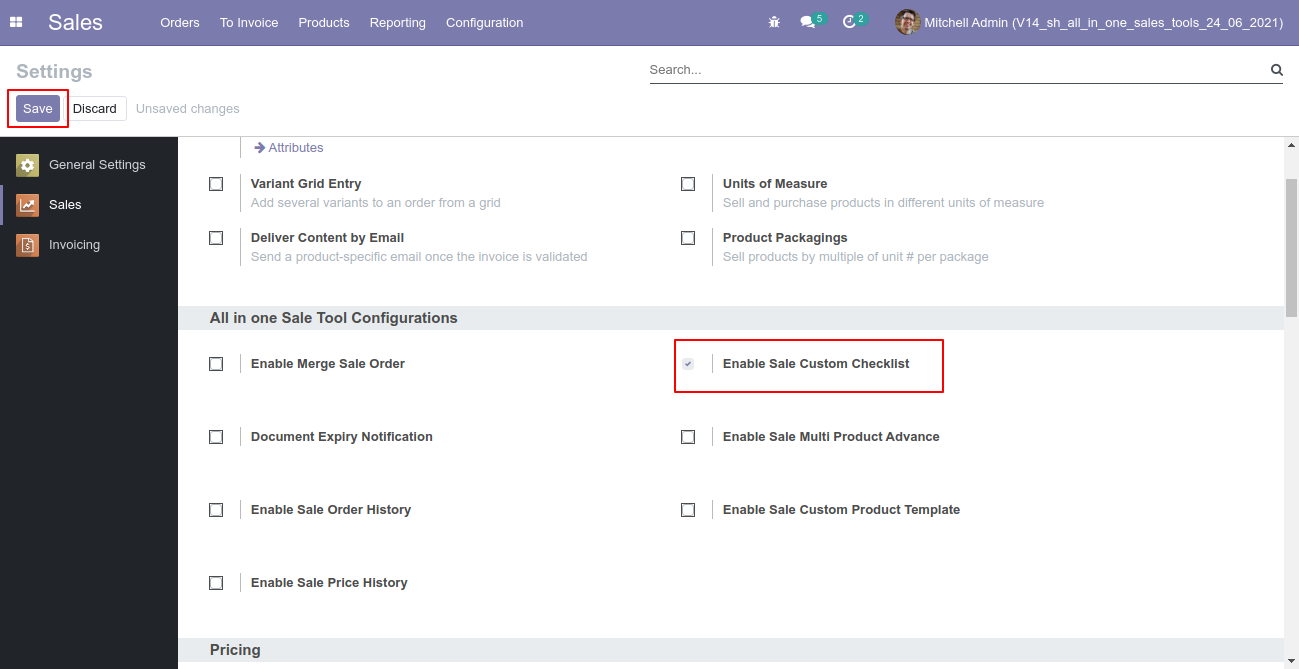
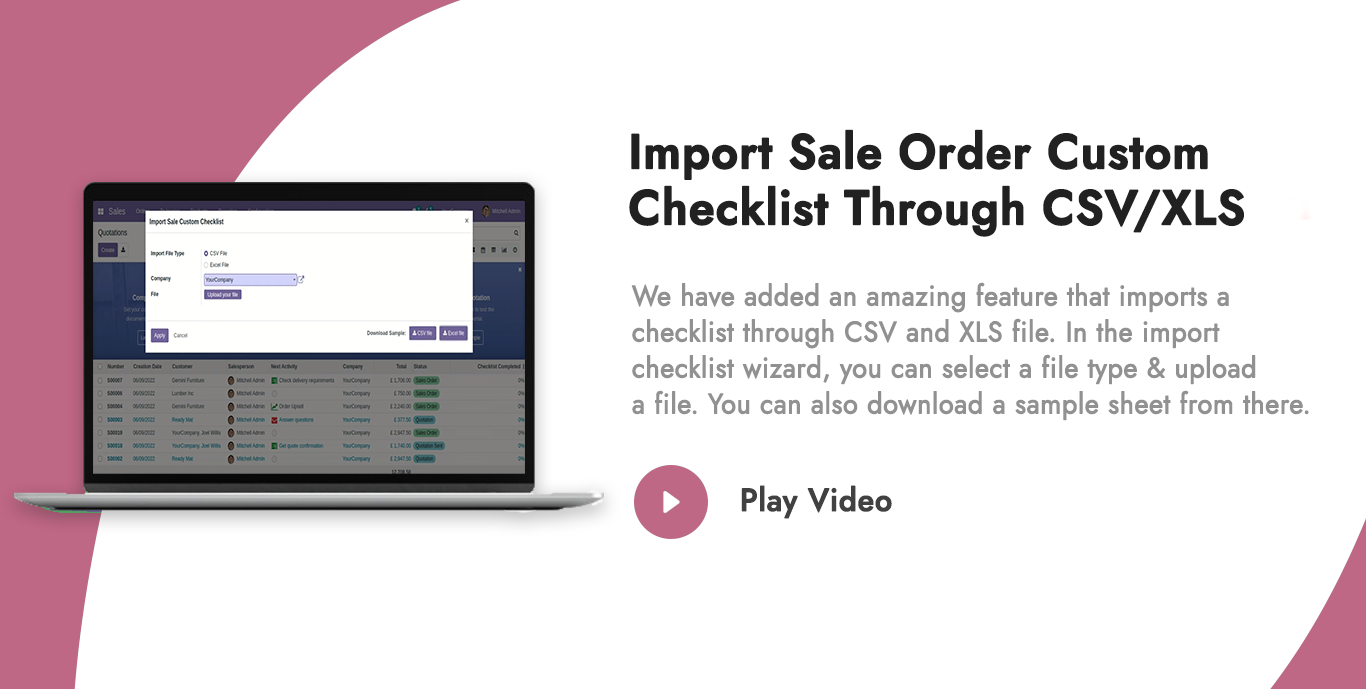
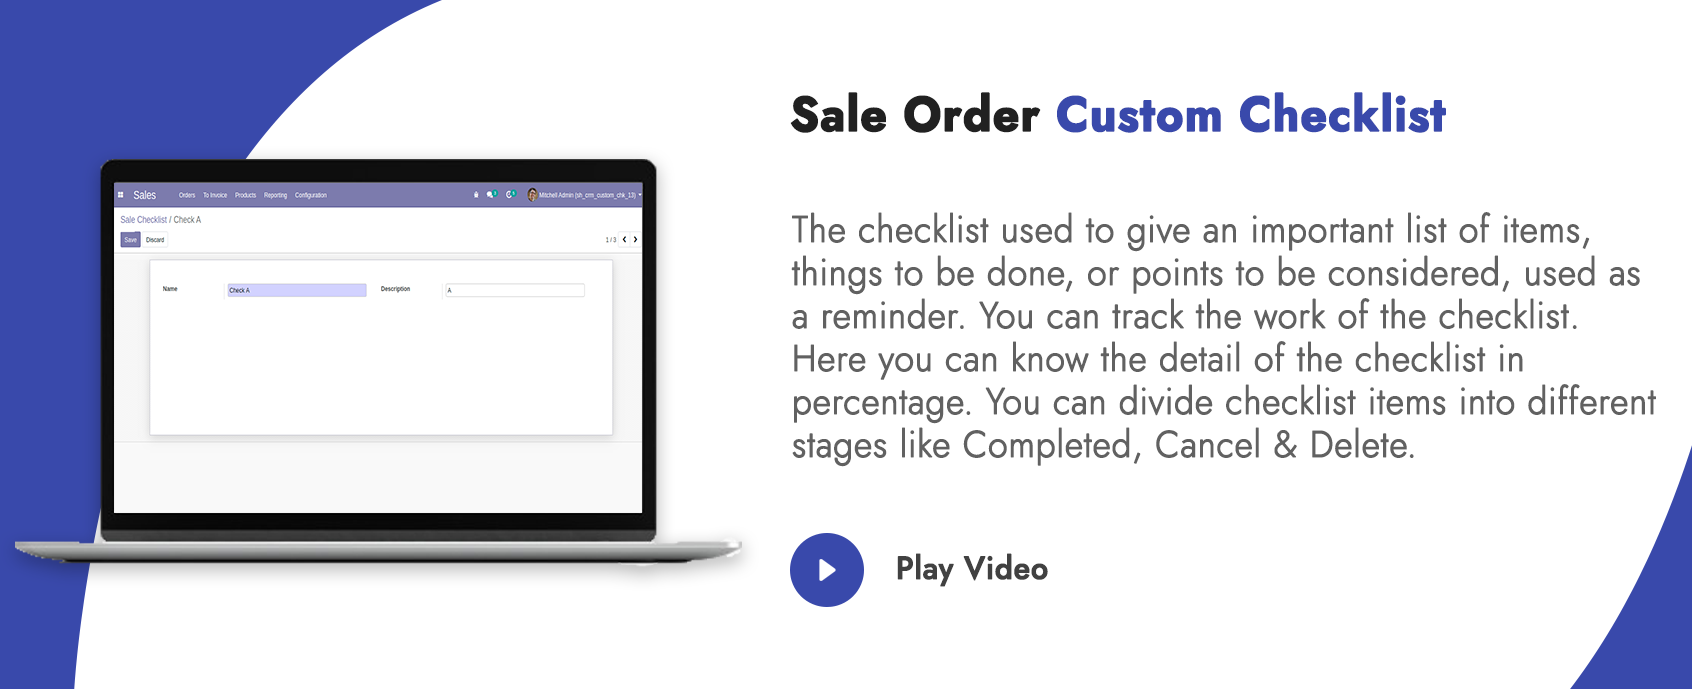
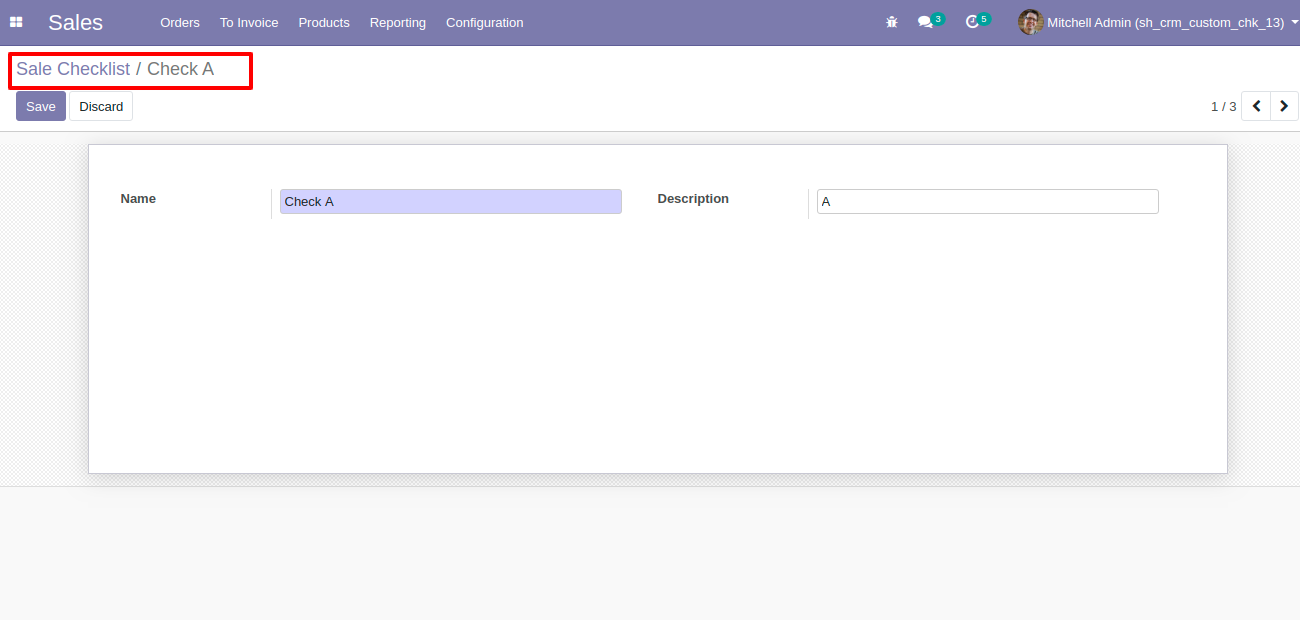
Go to configuration select "Sale Custom Checklist".

Write the name and description of the checklist.
Open timesheet, you can Complete, Cancel & Delete checklist.
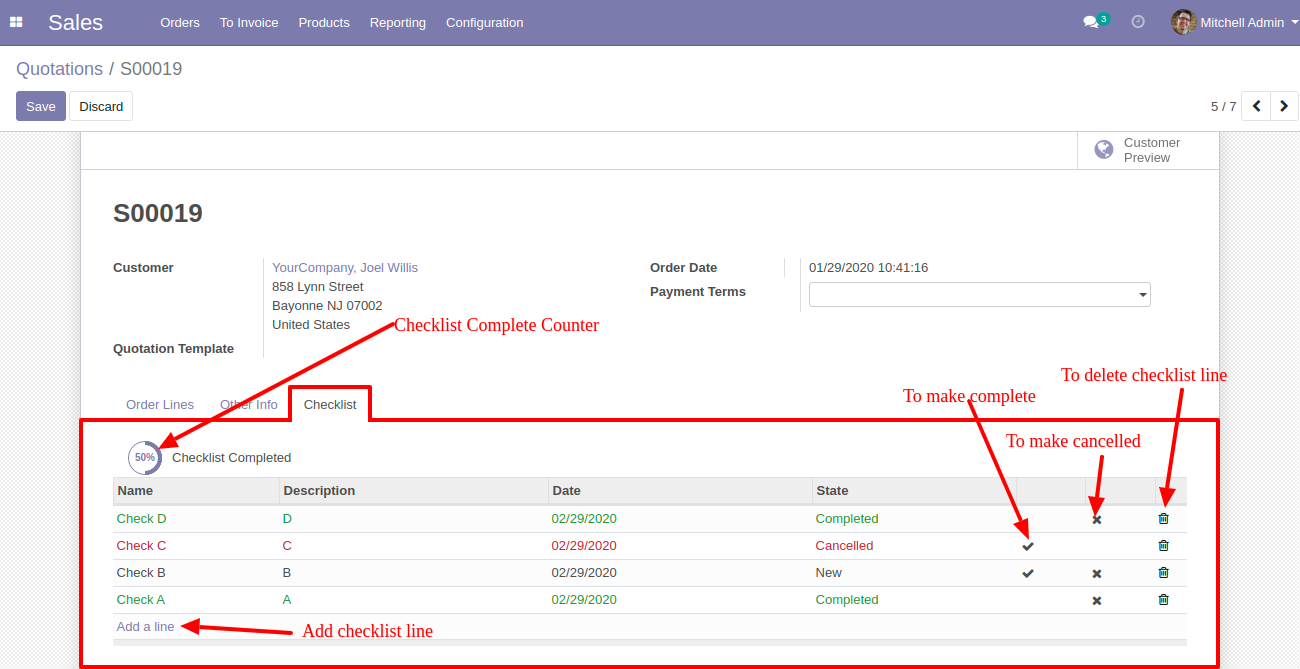
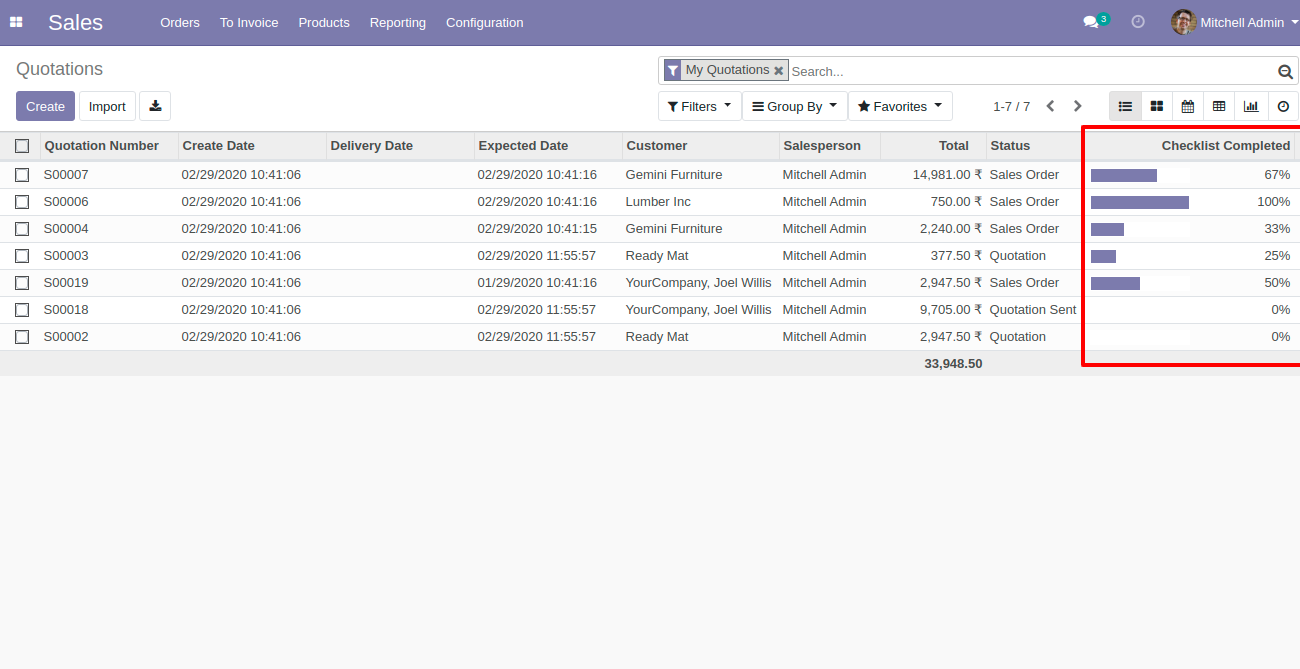
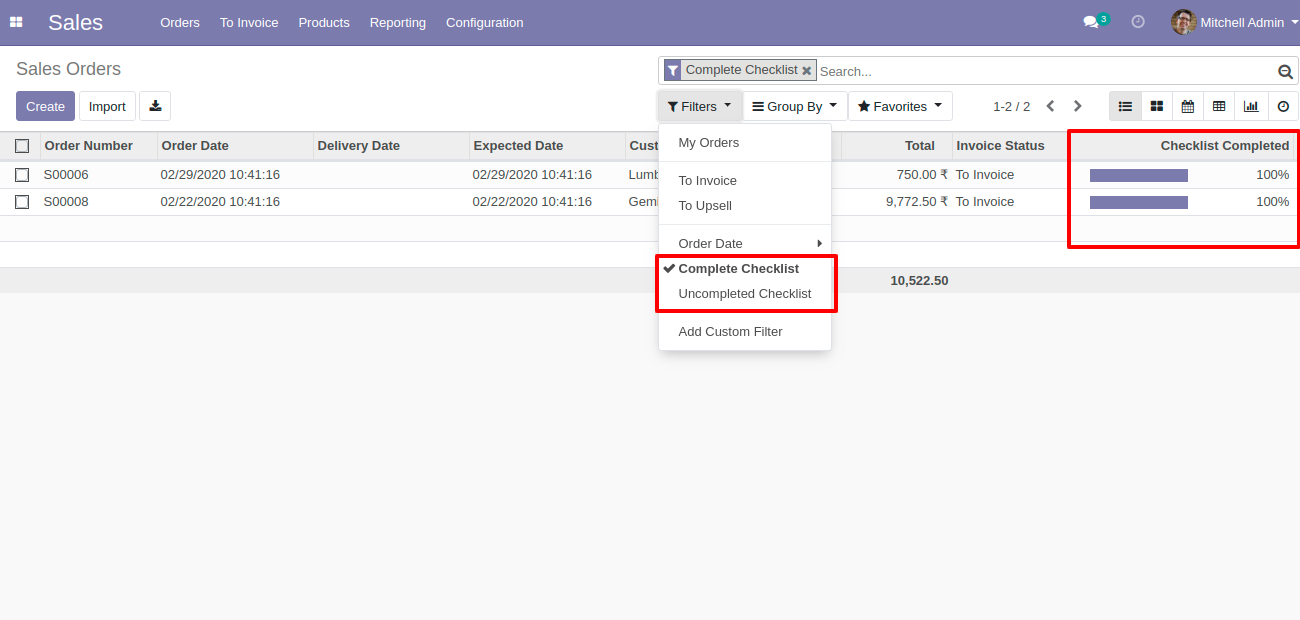
In the quotation list view, you can see a checklist progress bar.
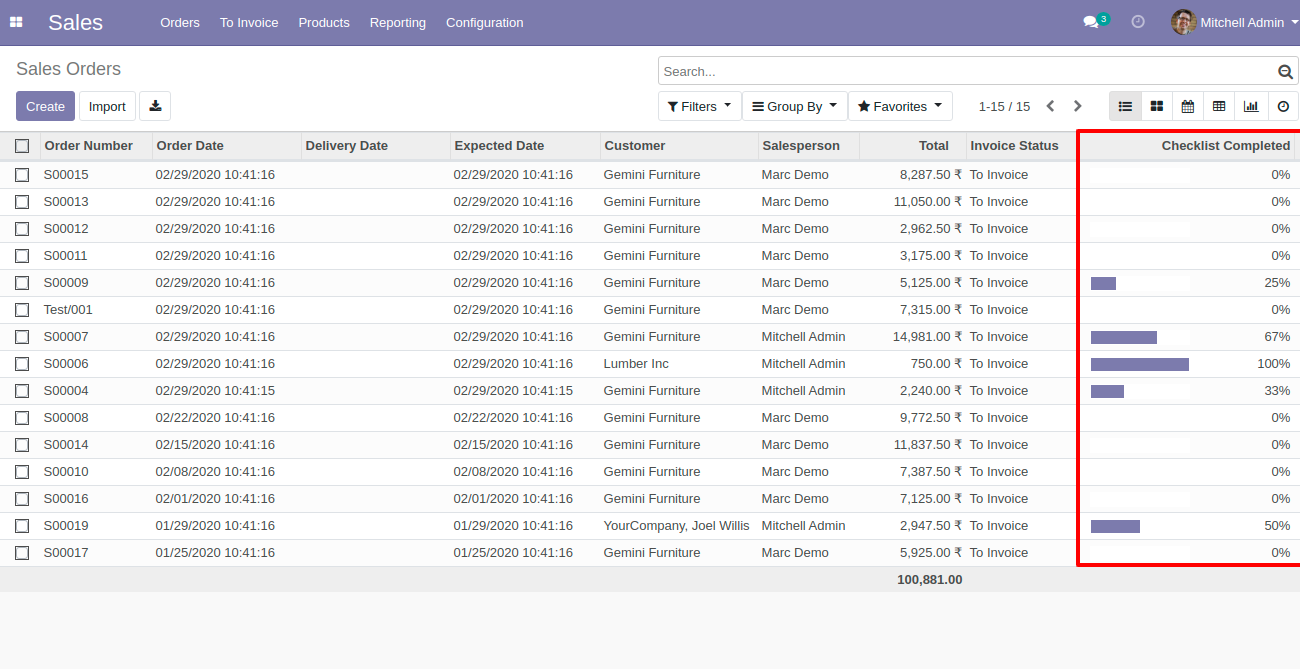
In the sale order list view, you can see a checklist progress bar.
In the sale order kanban view, you can see a checklist progress bar with a percentage.
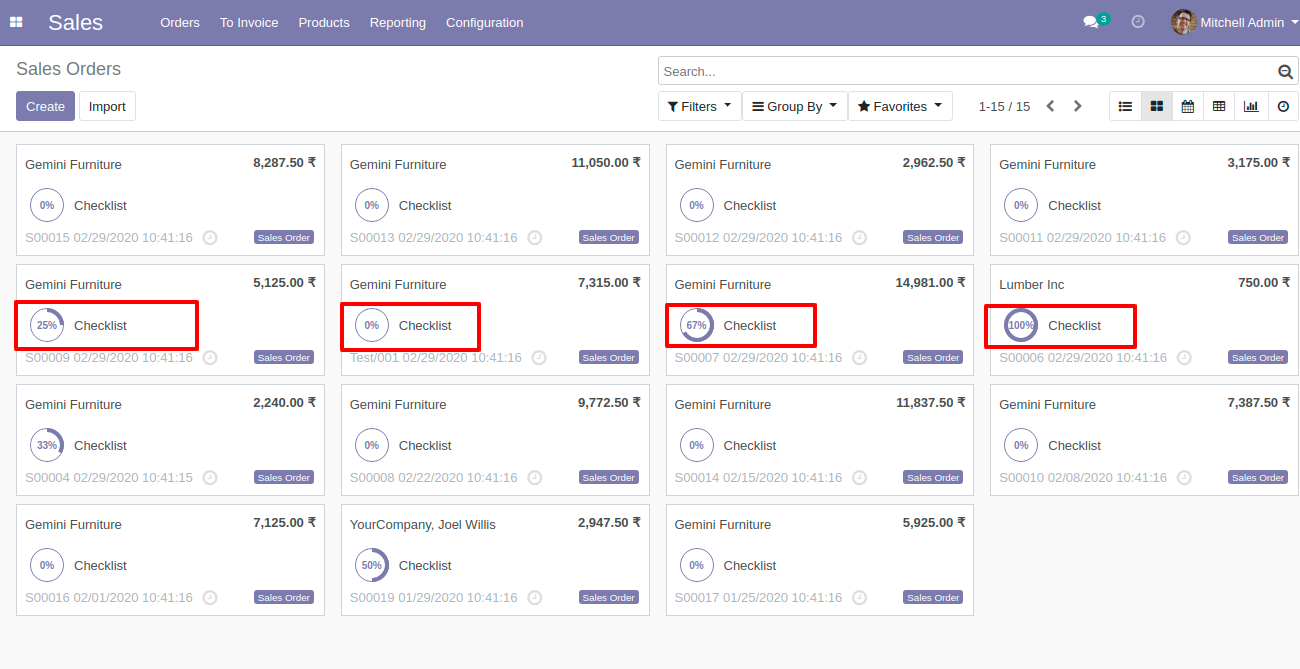
You can filter the completed and uncompleted checklist.
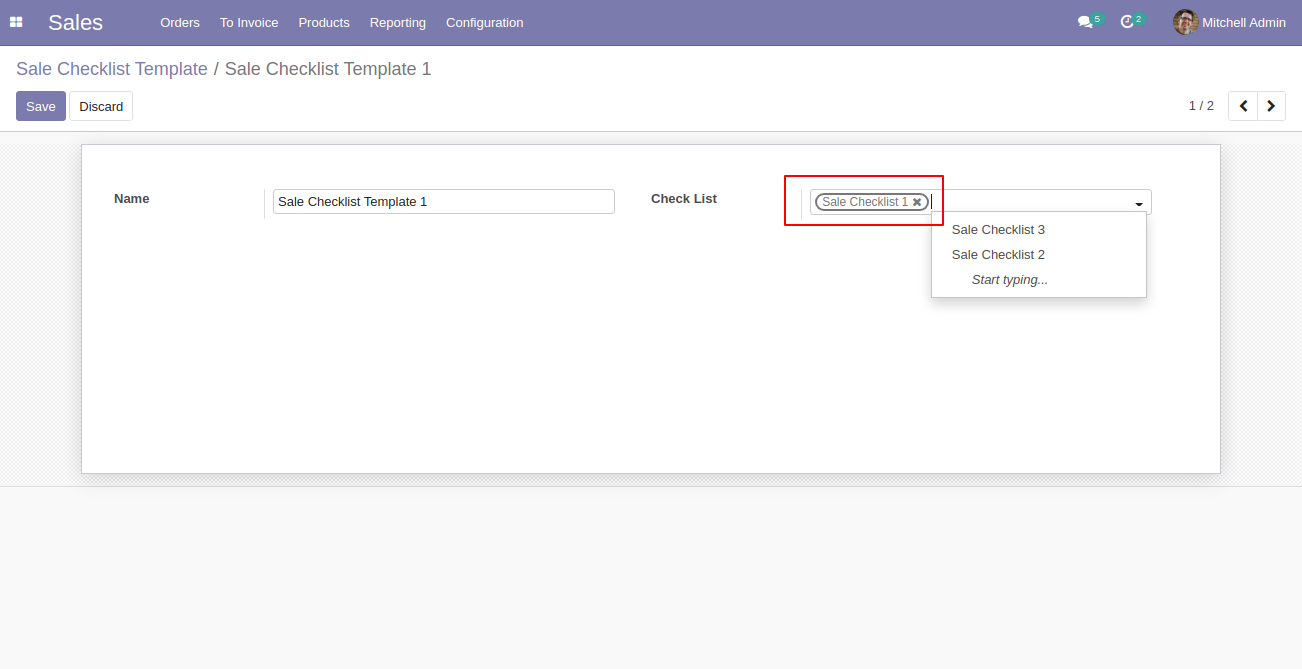
Go to the "Configuration" => Sale Custom Checklist Template.
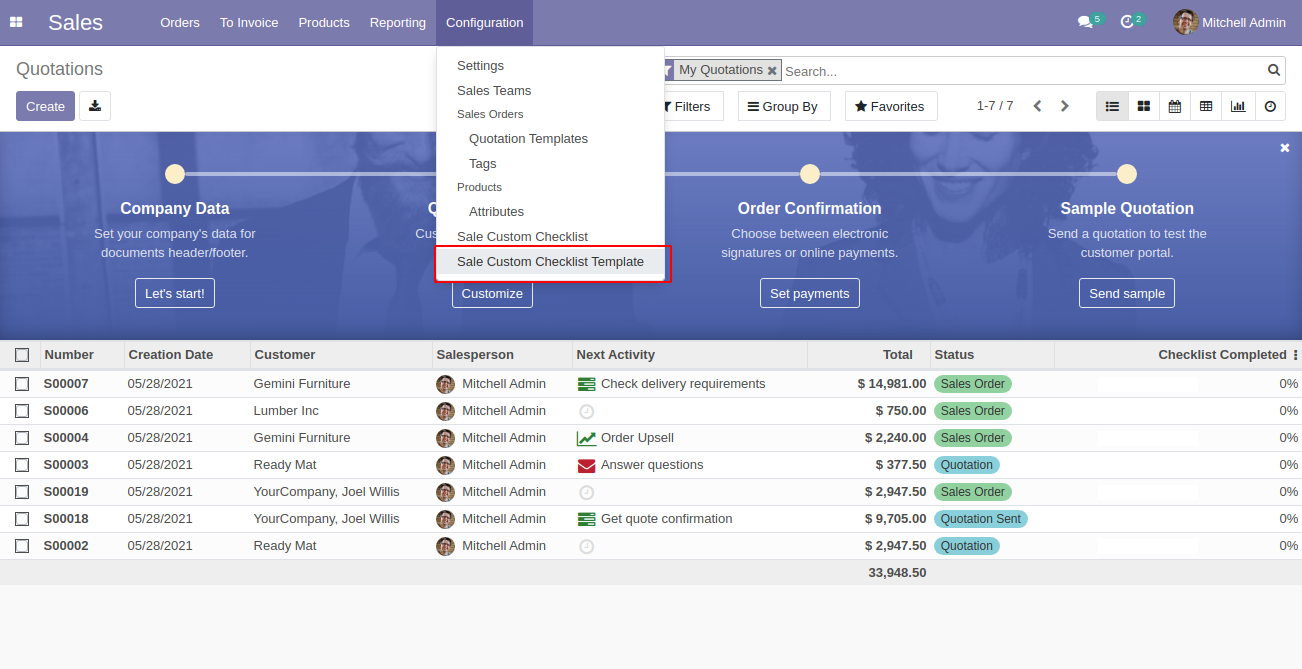
Now we create a sale checklist template, checklist template form view looks like this.
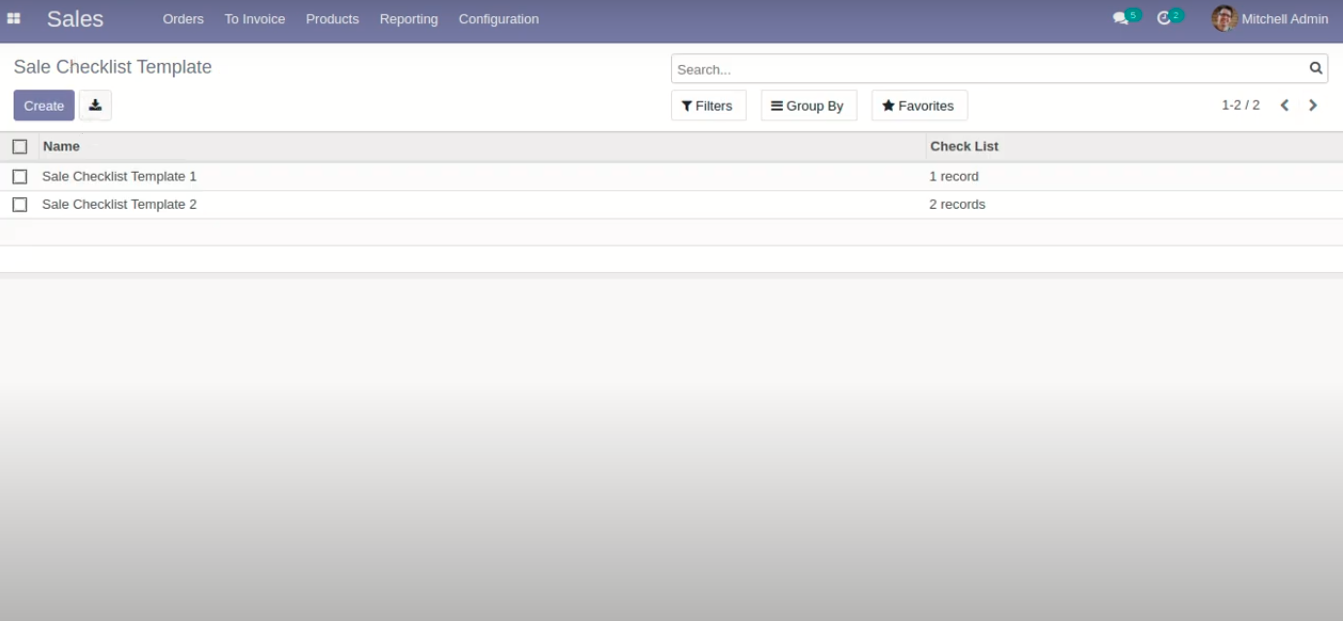
Sale checklist template list view looks like this.
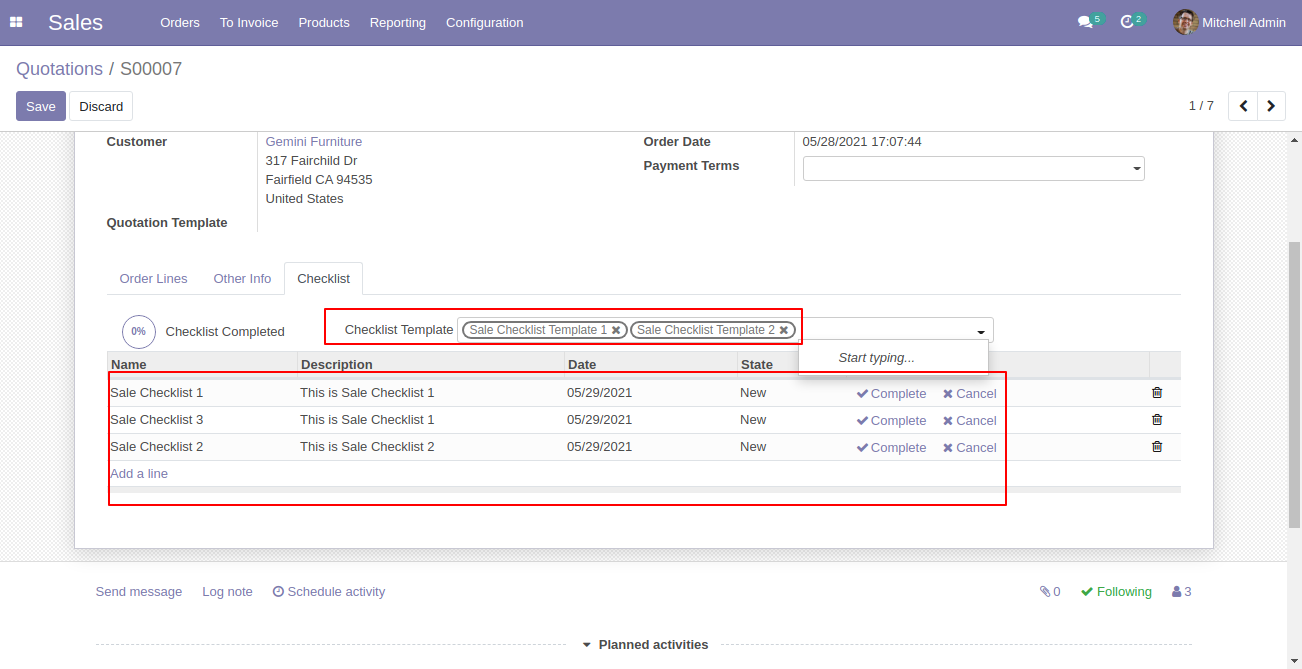
Now we fill the checklist by selecting the checklist template.
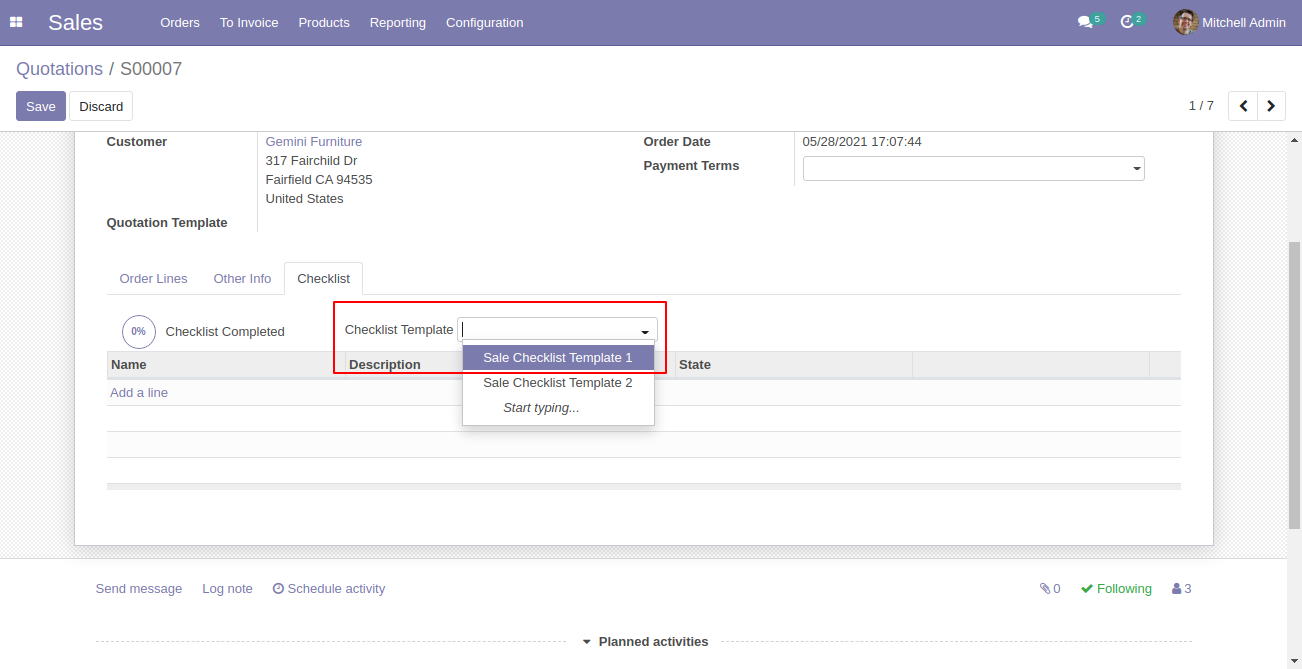
When we select checklist template, it adds a record by default.
Import checklist menu.
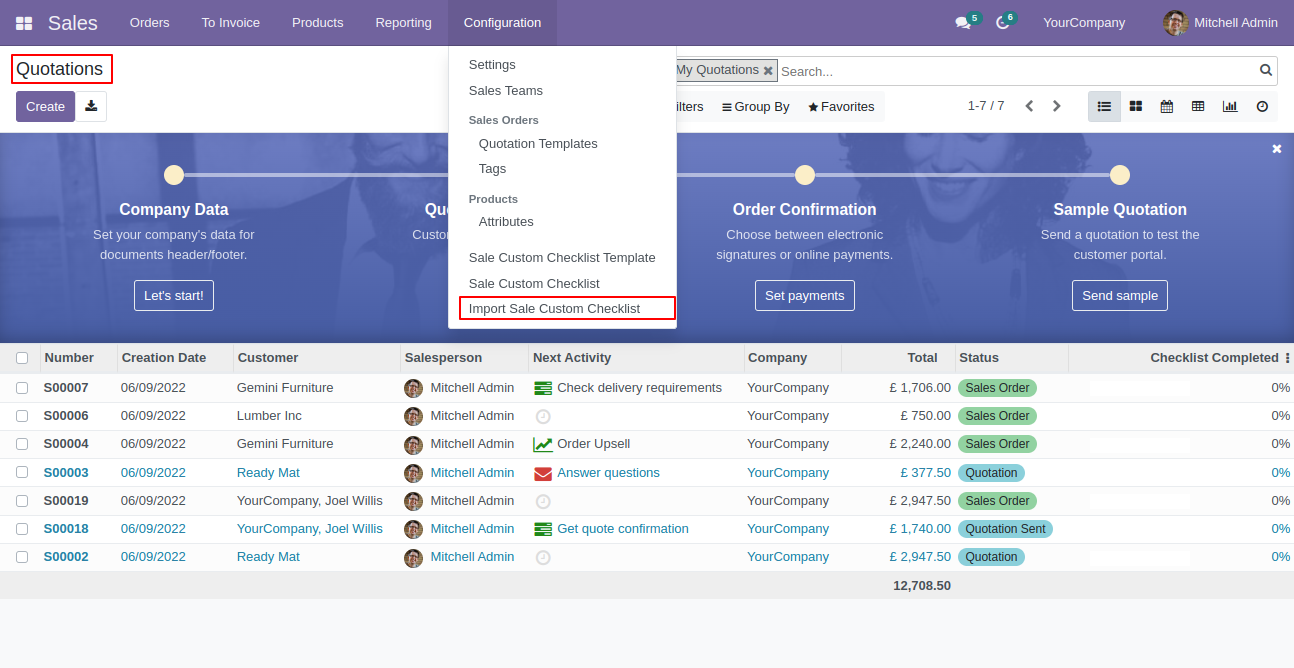
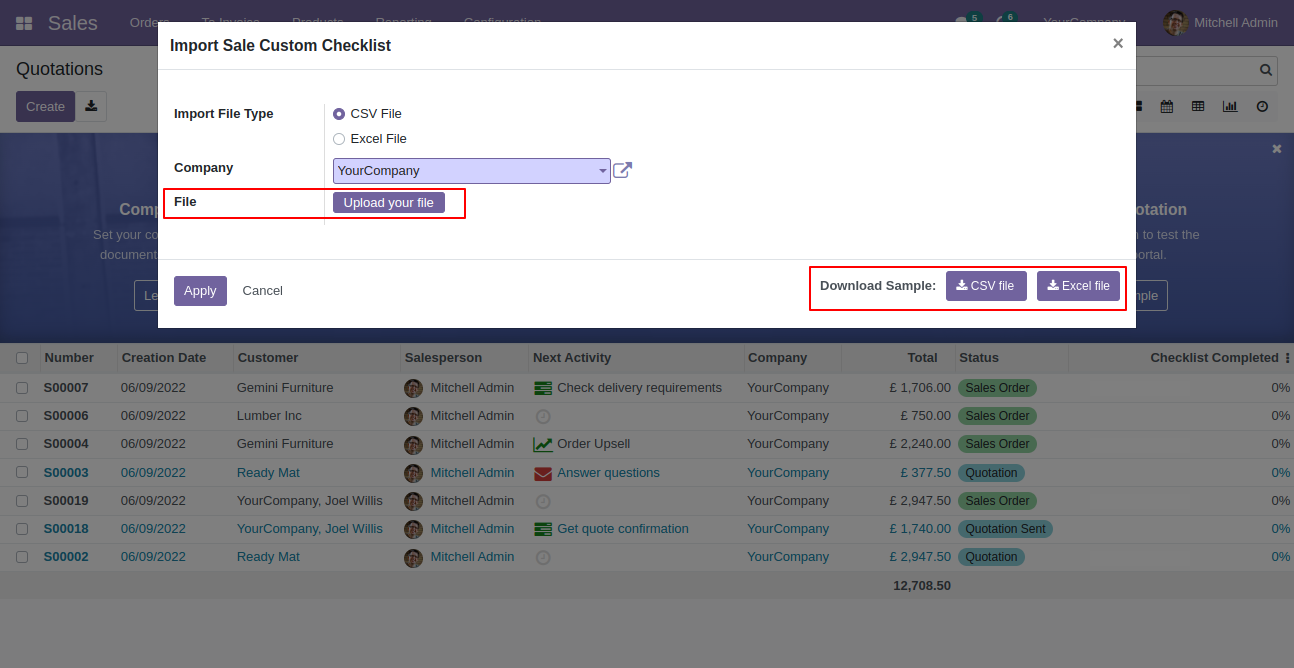
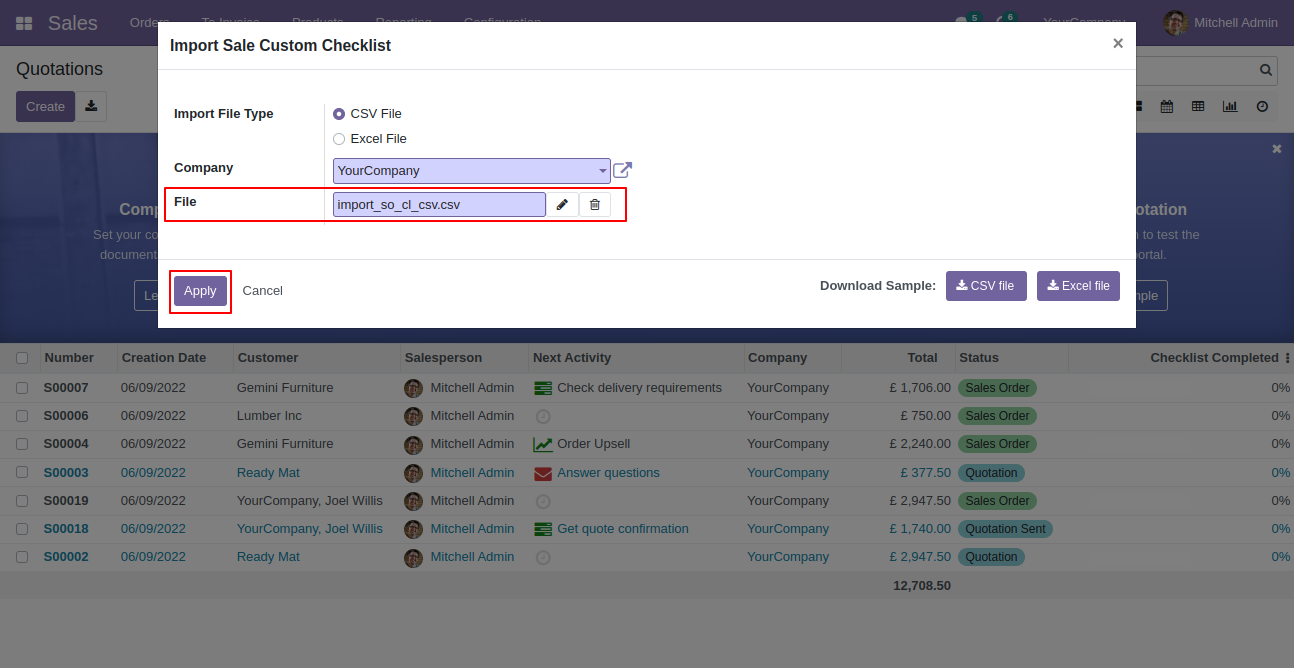
Import checklist wizard, select file type & upload file. You can download sample sheet from here.
Click apply after the file is uploaded.
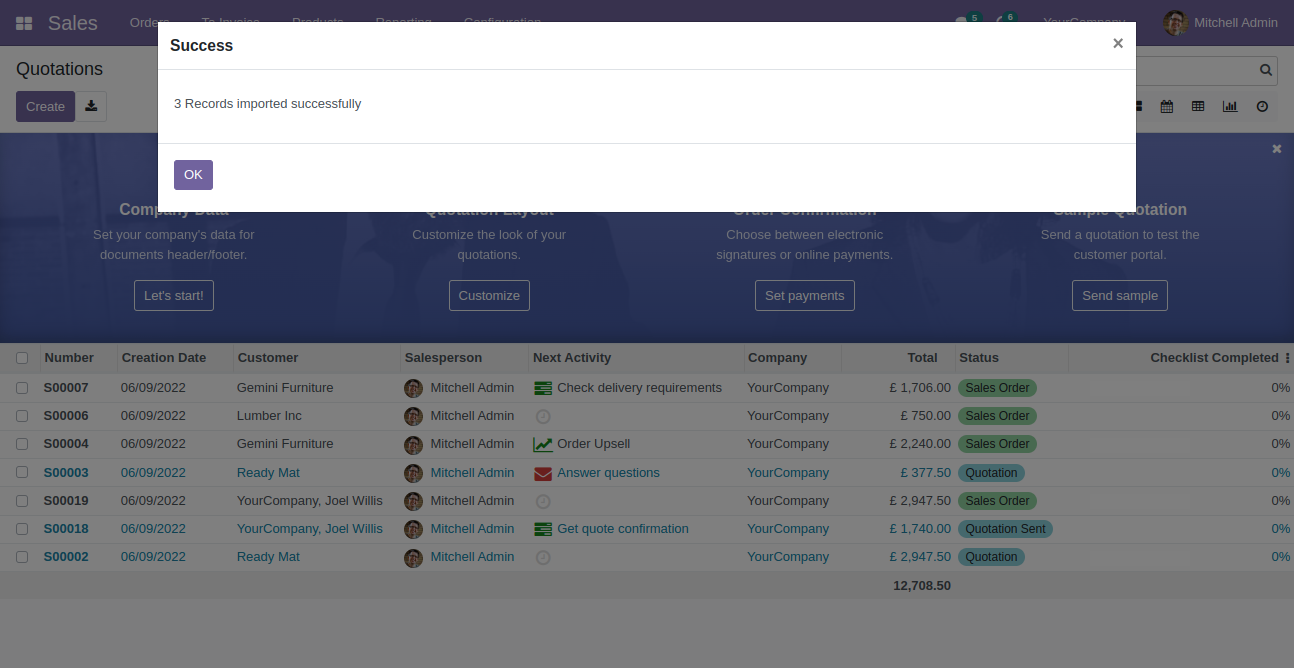
Success message looks like below it's shows successfully imported records.
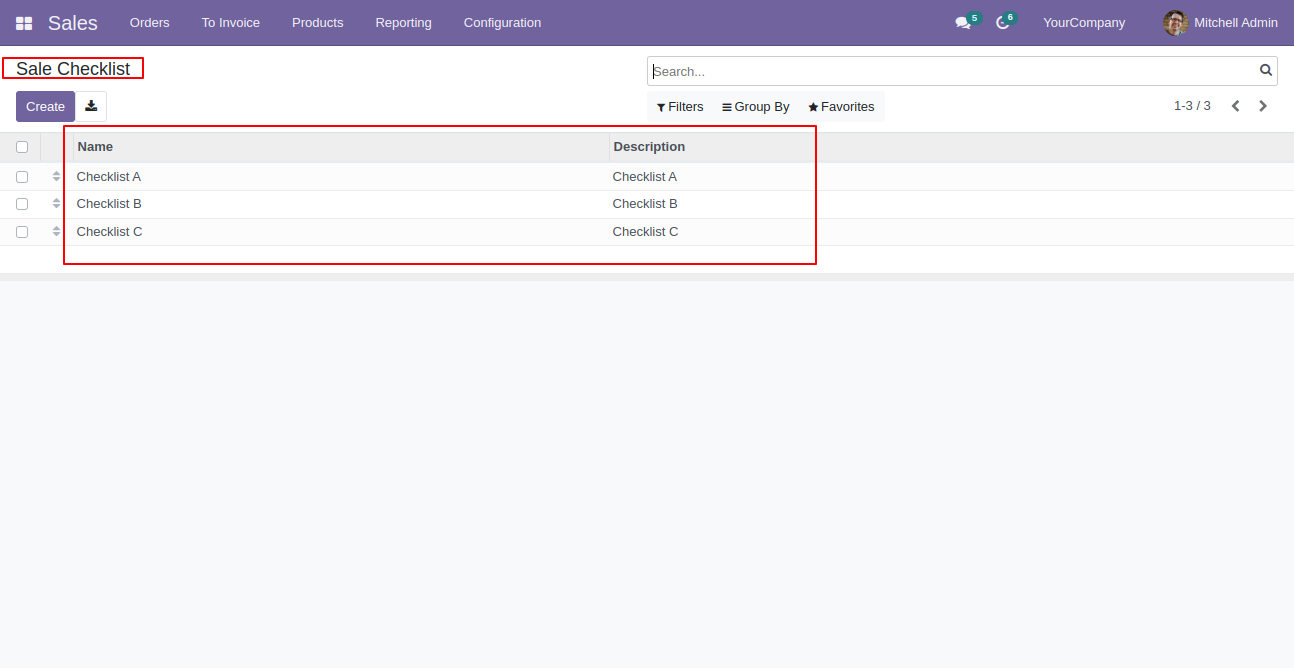
Following checklists are imported.
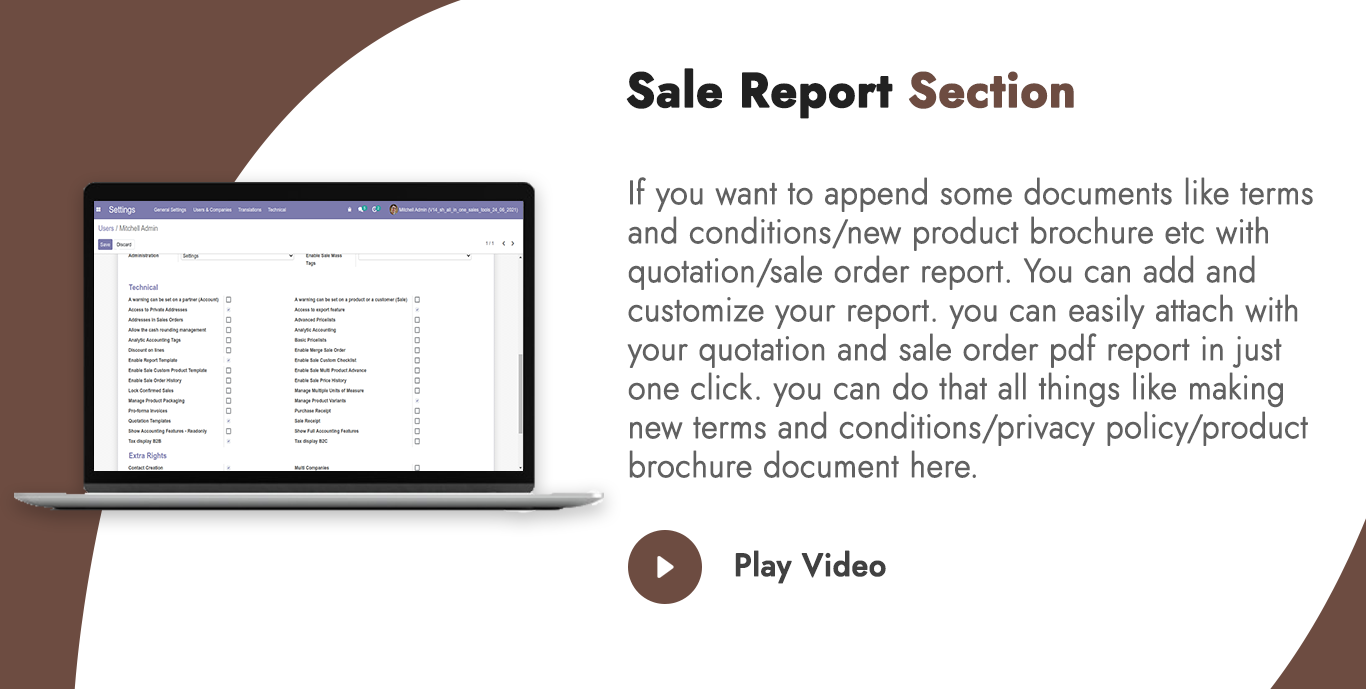
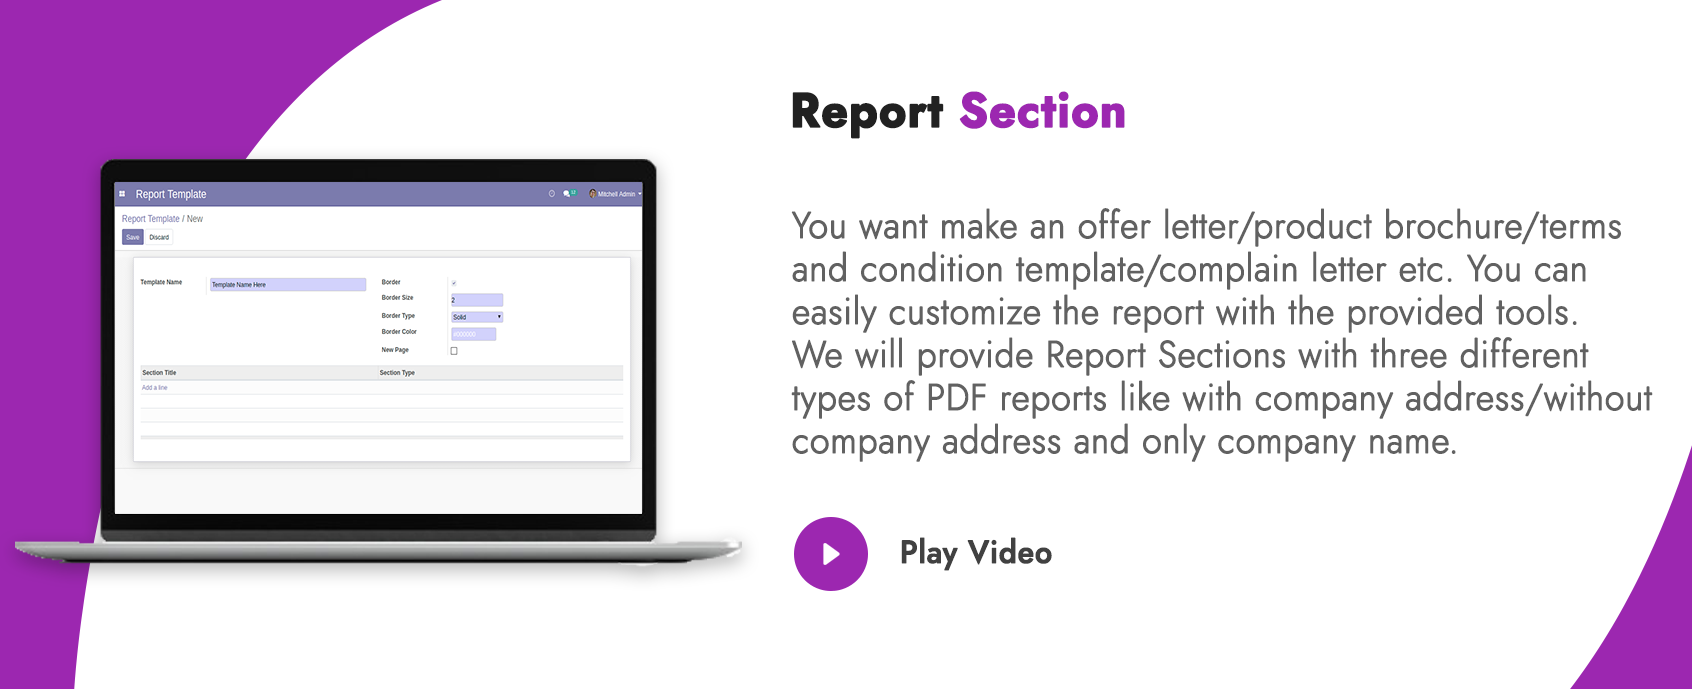
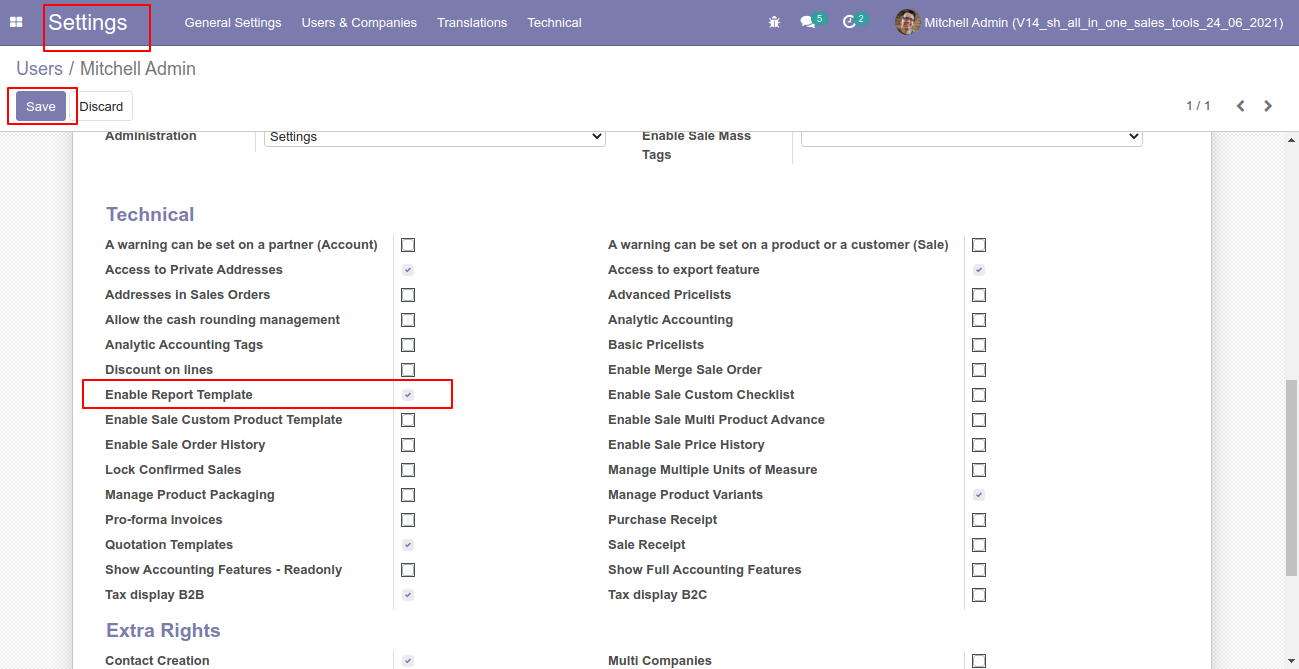
Goto Report Template.
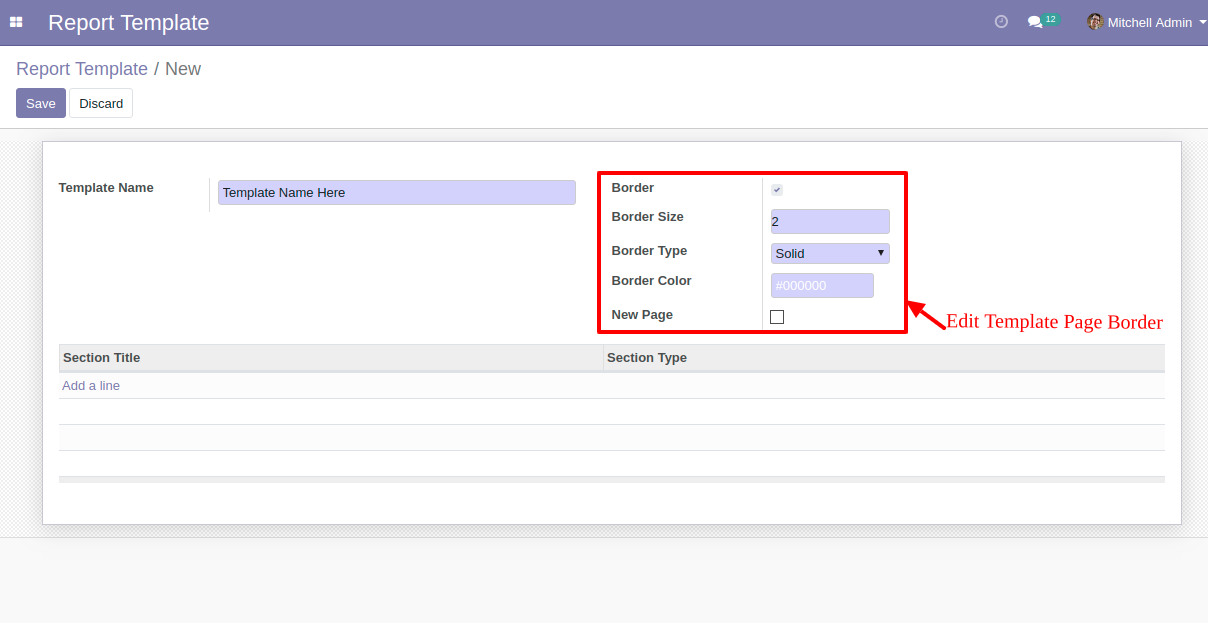
Define Report Name and Edit Report Template Border.
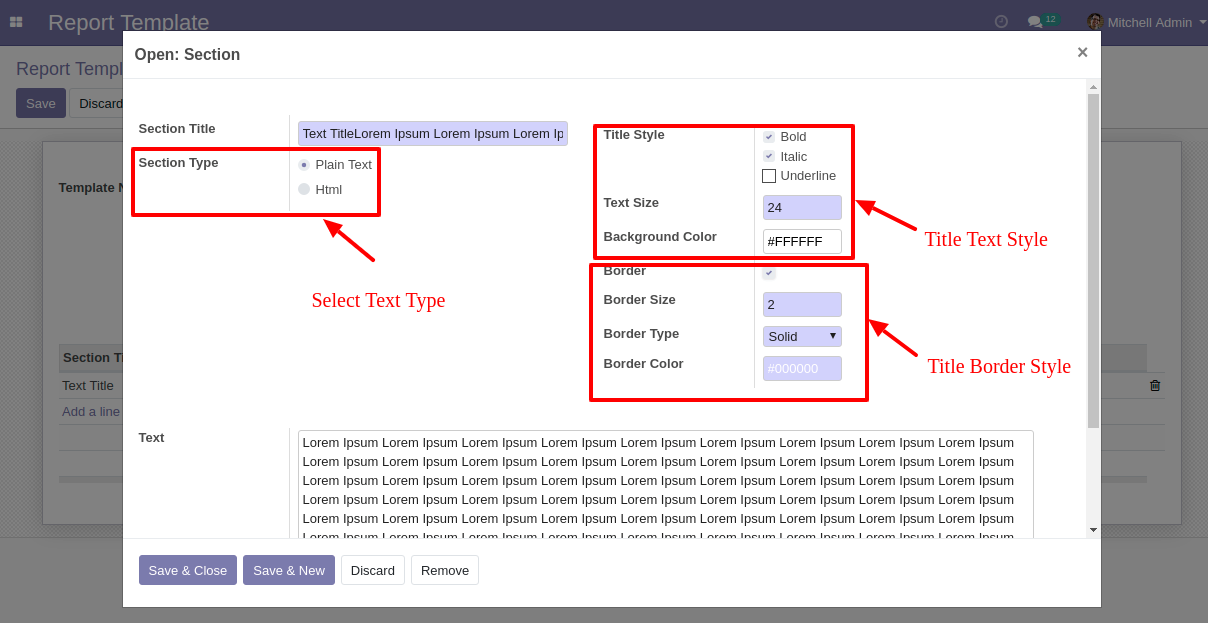
Write the Report Section Data Using Text.
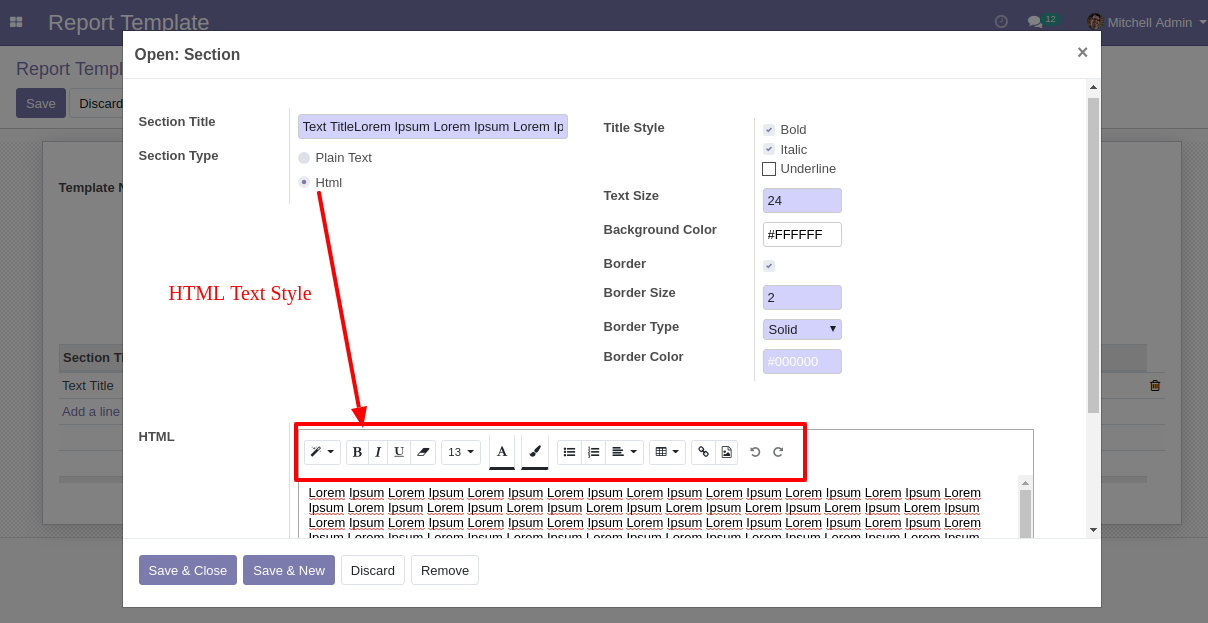
Customize the Report Section Data Using HTML.
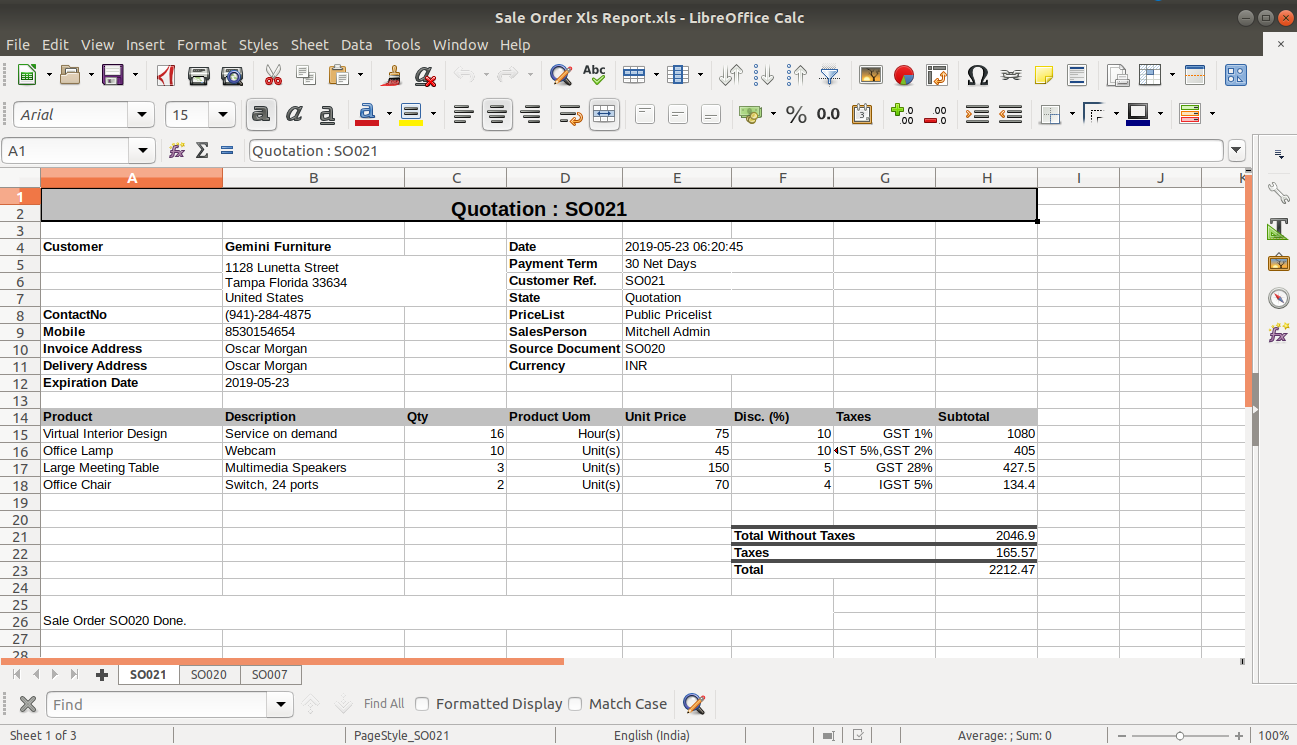
Print Report In Three Different Types of Format.
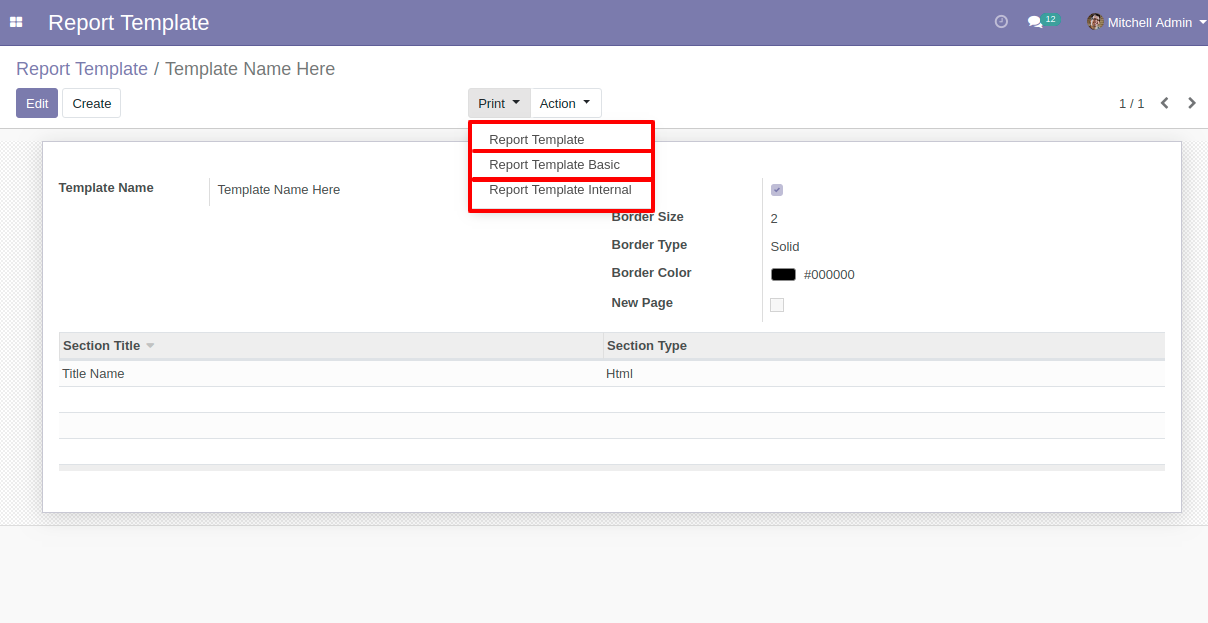
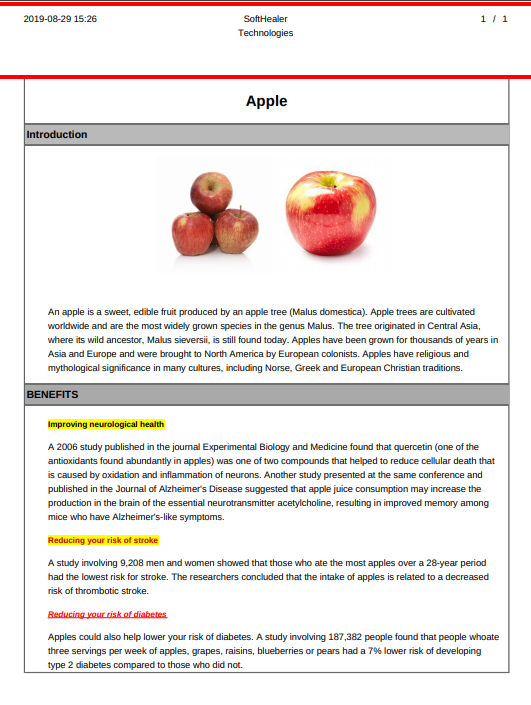
Print Report Without company name and address "Report Template Basic".
Print Report With company name "Report Template Internal".
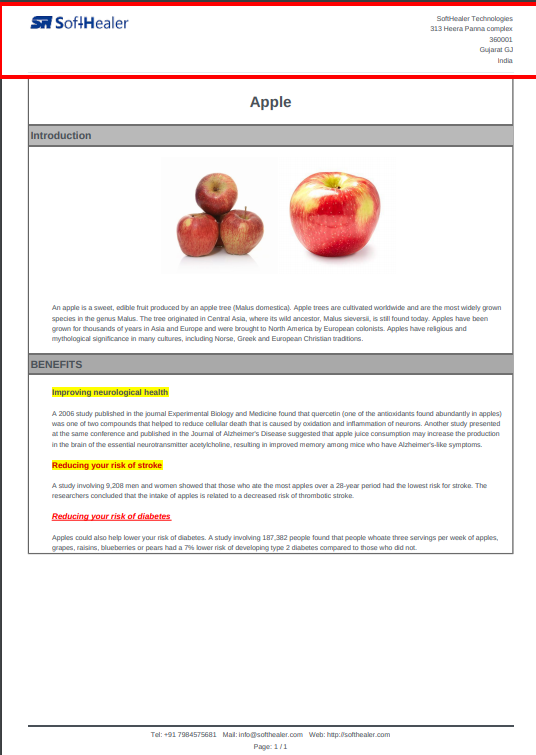
Print Report With company name and address "Report Template".
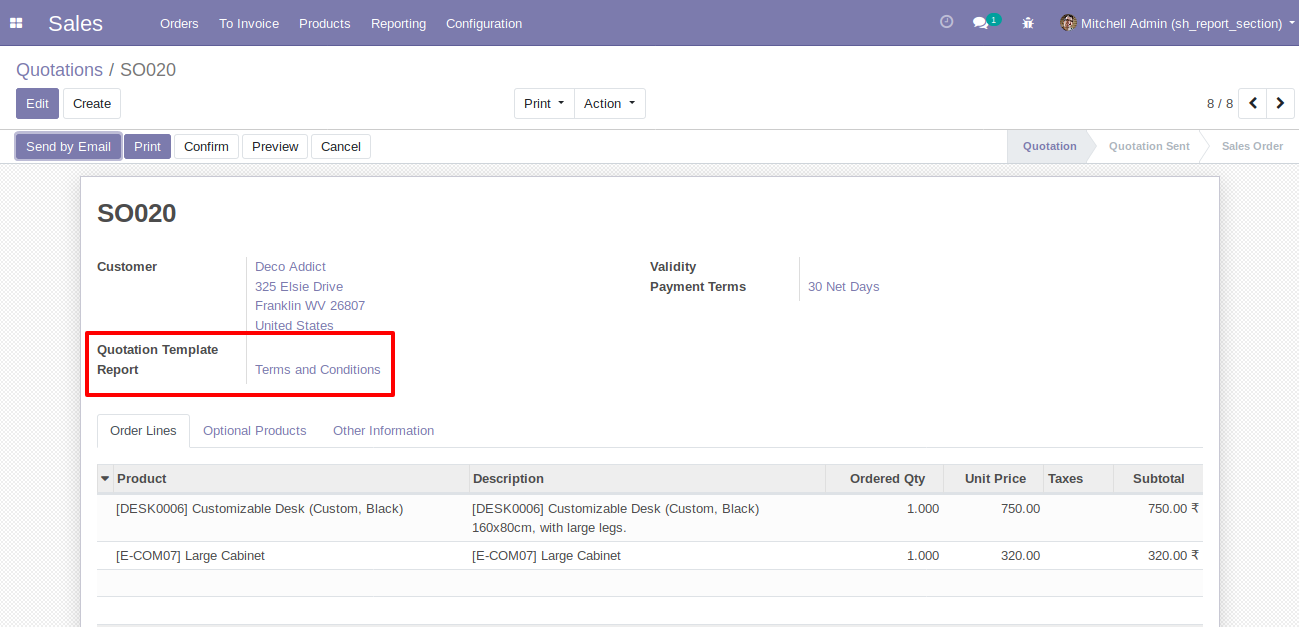
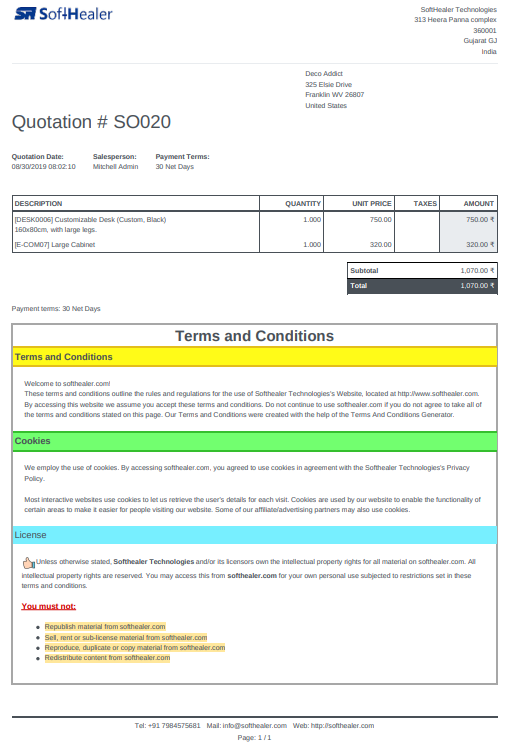
For example like Terms and condition report.
For example Offer letter.
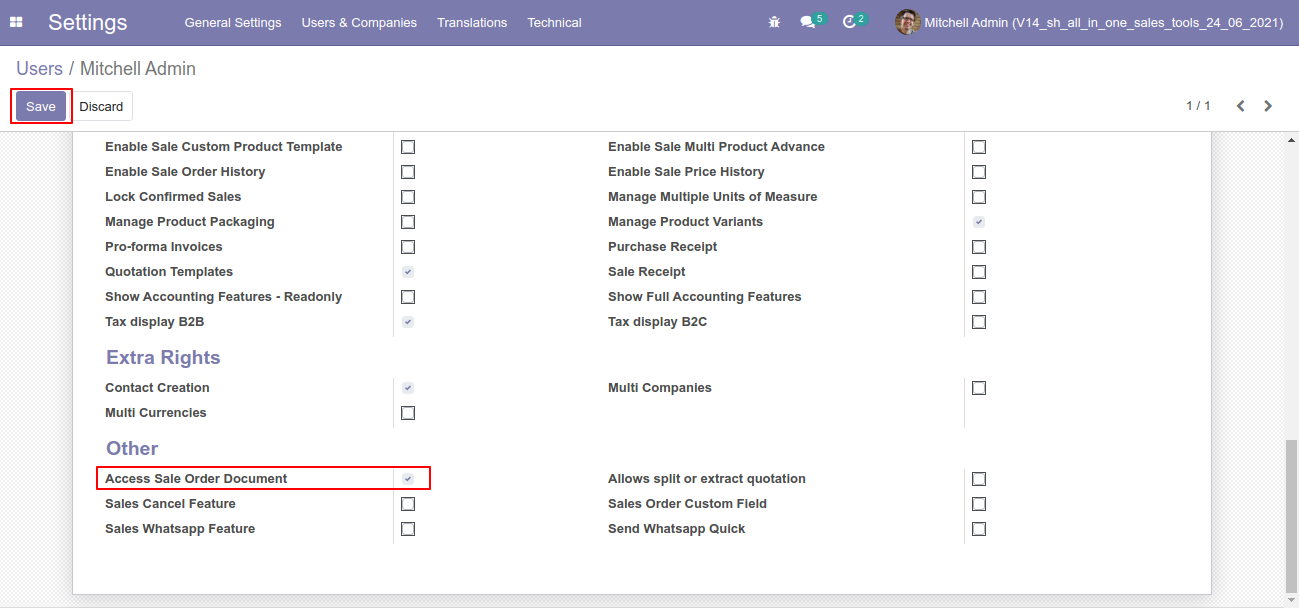
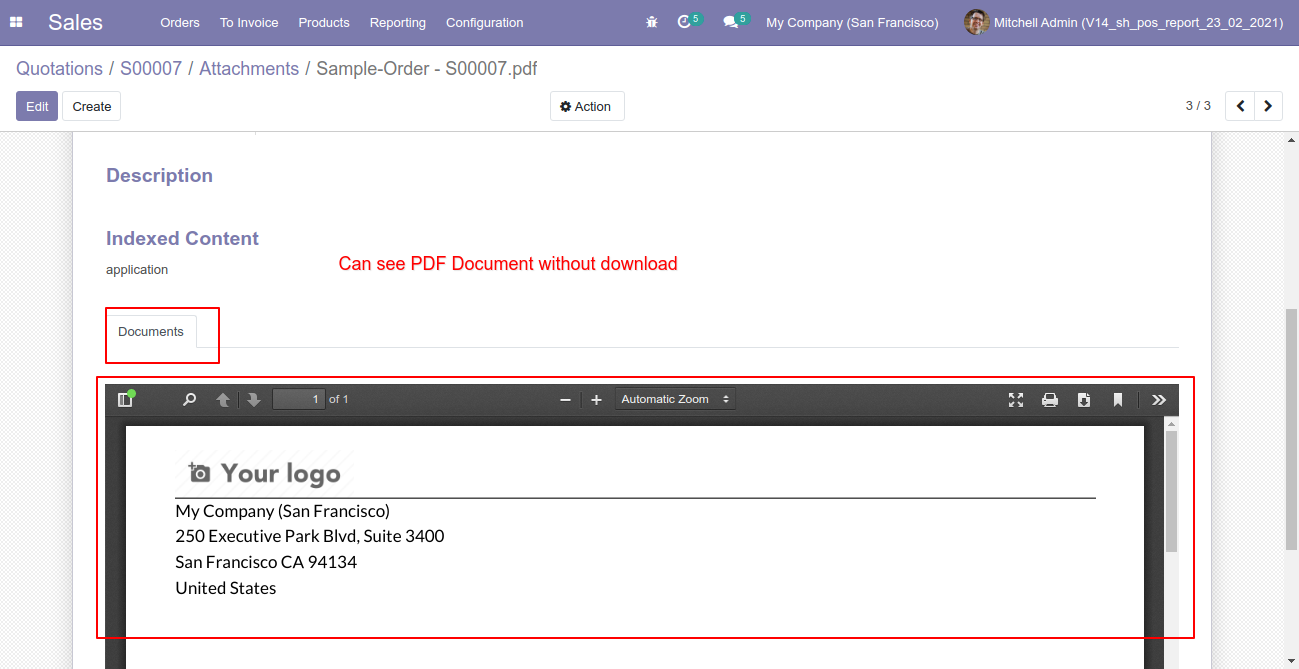
Tick the "Access Sale Order Document" group.
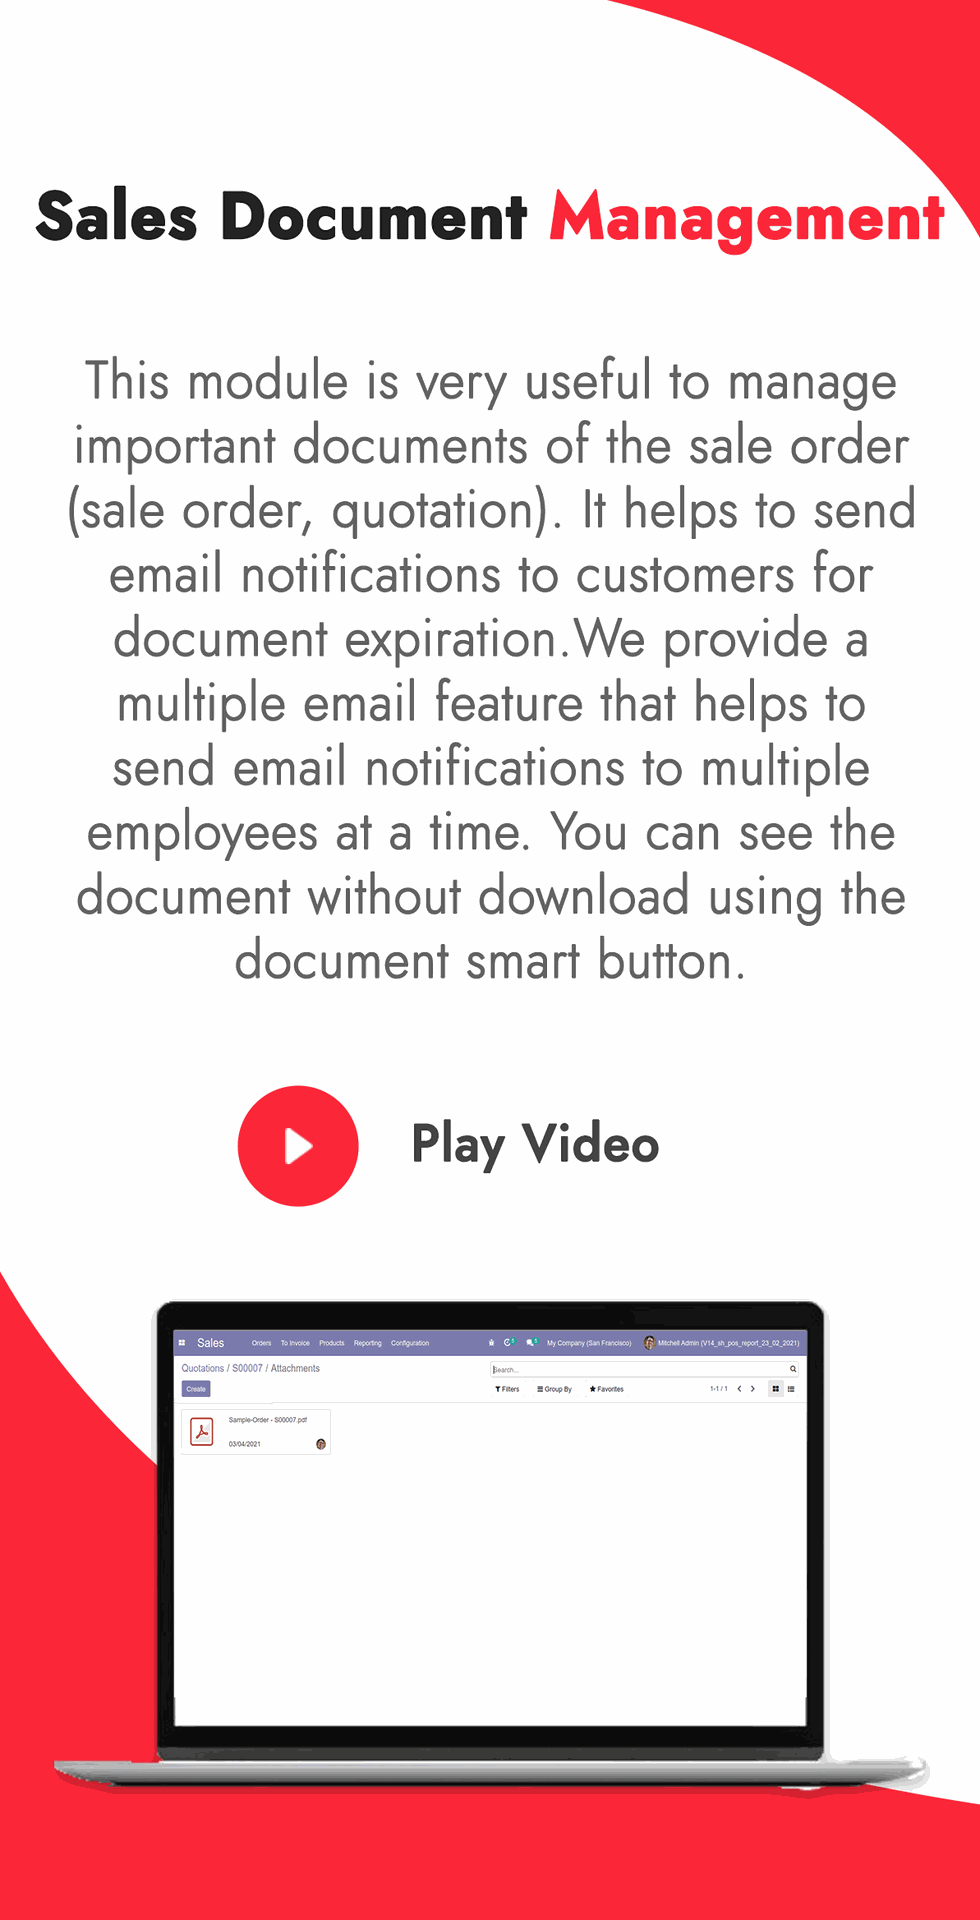
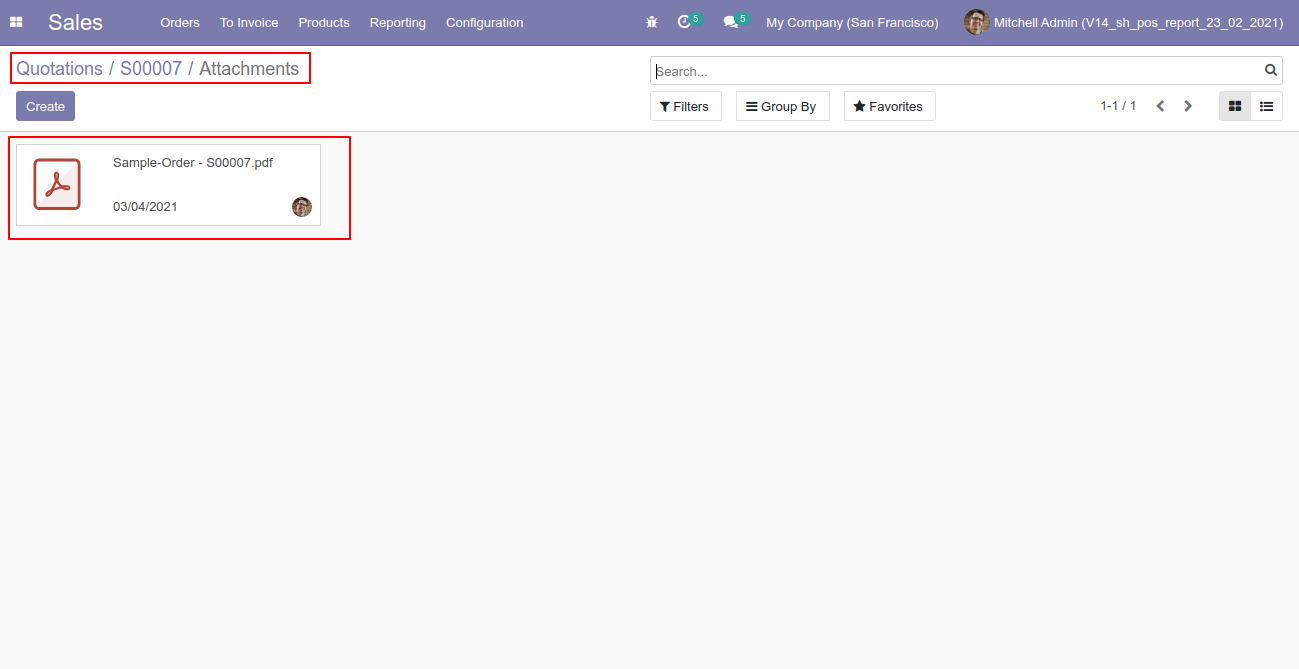
Now go to the sale order/quotation and attach the document.
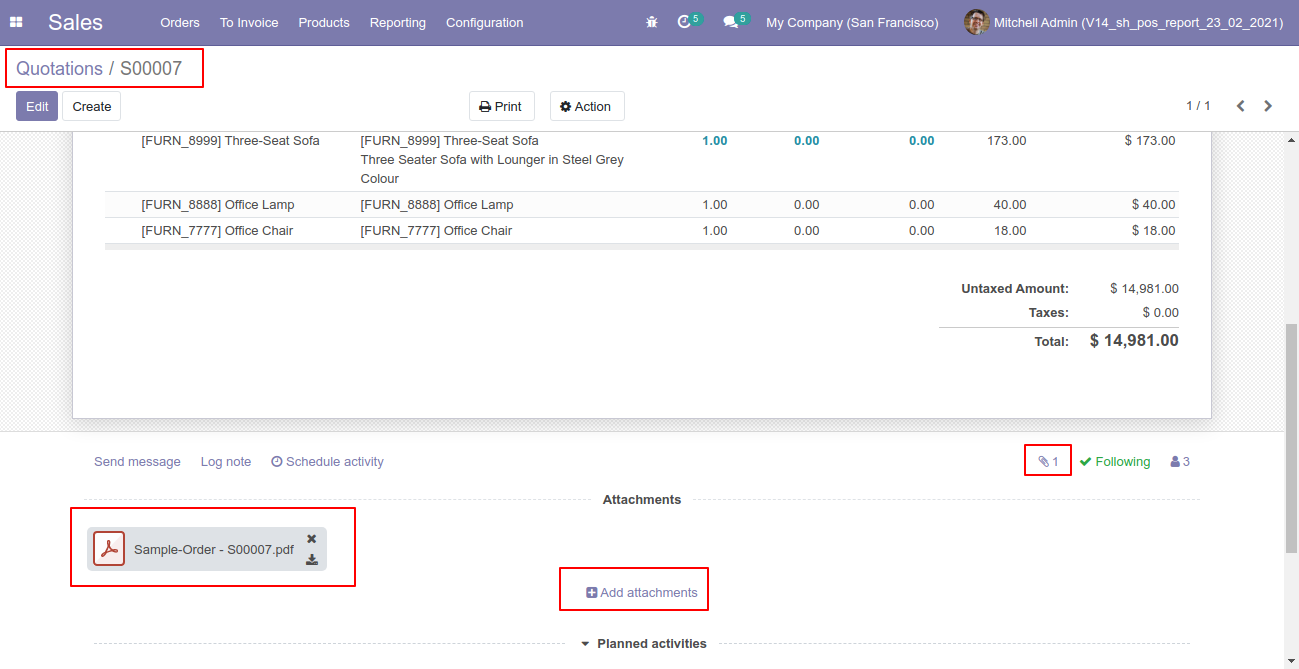
You can see the document without download using the document smart button.
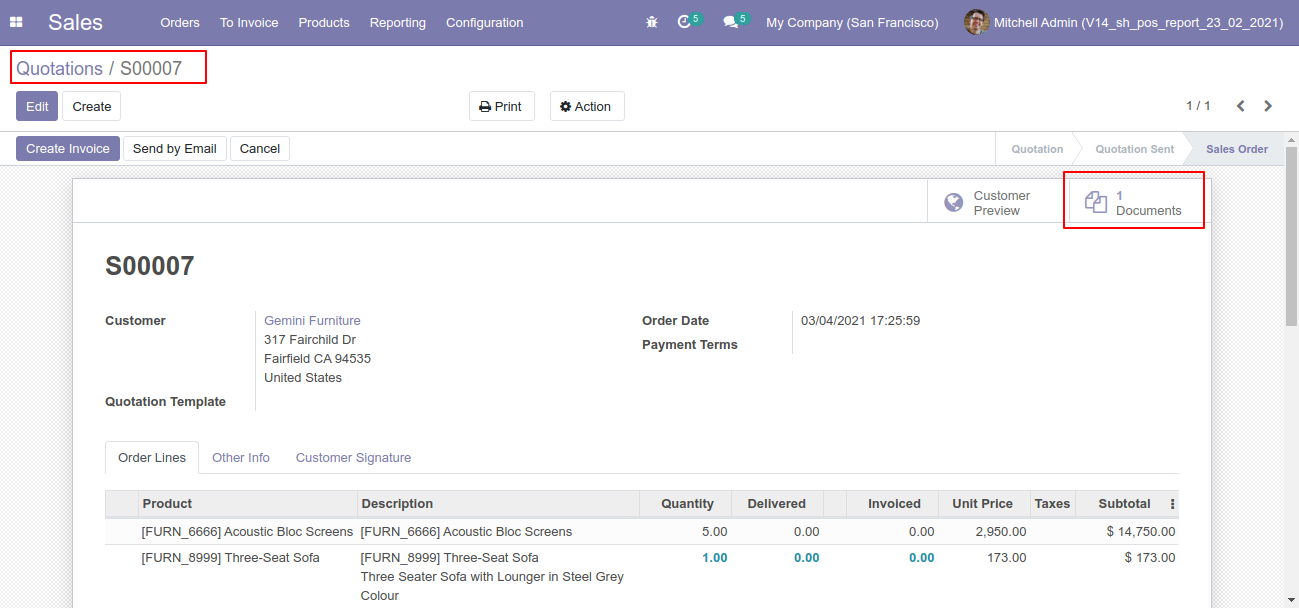
After press on the document smart button, it opens the document kanban view.
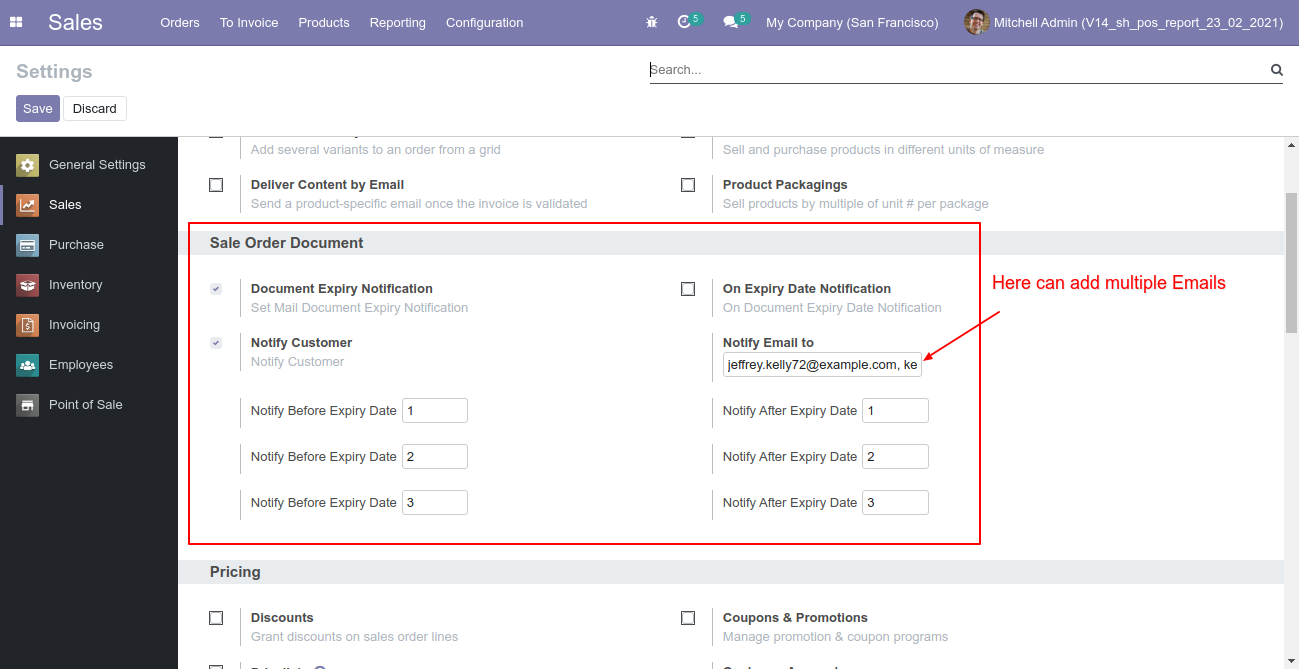
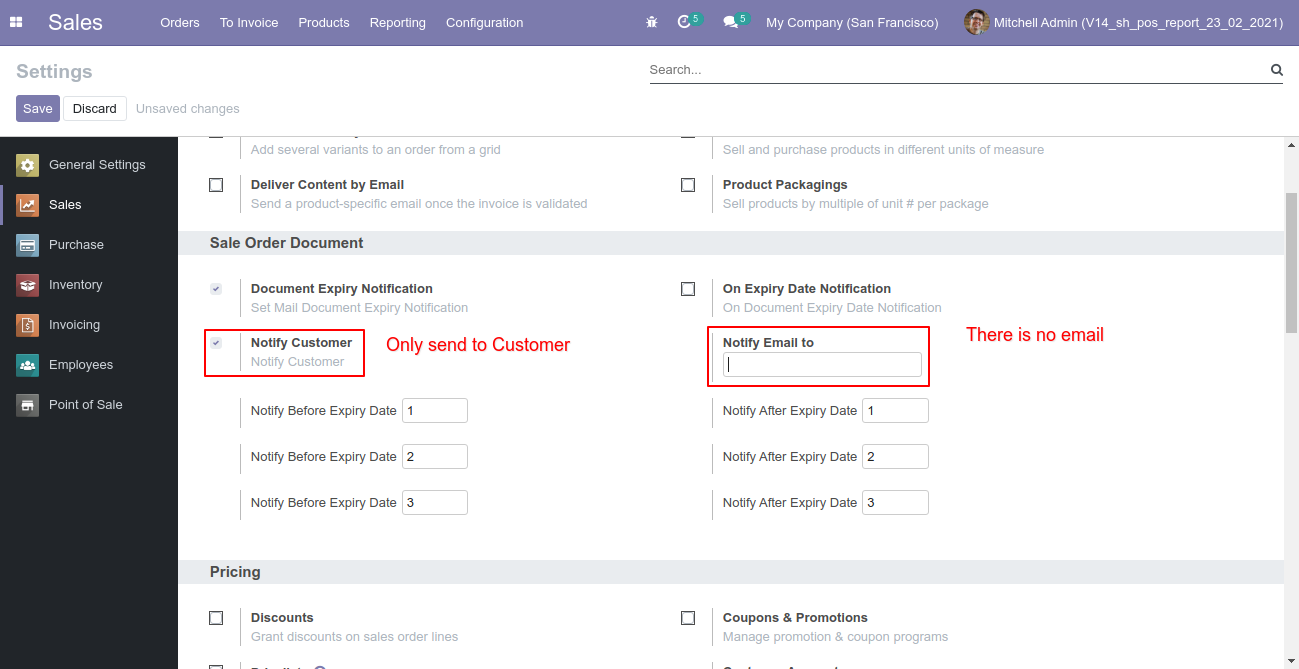
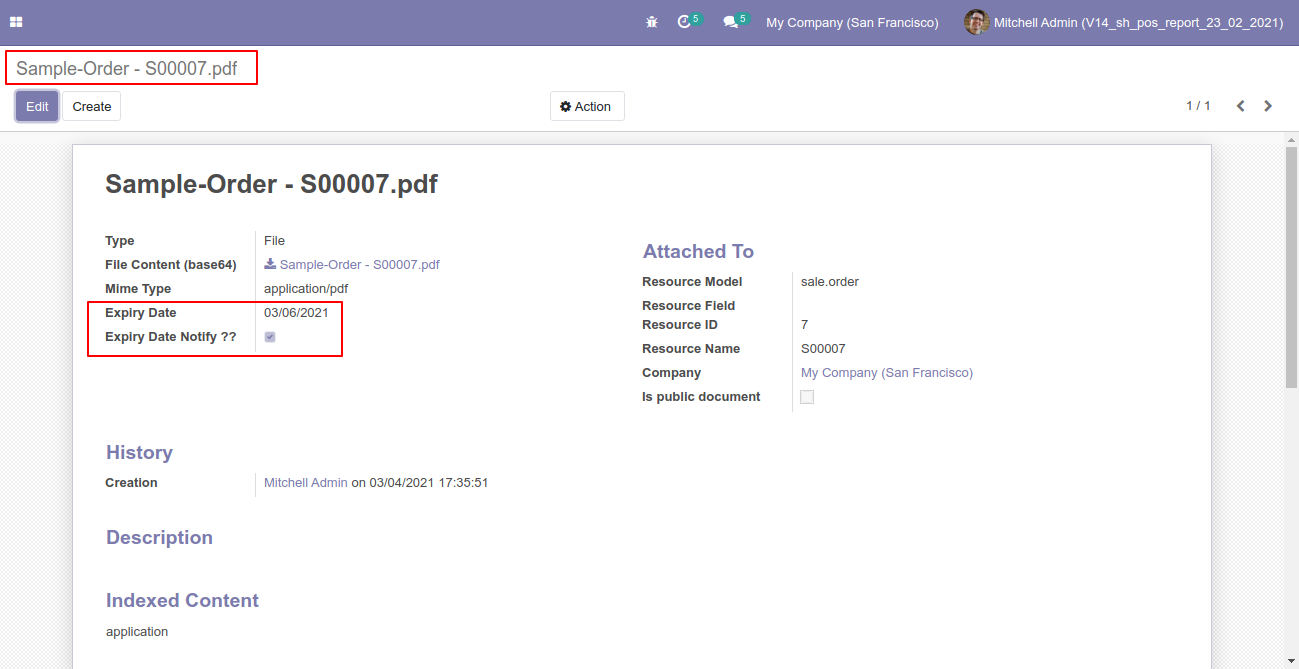
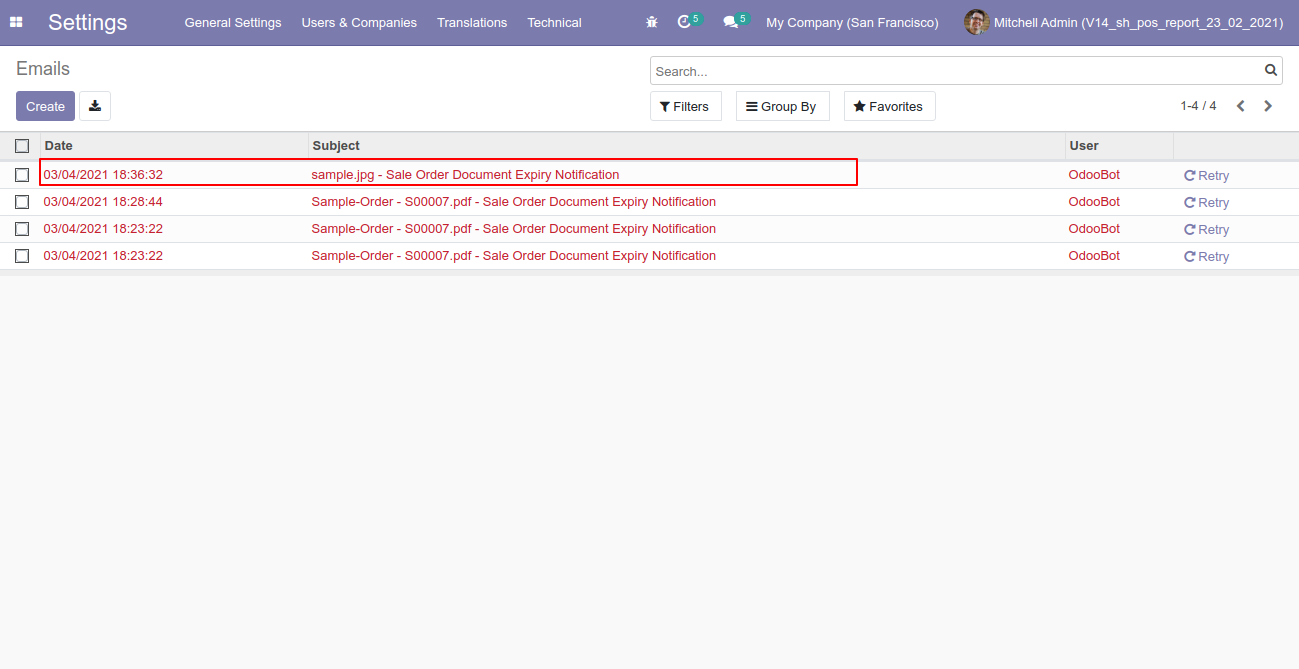
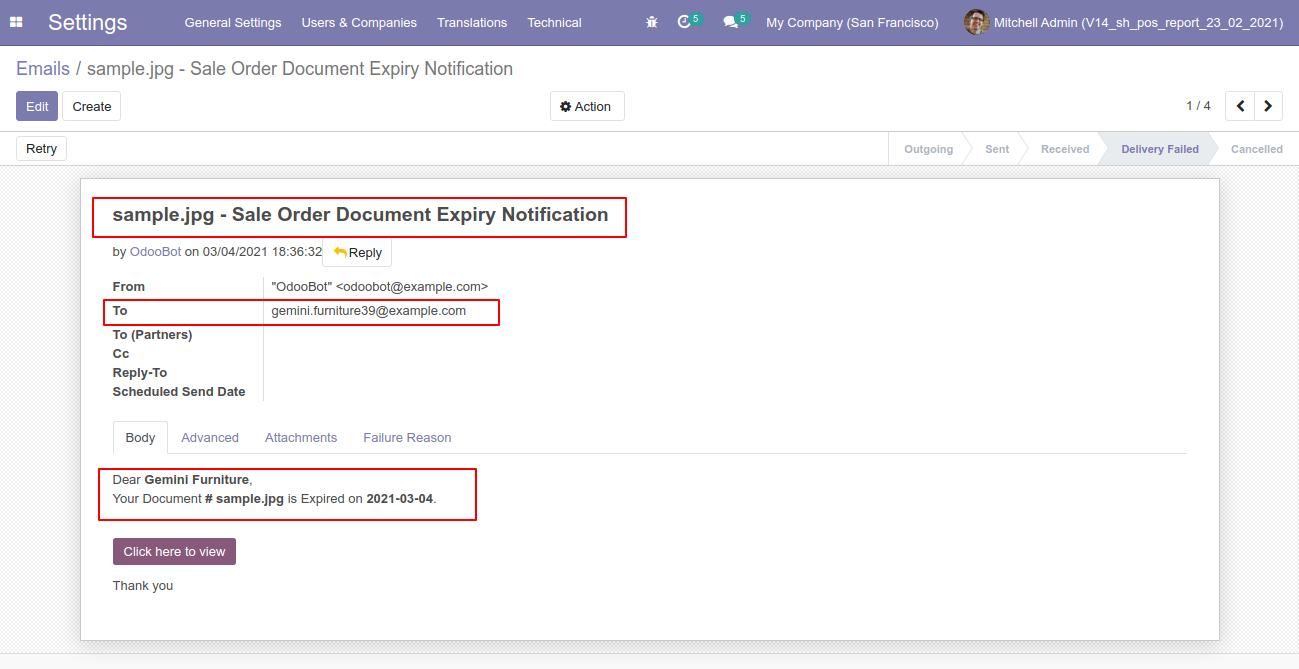
In the document form view tick, the "Expiry Date Notify?" to get expiry date email notification.

You can see the document without download that document.
You can send email notifications to multiple employees using the "Notify Email" option.
You can send the notification manually by modifying scheduled actions.
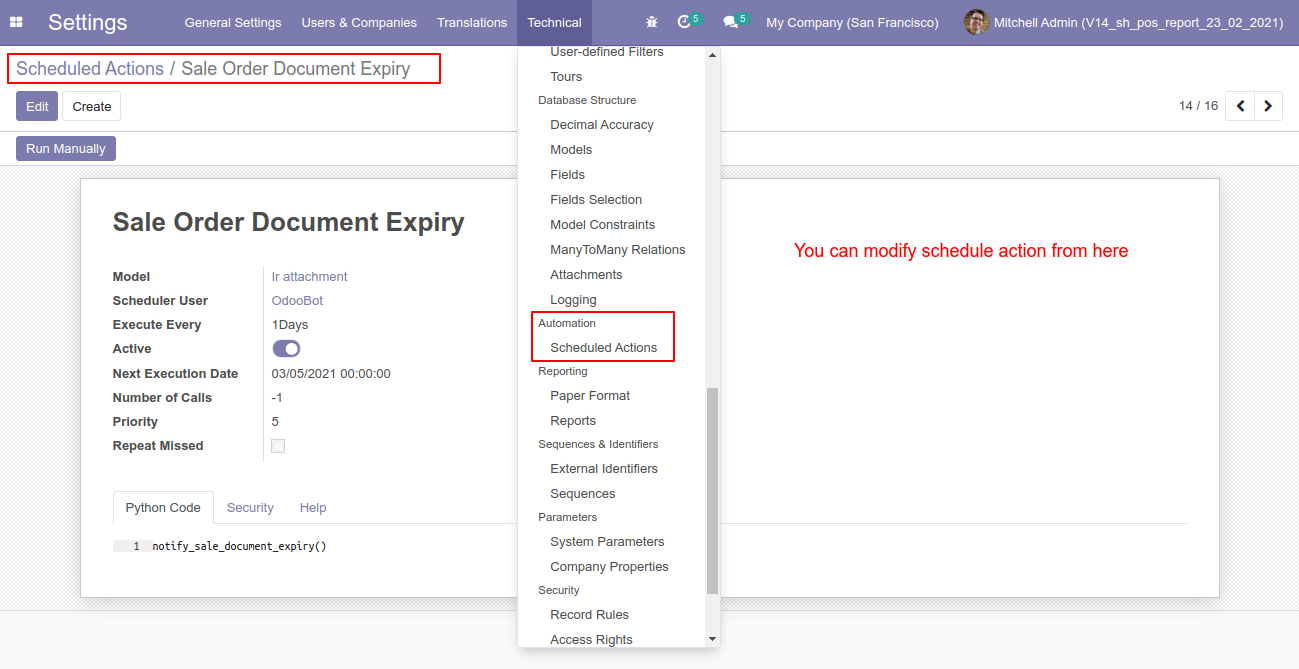
Manually sends email notifications without scheduled actions.
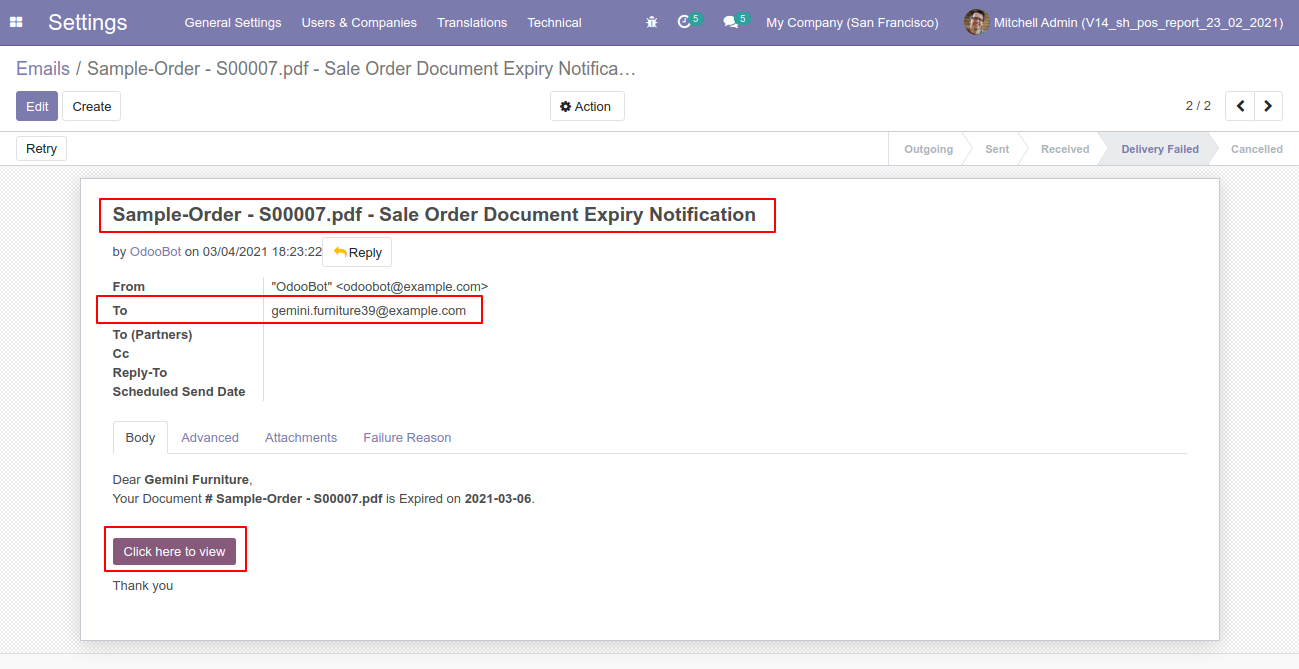
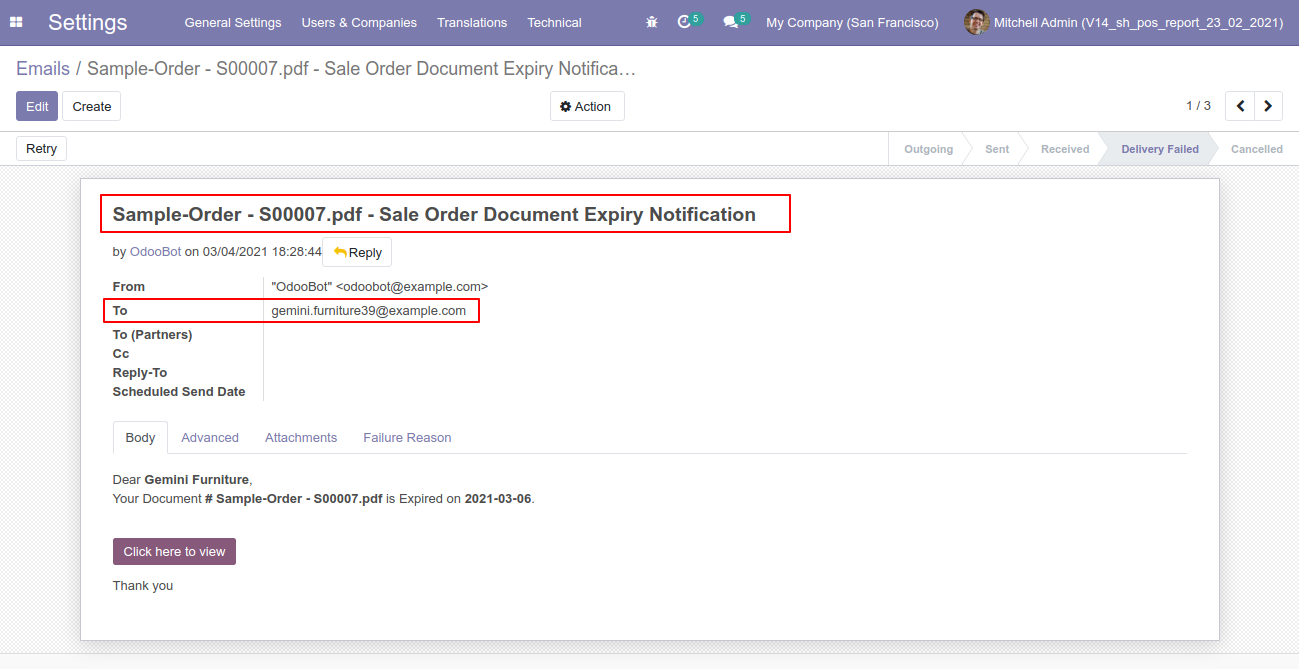
The email notification form view looks like this, you can see the document from here.
You can send multiple employee emails manually also.

Tick the "Notify Customer" to send document expiry notification to the customer only.
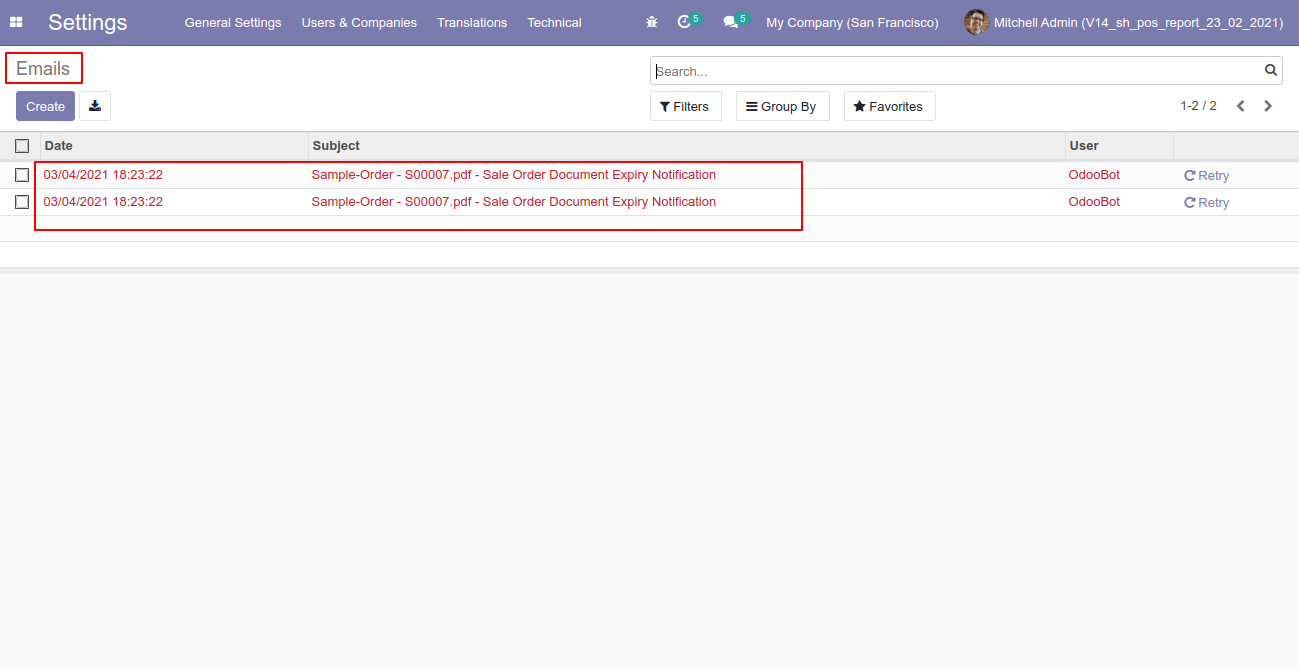
Email notification list view.
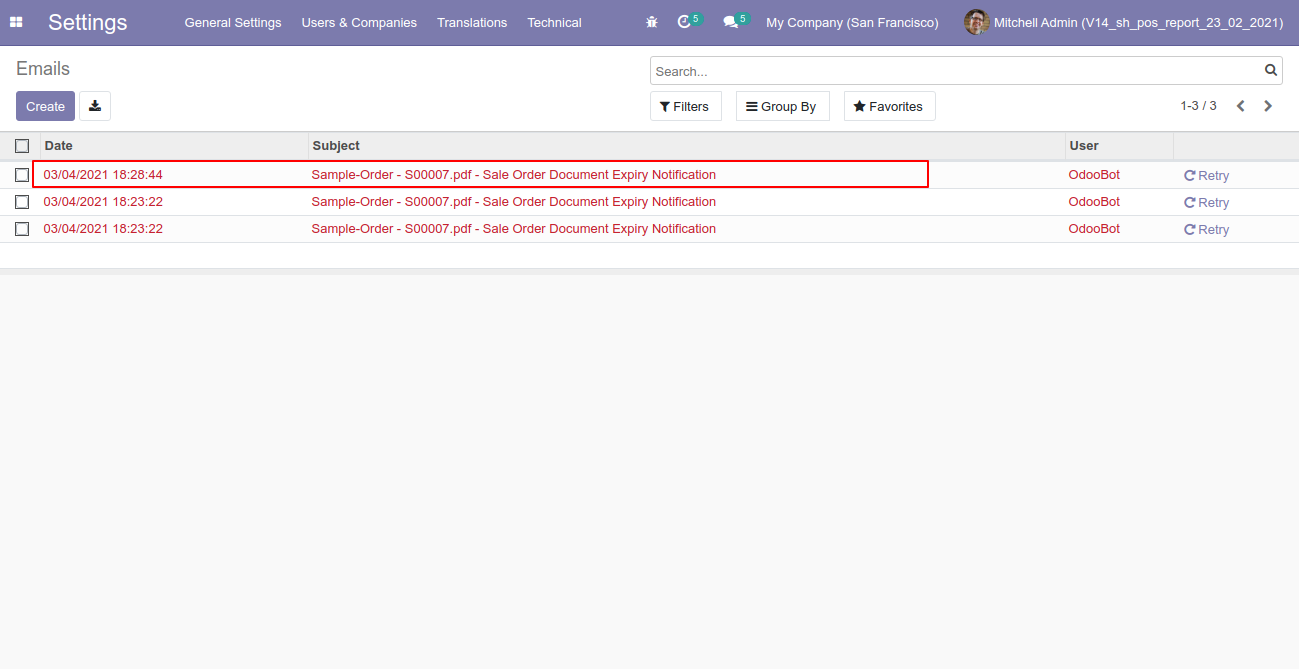
Email notification form view, you can also see the document from here.
You have to tick "Expiry Date Notify?" to get an email notification on the expiry date.
Tick/untick "On Expiry Date Notification" to enable/disable email notification on the expiry date.
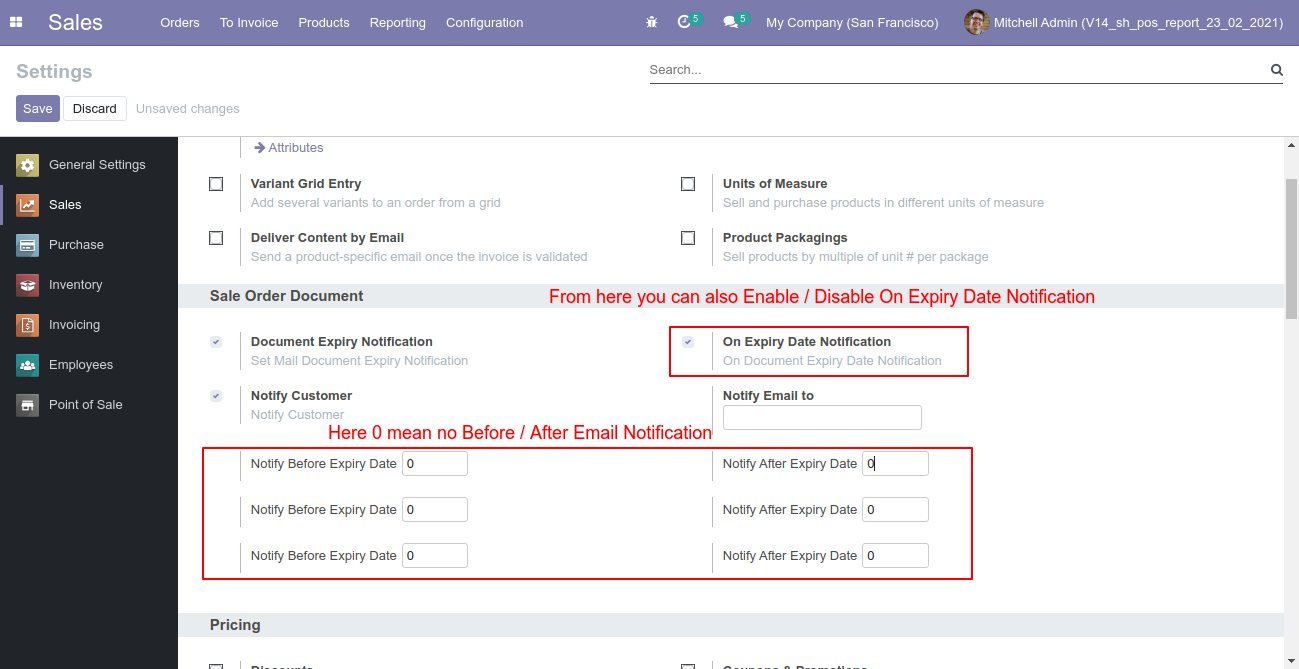
It sends email notifications based on the configuration.
The email notification form view looks like this.
The email notification kanban view looks like this.
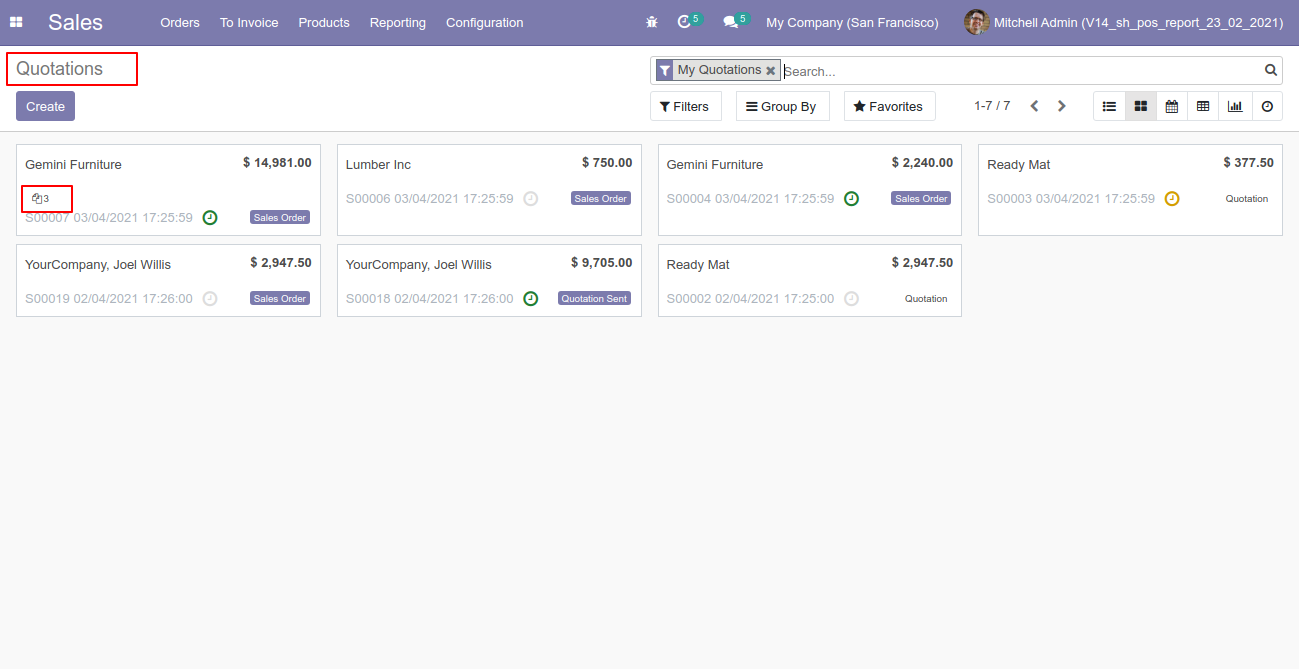
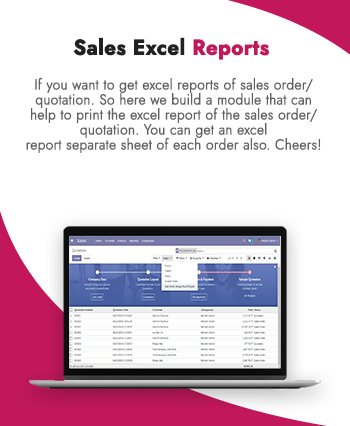
"Sale Order Merge Excel Report" menu, select order from list view which you want to merge or download excel report.
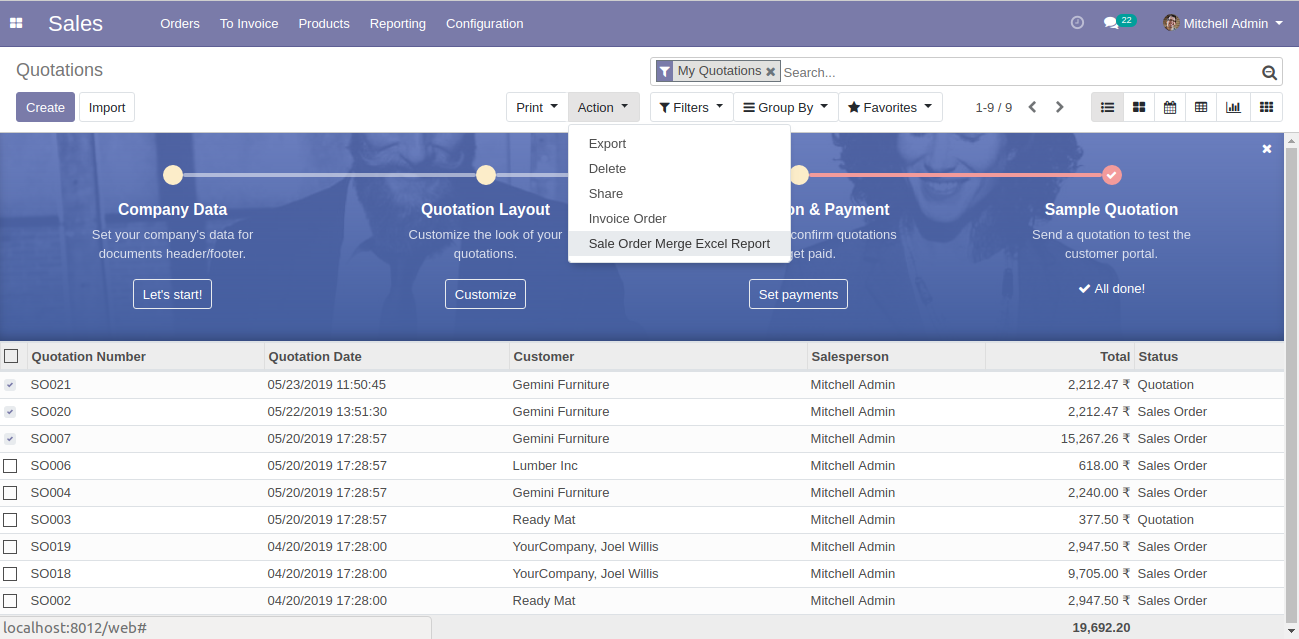
The excel report file with different sales order sheet wise.
Set user rights to enable this functionality.

In settings, Select product fields and attributes that you want to search
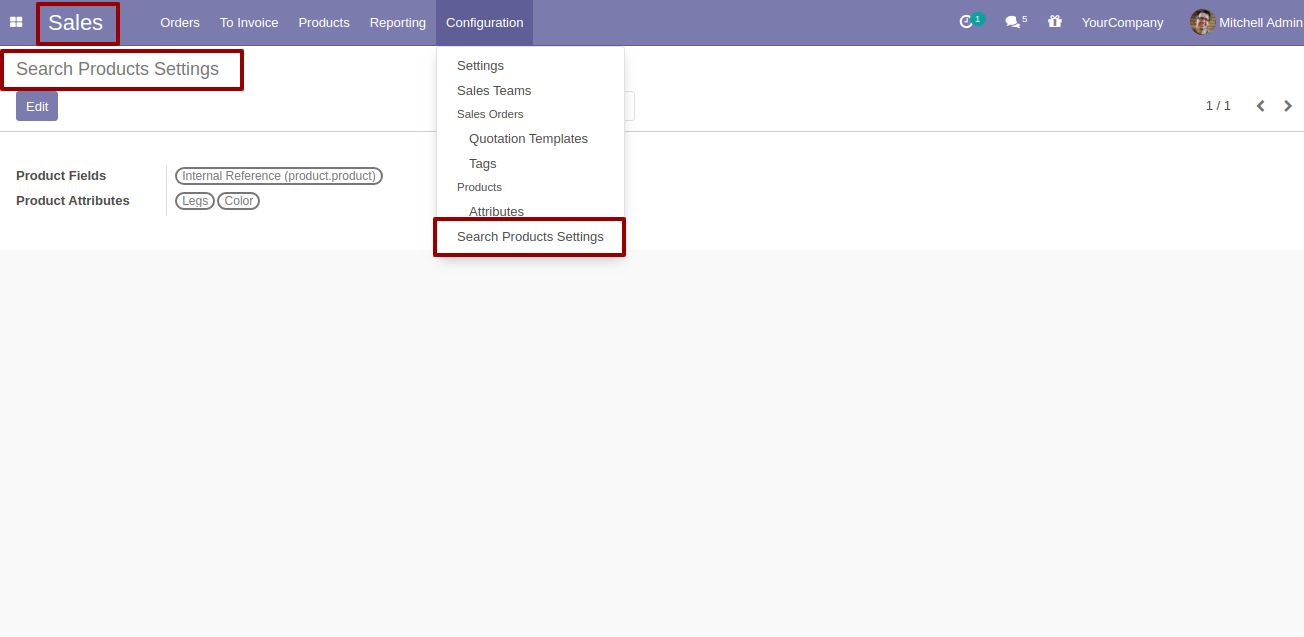
You can select product template and product fields as you want.

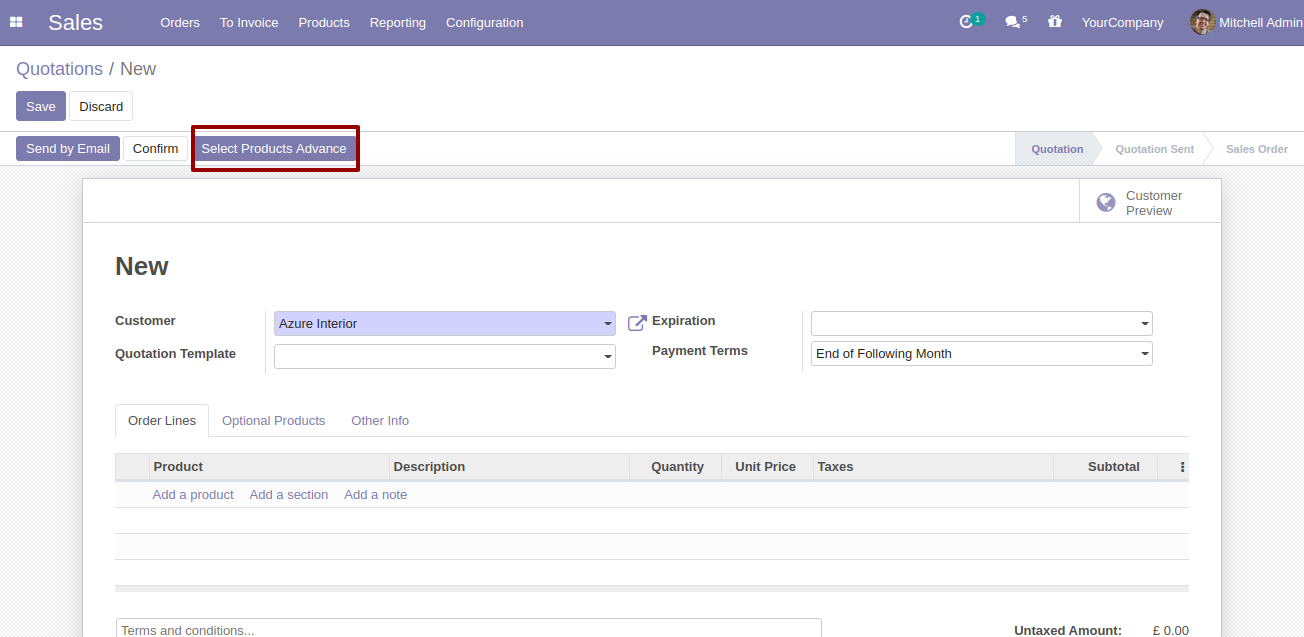
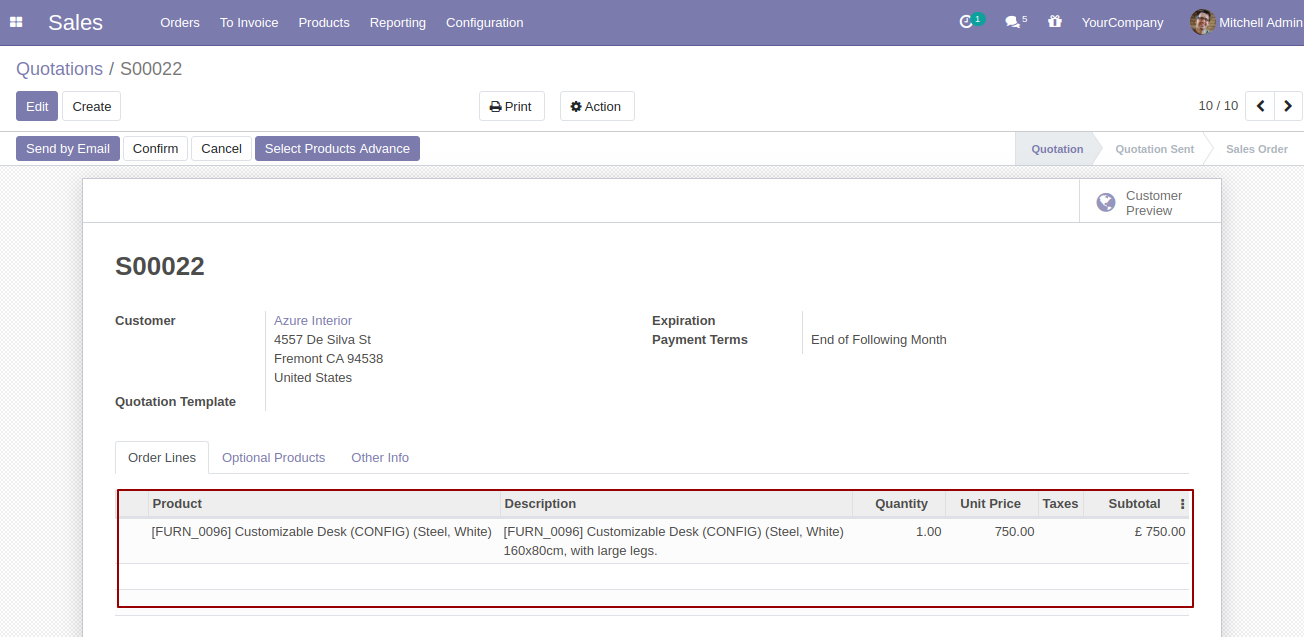
'Select Products Advance' button in Quotation/Sale Order Form View.
When you click 'Select Products Advance' button, wizard will open that looks like below. Wizard contains all the fields and attribute that you selected in settings, related comparison operators and Filter button, Reset button.
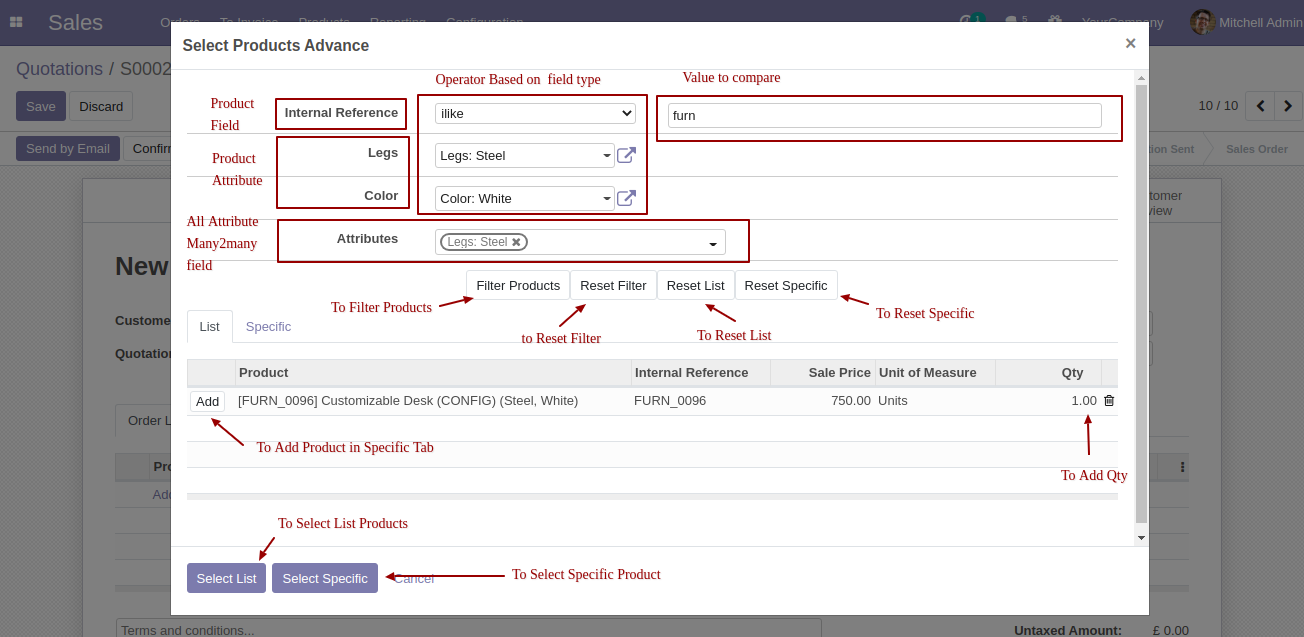
When you click 'Select List' or 'Select Specific' button in wizard, All the products and it's qty automatic add in sale order line from List or Specific tab of wizard.
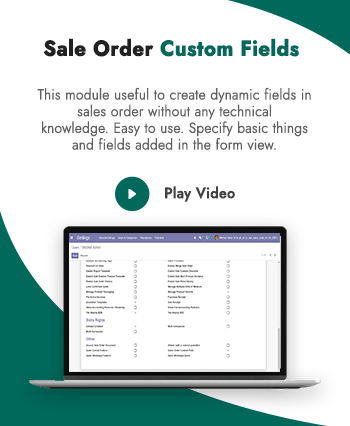
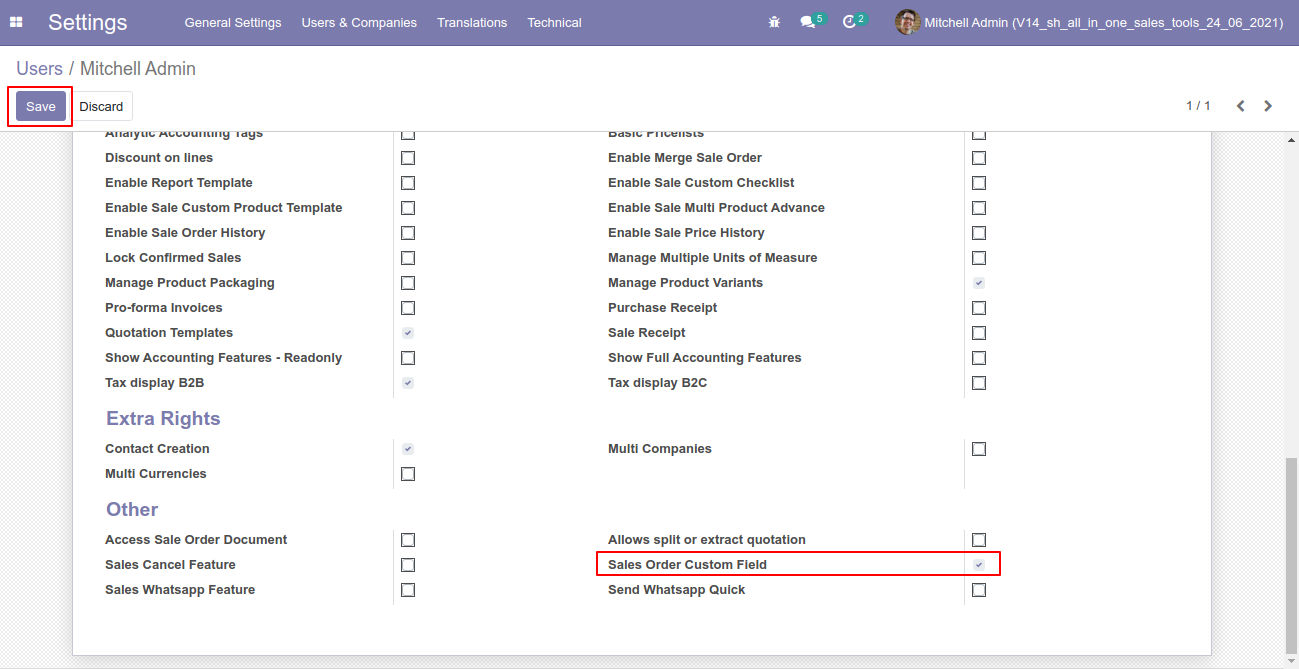
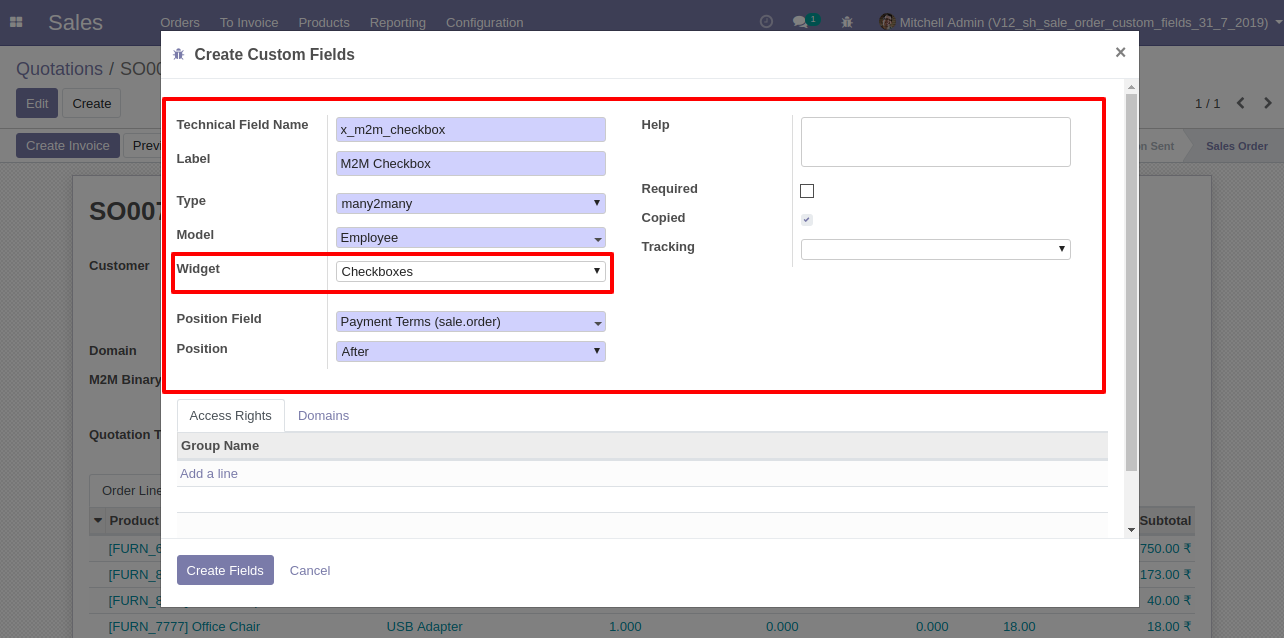
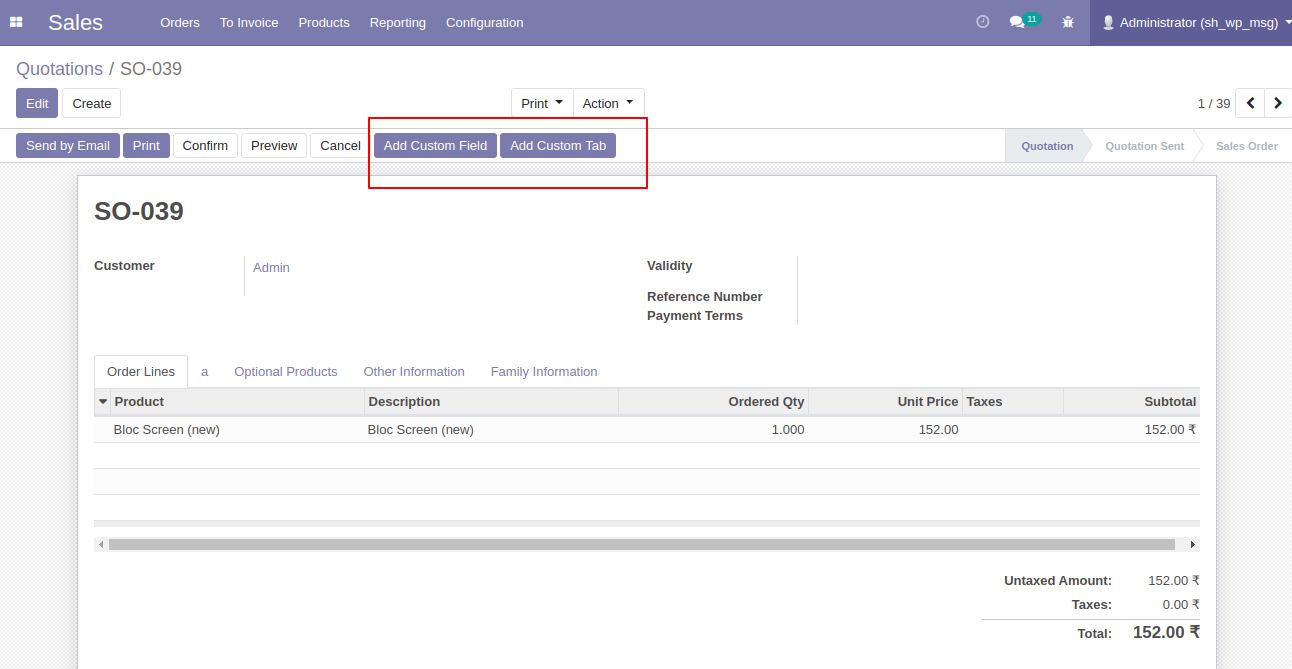
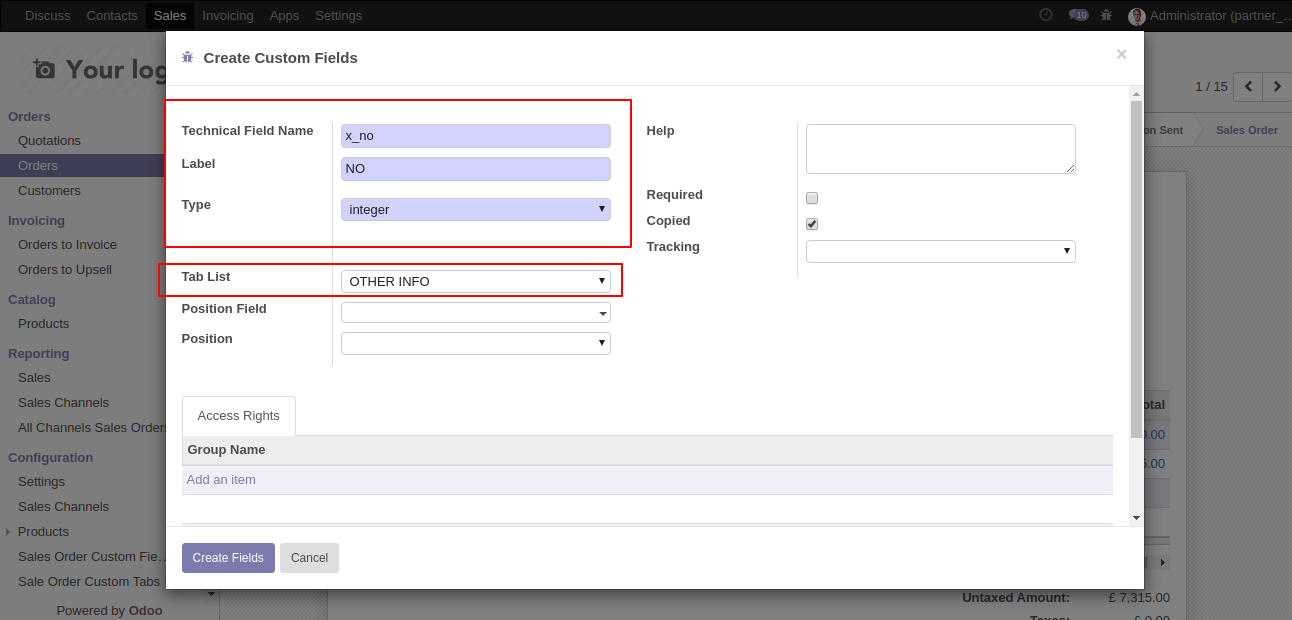
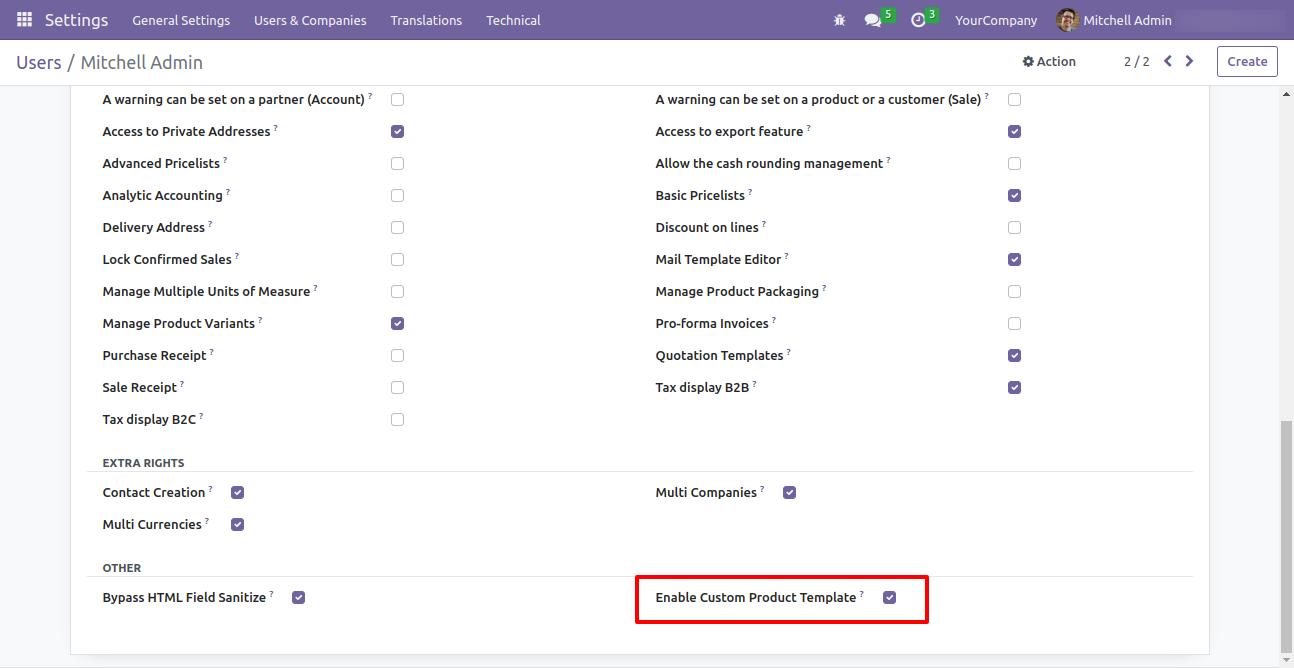
Set User rights to allow add custom field inside sale order.
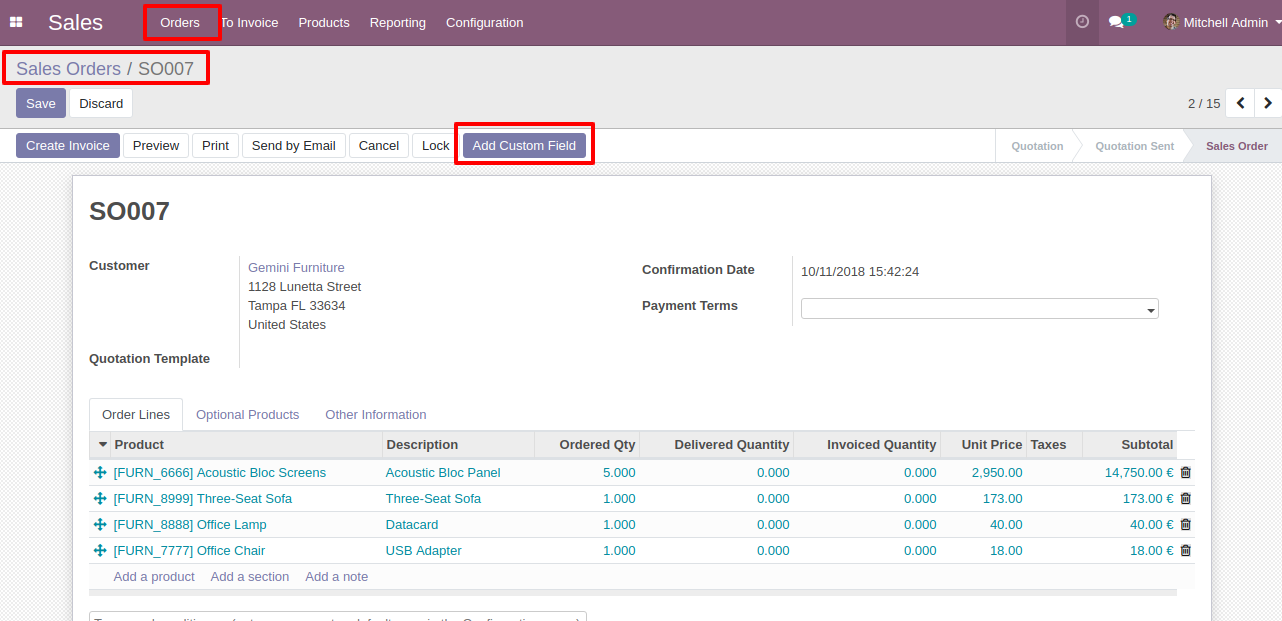
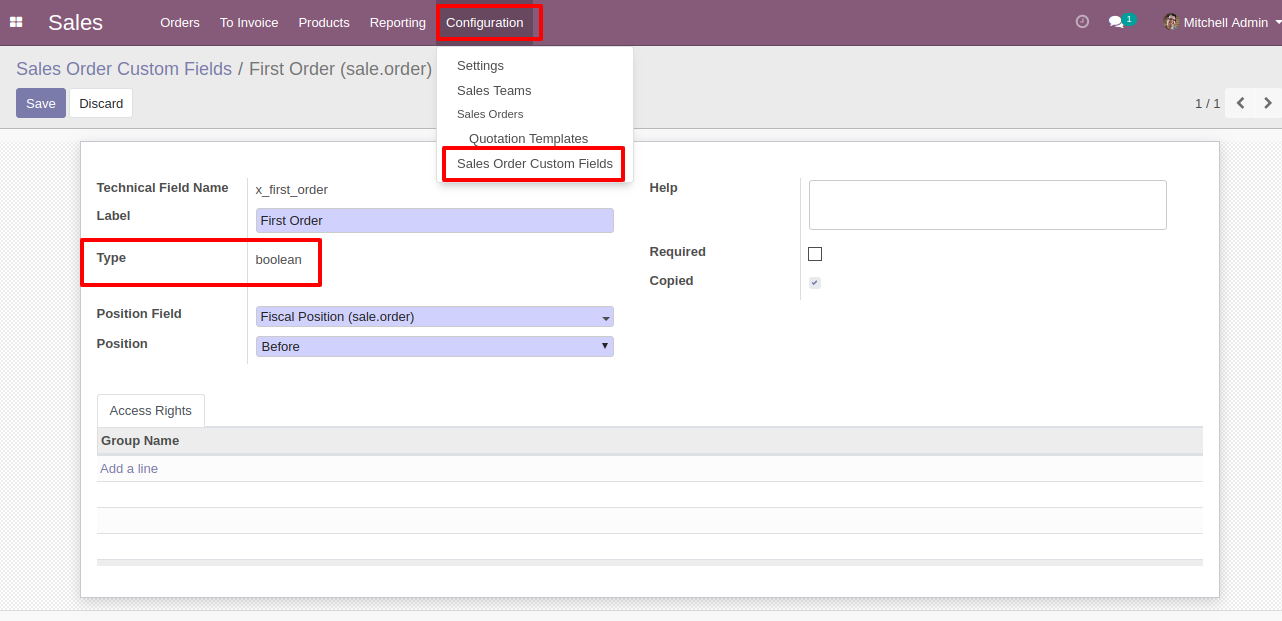
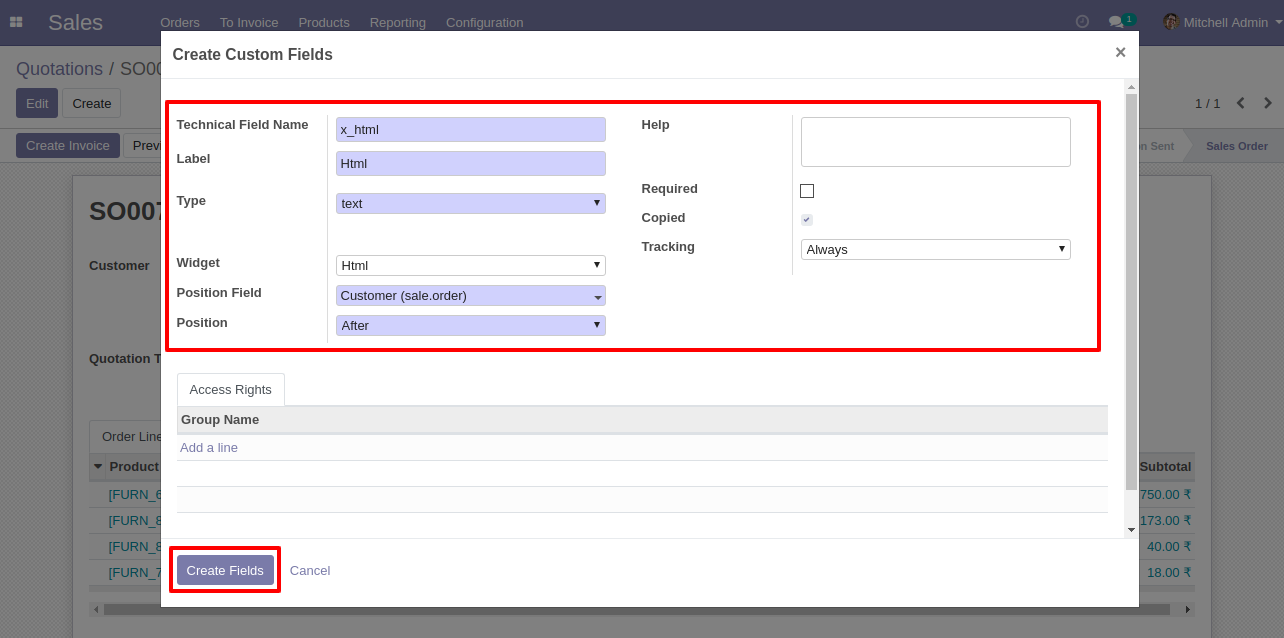
Click on "Add Custom Field" to add the new field inside the sale order form.
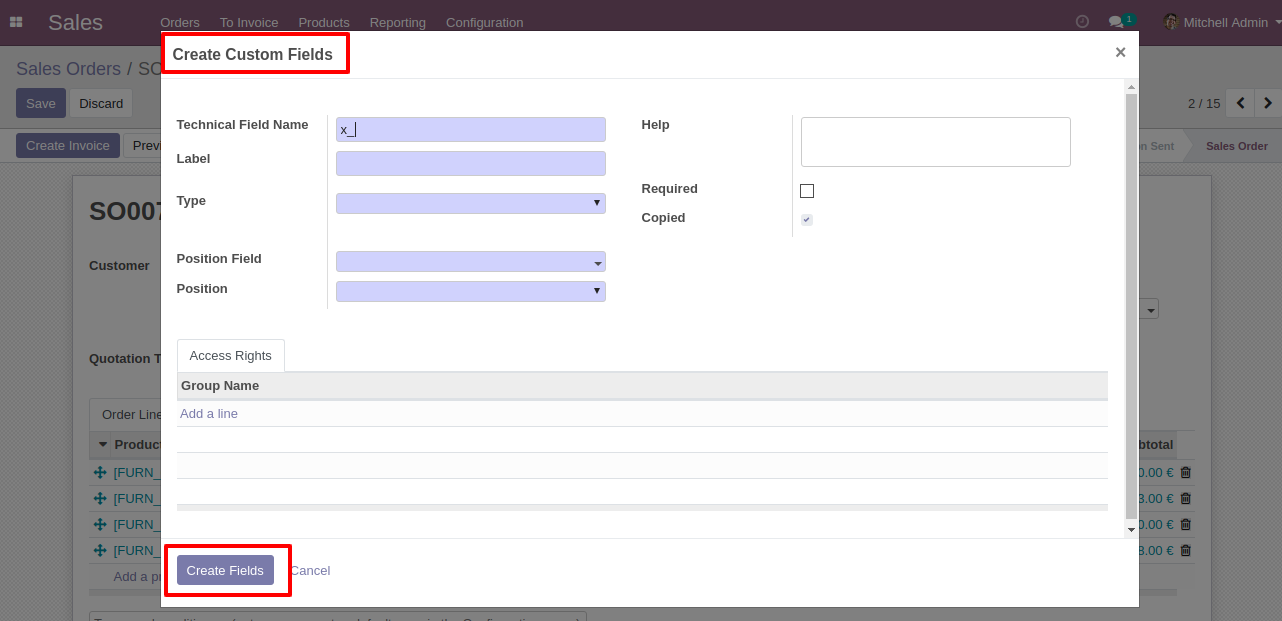
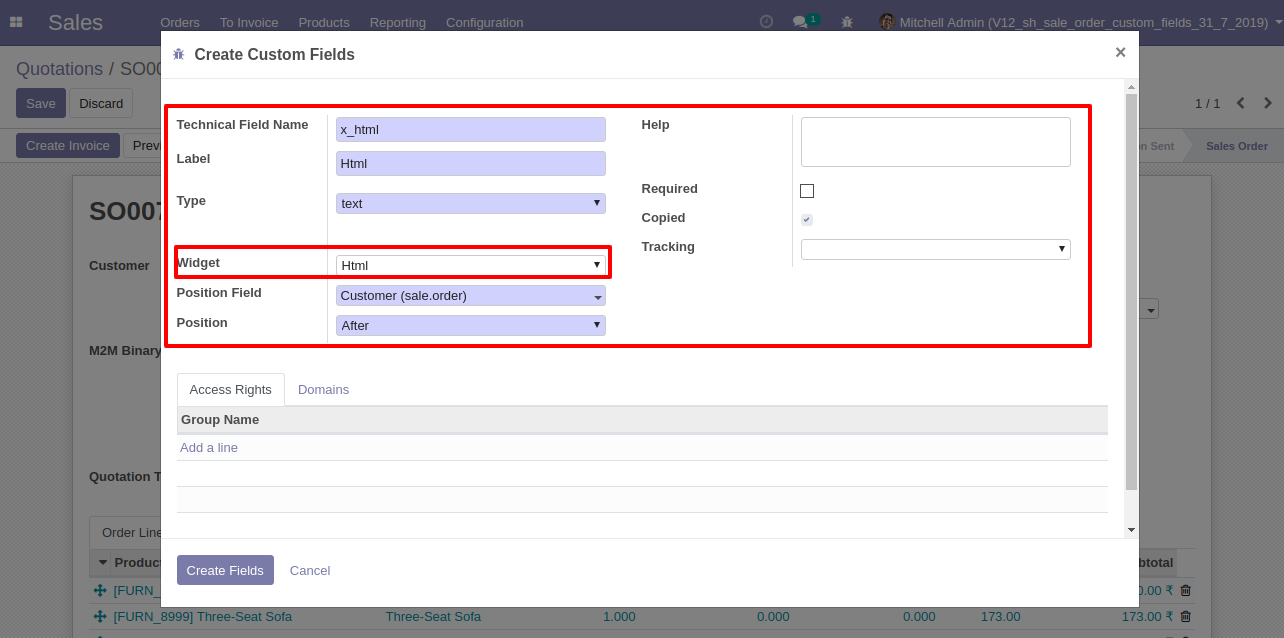
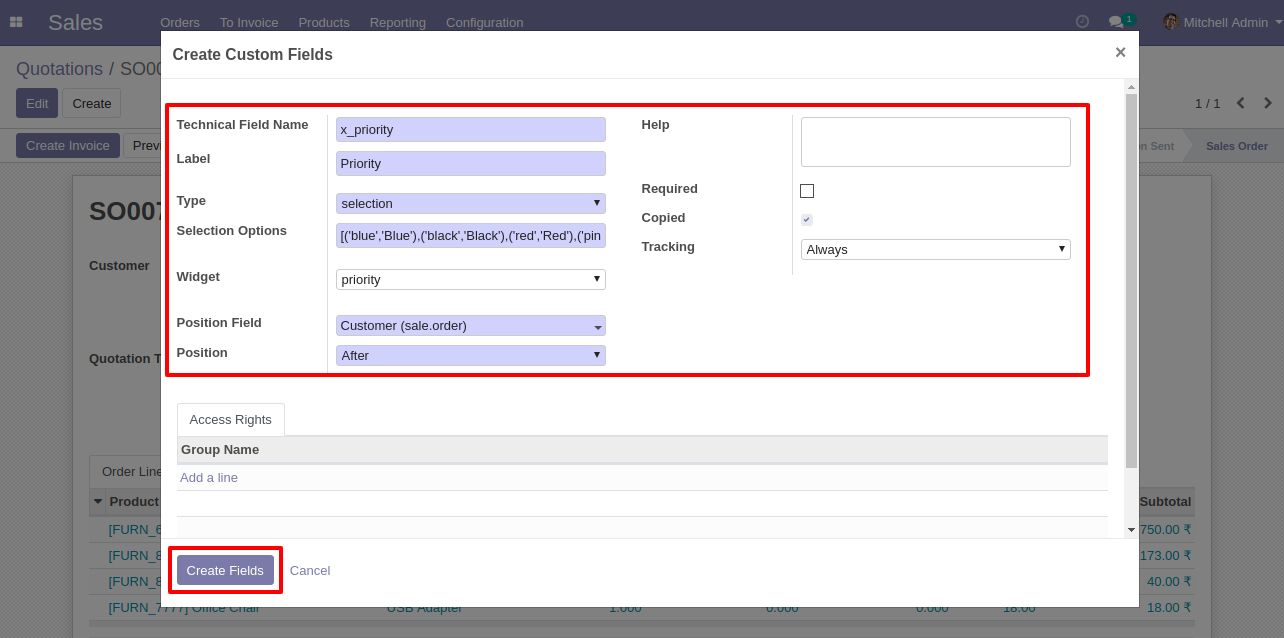
Assign Field Id, Label, Type,Position Field Name, Position,Field Help,Set Required or not,field copy or not, and Set Field Access Rights group wise into Pop Up and click on "Create Field" button.
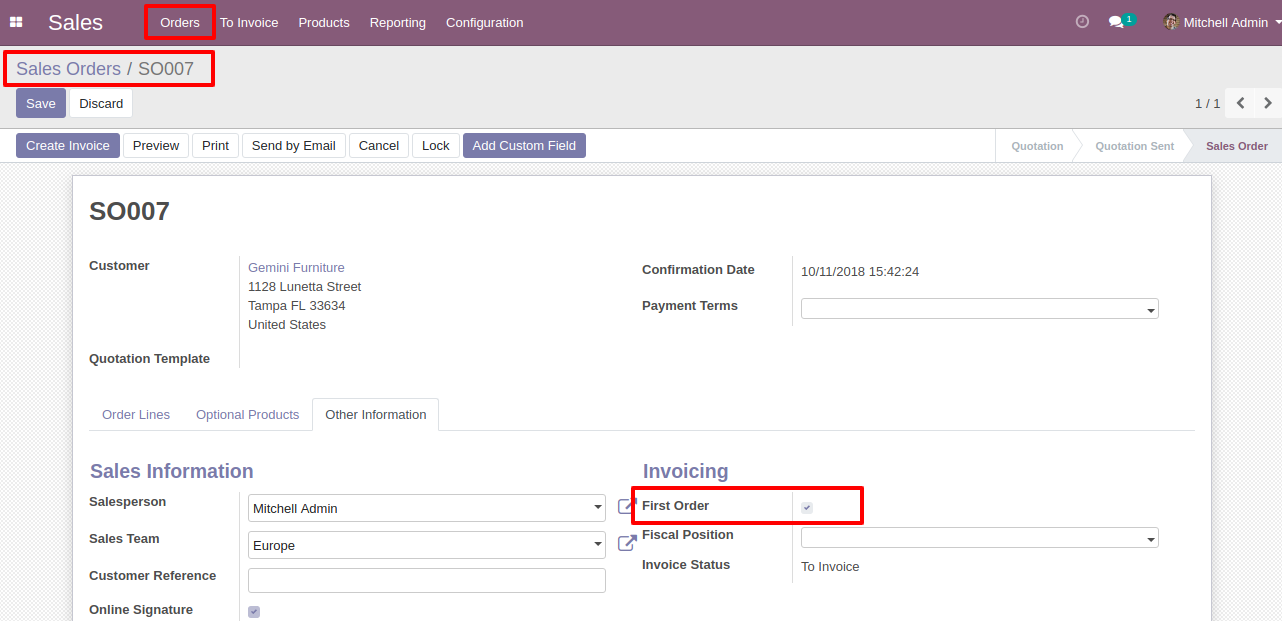
The Boolean field created.
Boolean field added to the sale order.
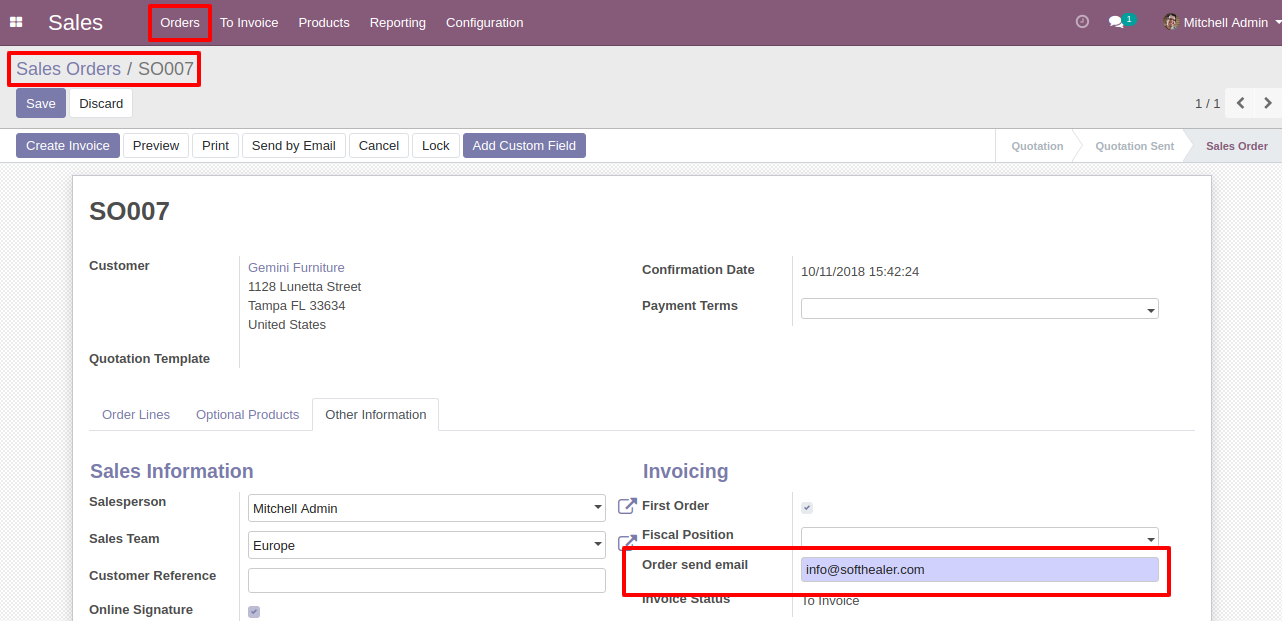
Char field with widget "email" and required set to "True".
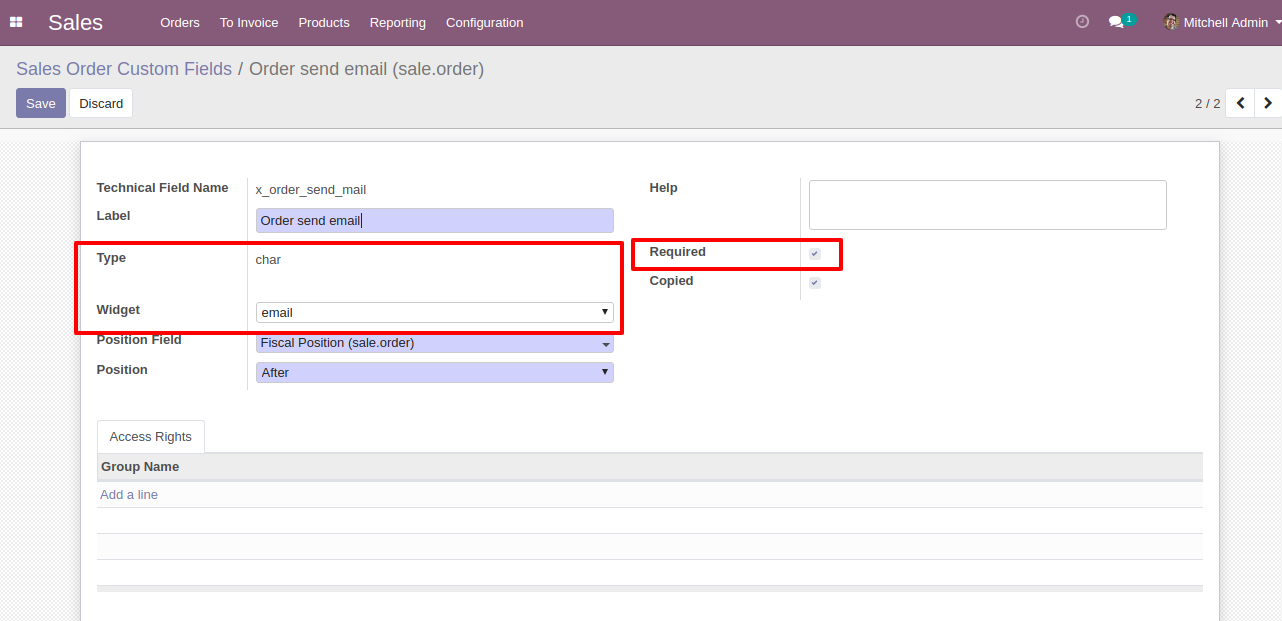
Field added to the sale order,must enter email to save.
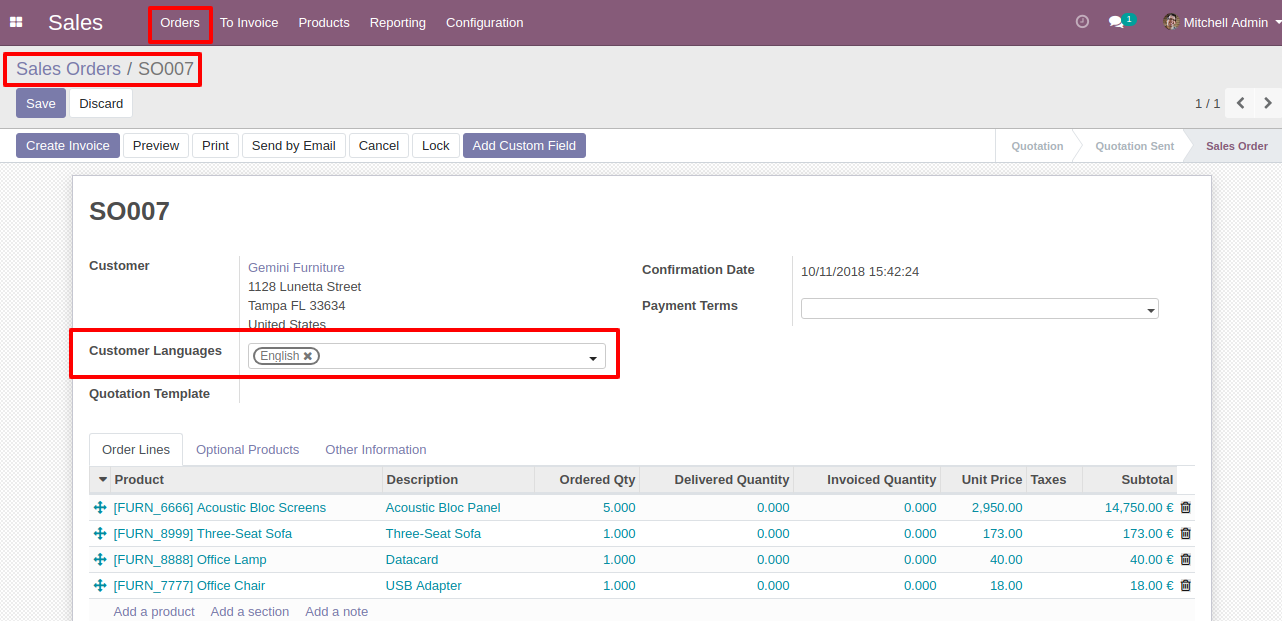
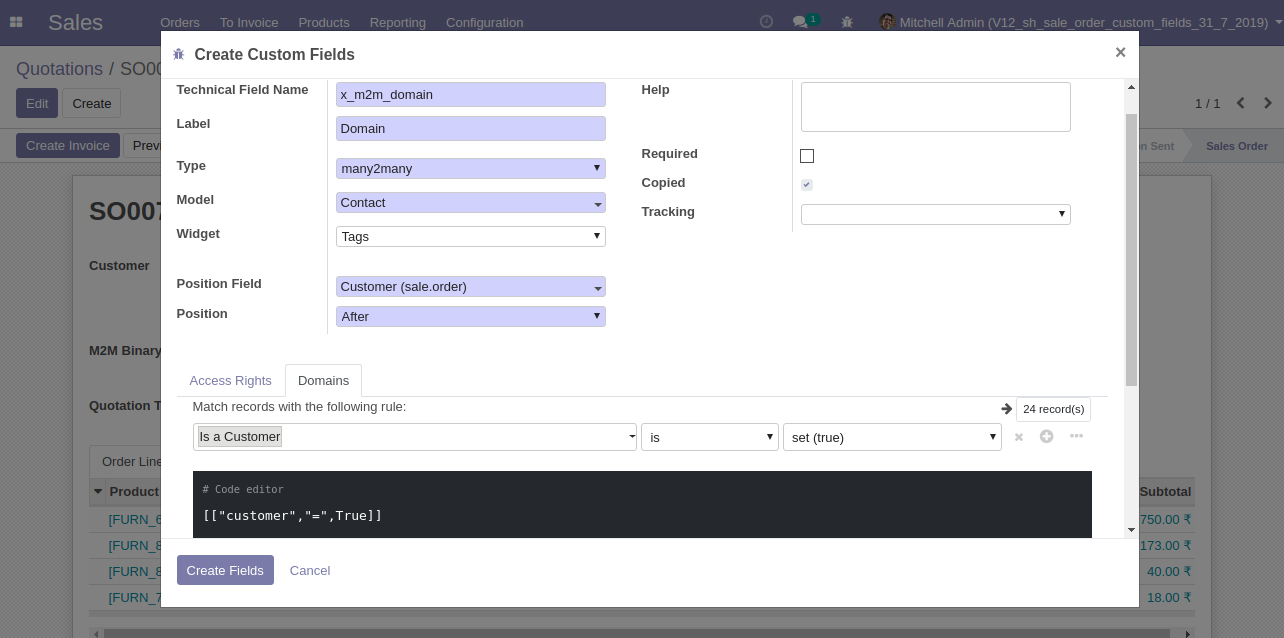
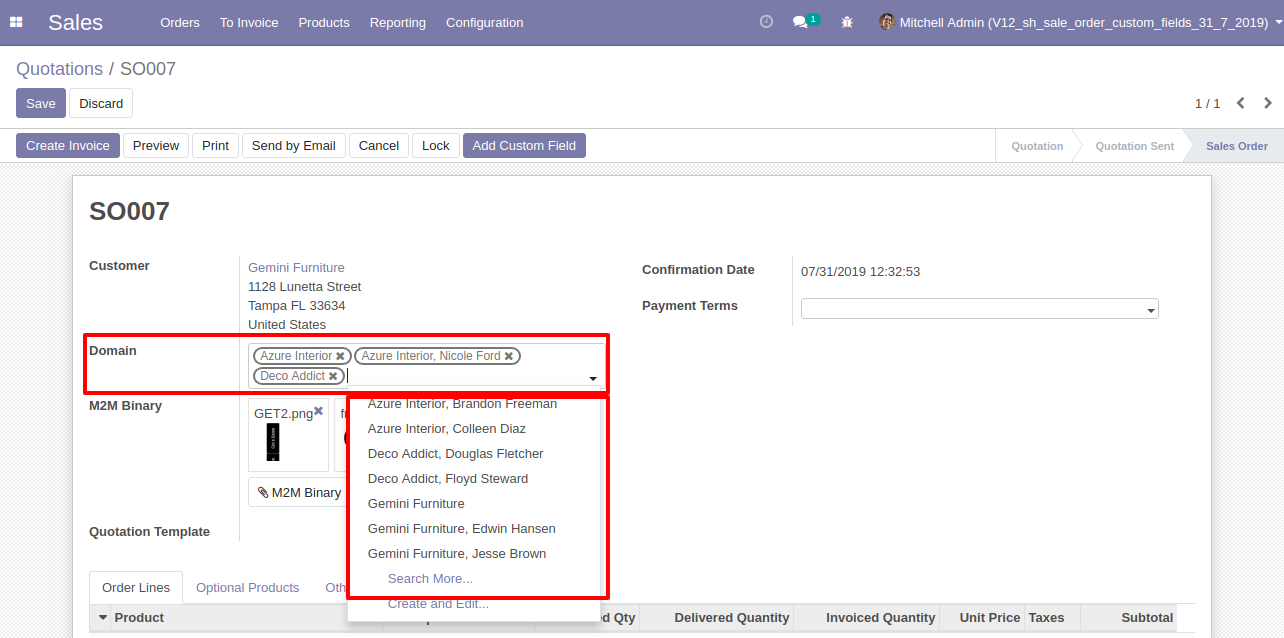
Many to many field with select appropriate model and "Tags" widget.
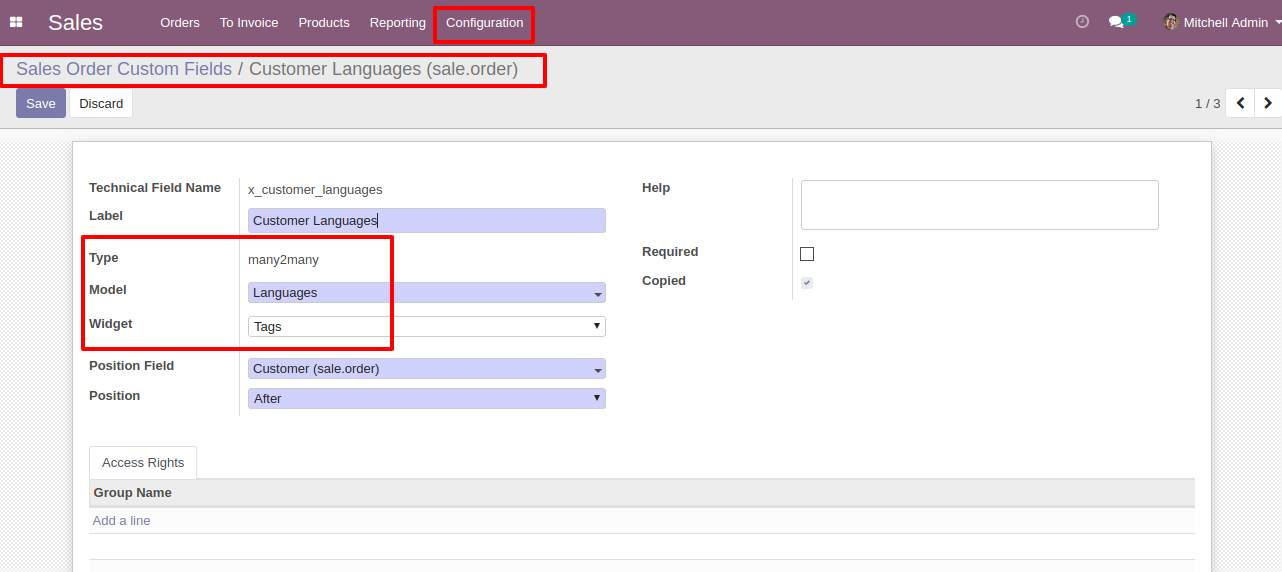
Select value from the model.
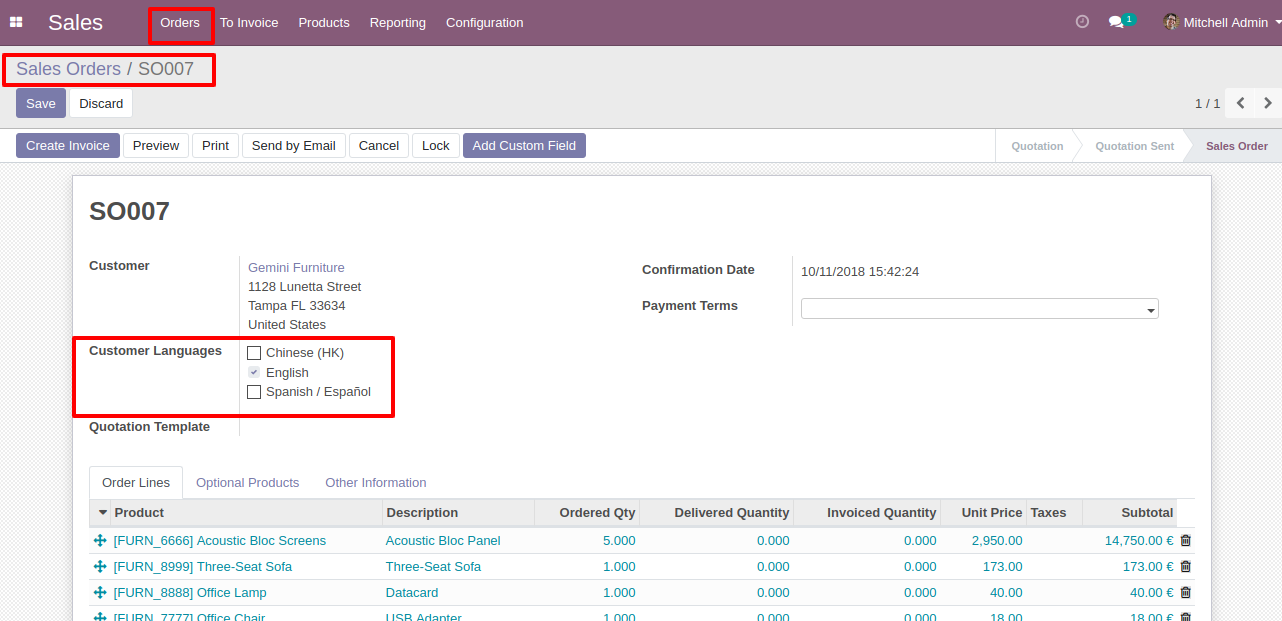
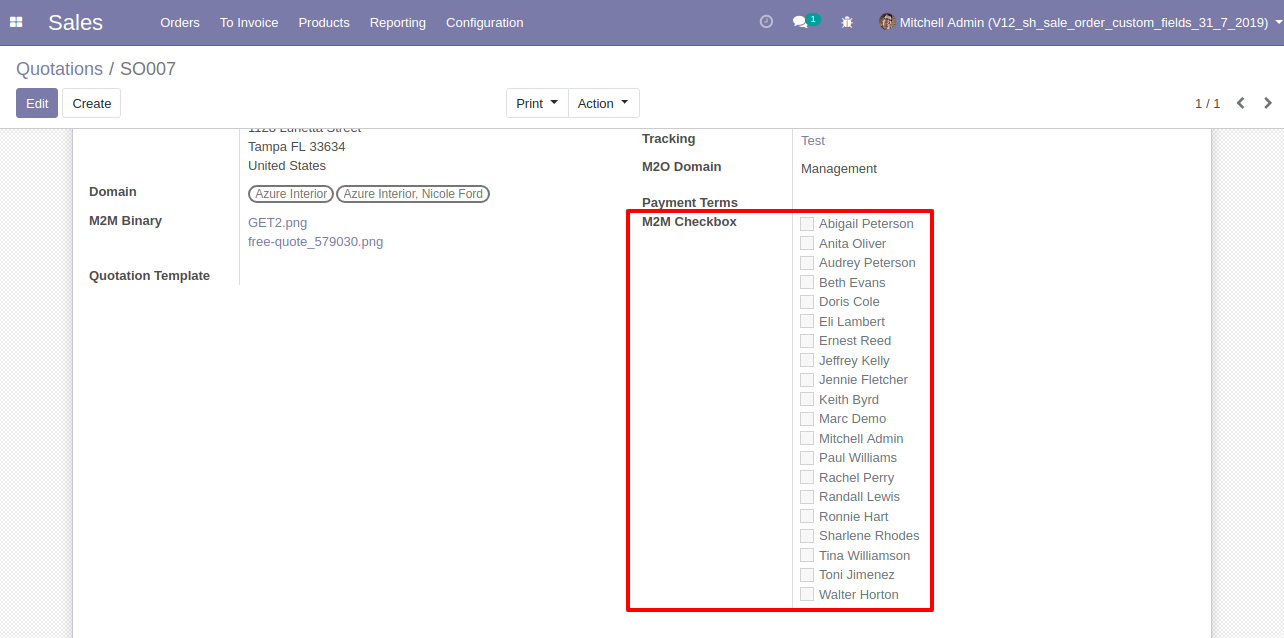
Many to many field when widget set to "checkboxes".
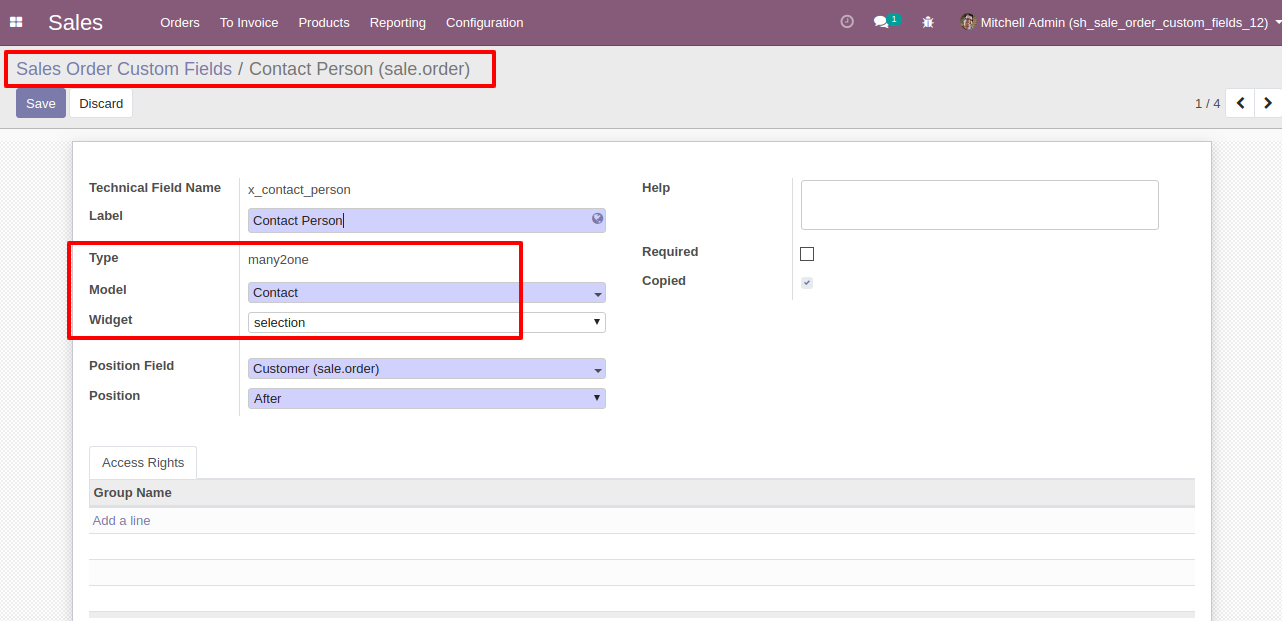
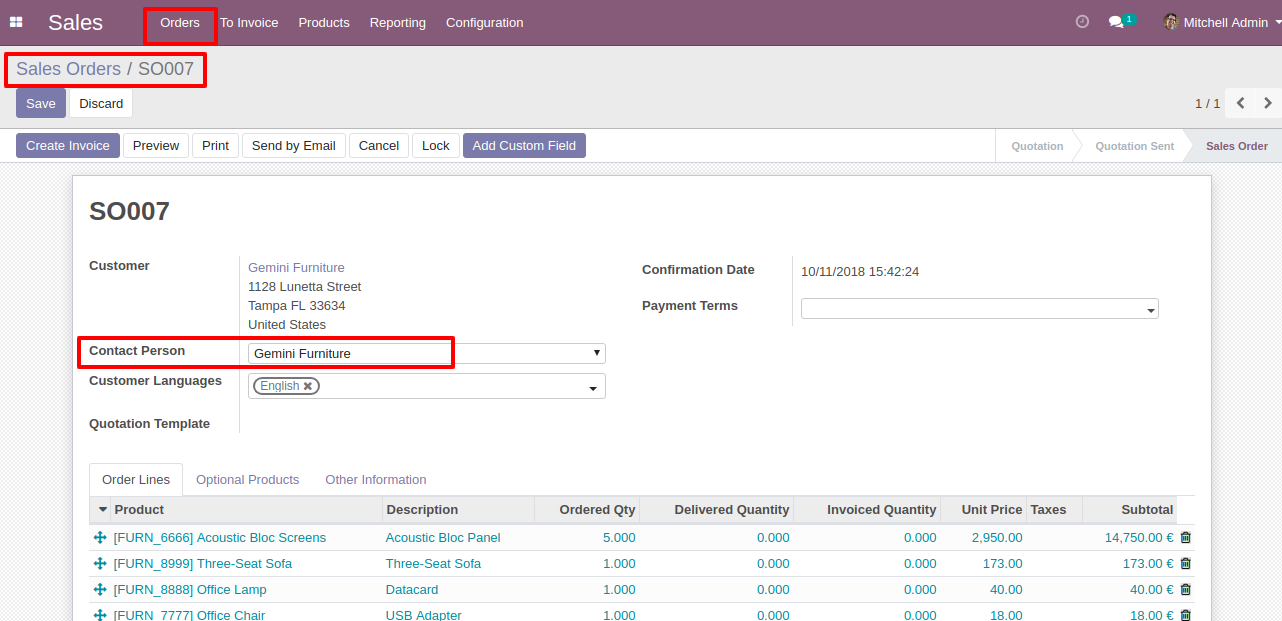
Many to one field with select model and widget set to "selection".
Many to one field set on sale order.
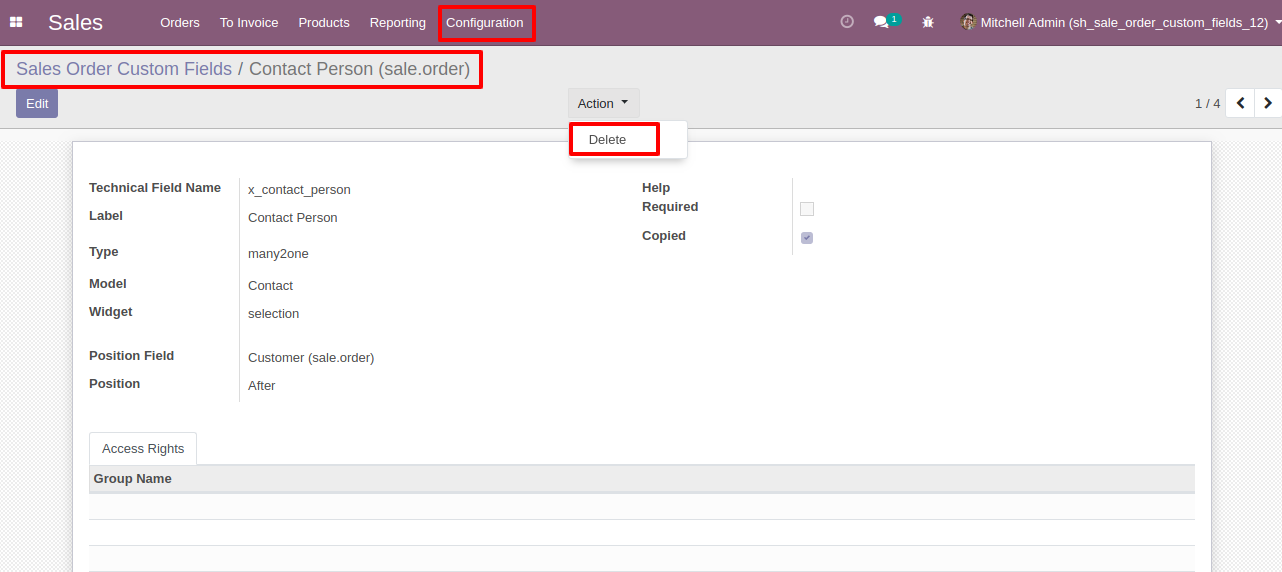
From custom field menu on Delete action custom field can be deleted.
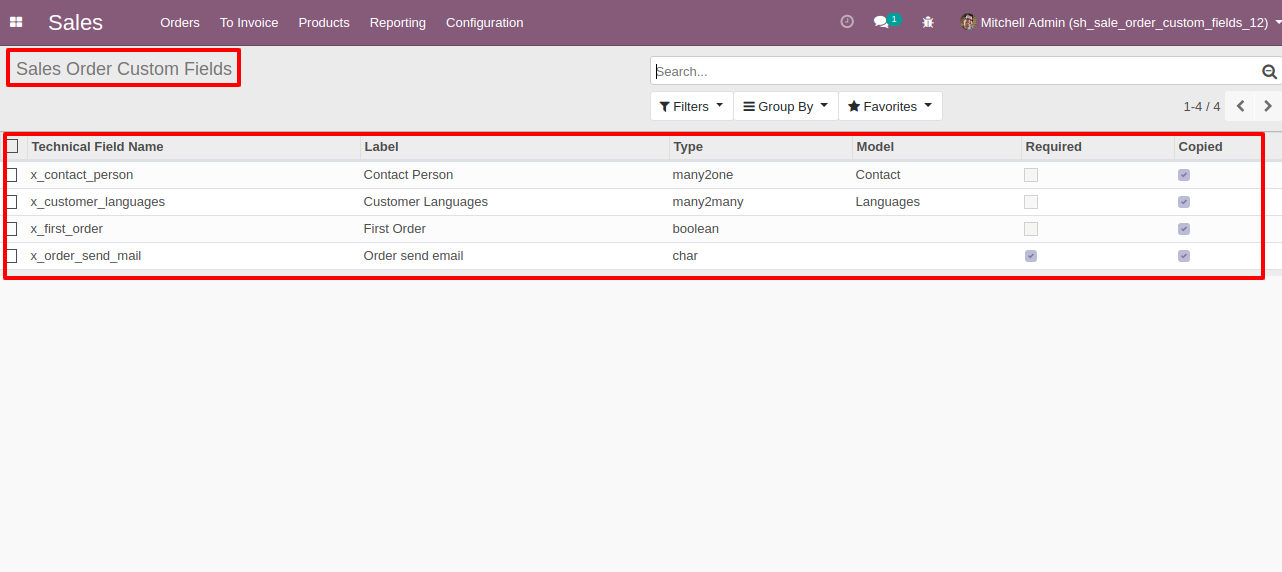
Custom field created for sale order.
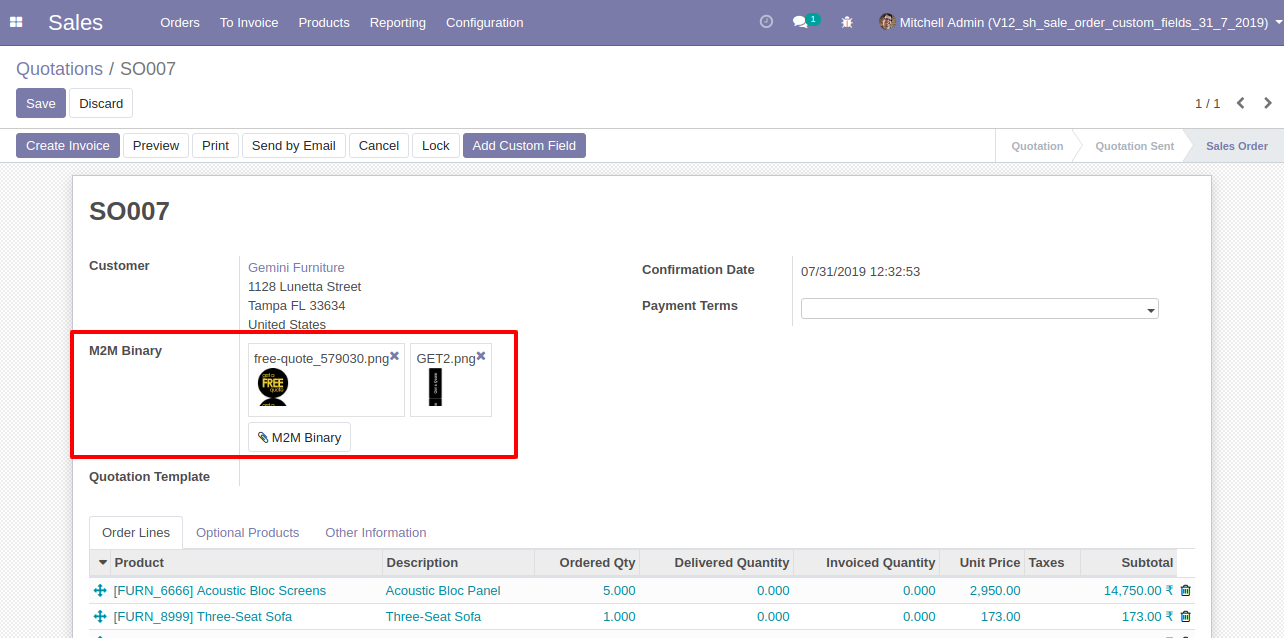
Many to many: Binary widget added (Binary widget useful to give more than 1 one attachements).

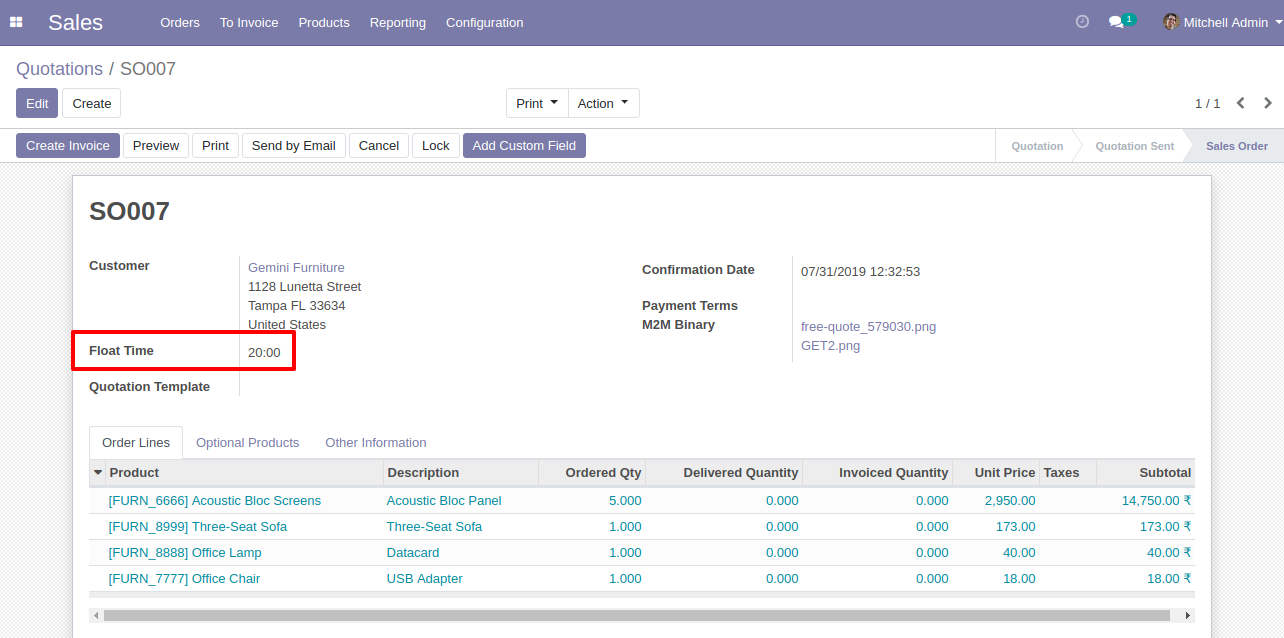
Float: Float time widget added to track time (hours:minutes).

Text: Html widget added which will be useful to get html interface on text field.
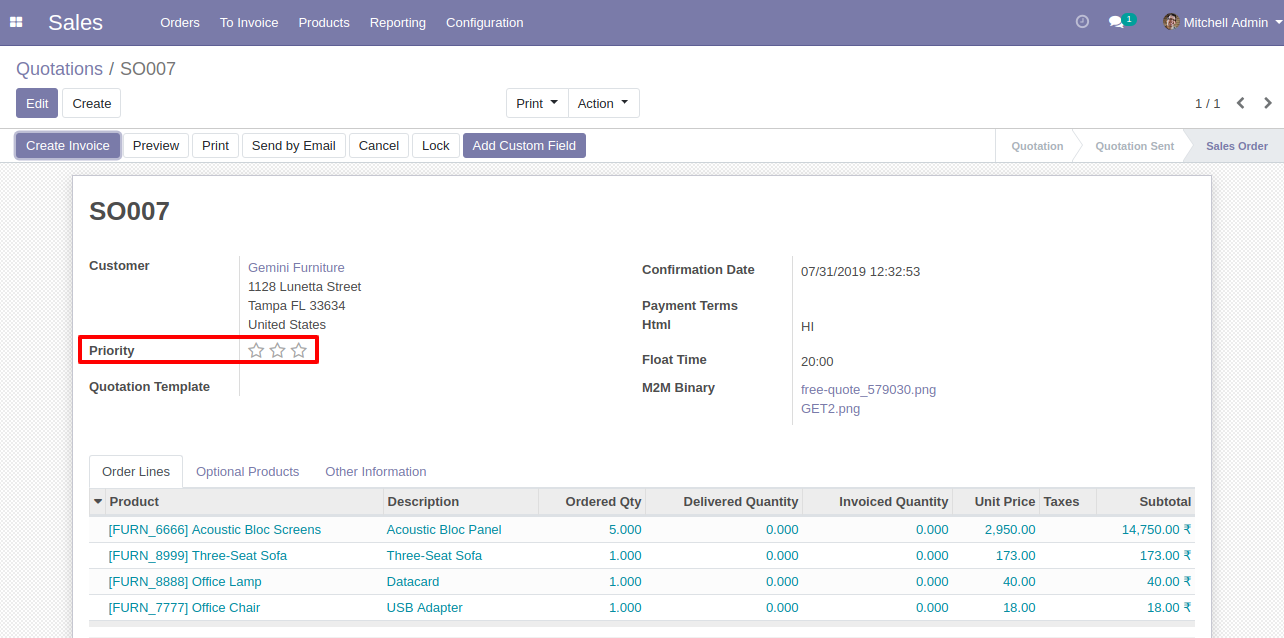
Priority: This feature added to add priority view.
Domain Many to many: This feature added for many2many fields. this will help you to filter records of selected model. lets say you have selected contacts model and you want to filter only customers. so you can easily do using this feature.

After you click "Add filter" button, it will show you as like below,Add Domain as shown below.
Many to many field output look like below.
Domain Many to one: This feature added for many2one fields. this will help you to show records of selected model. lets say you have selected contacts model and you want to show only contact of management department. so you can easily do using this feature.
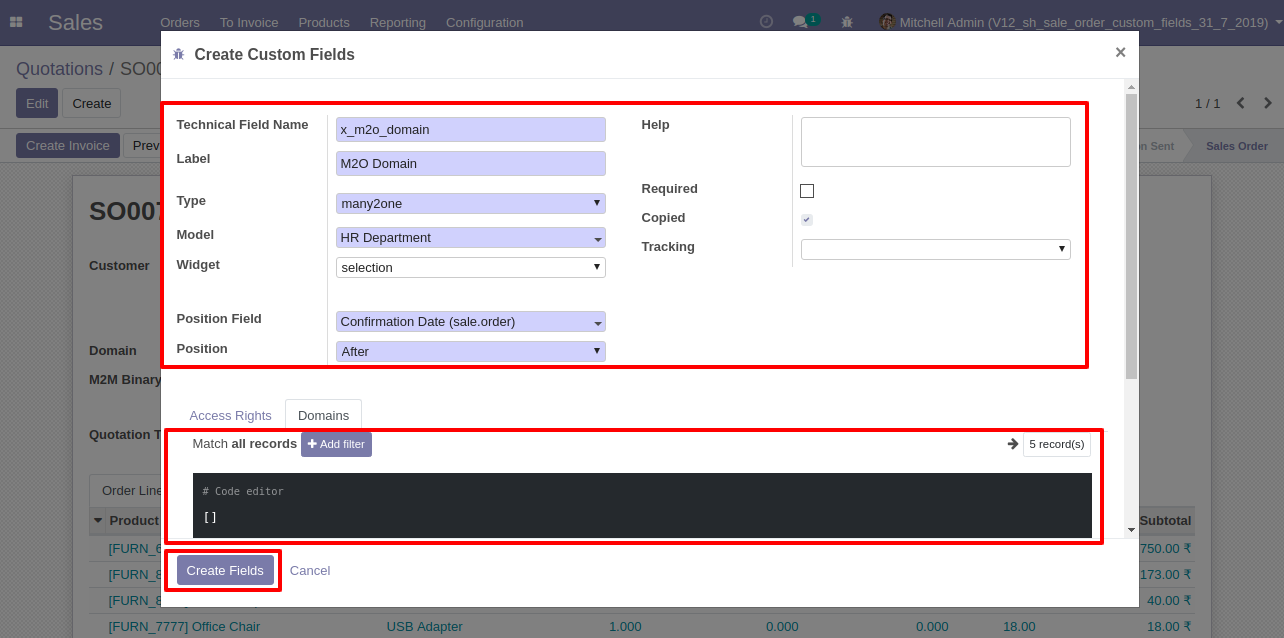
After you click "Add filter" button, it will show you as like below,Add Domain as shown below.
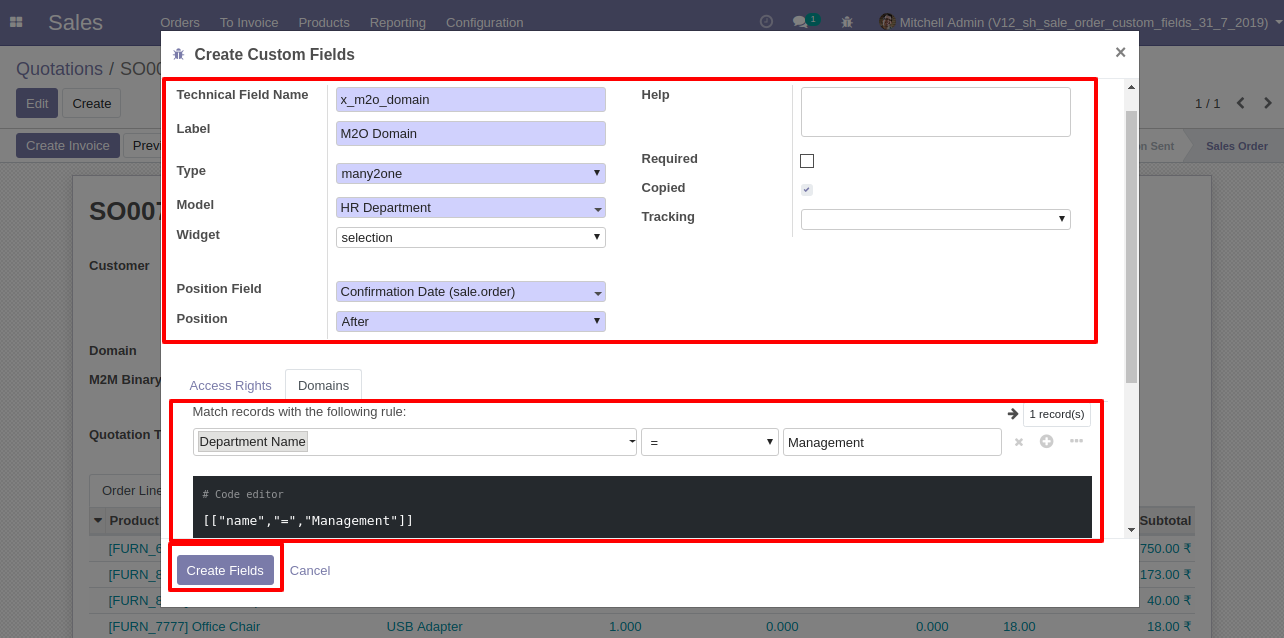
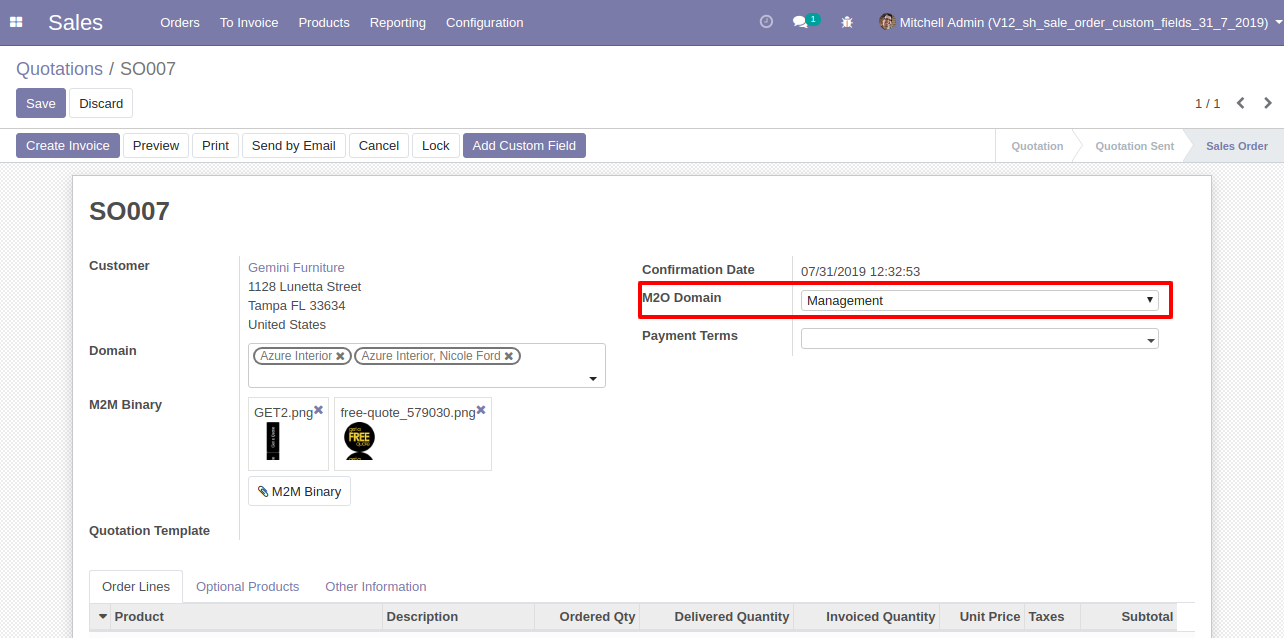
Many to one field output look like below.
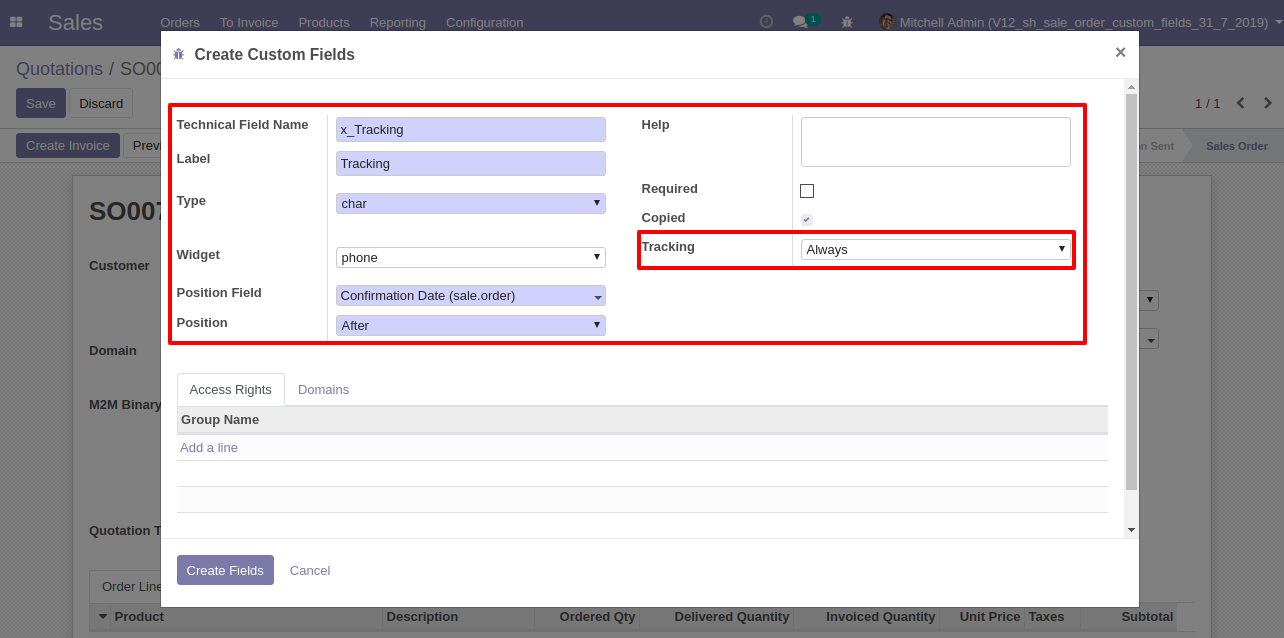
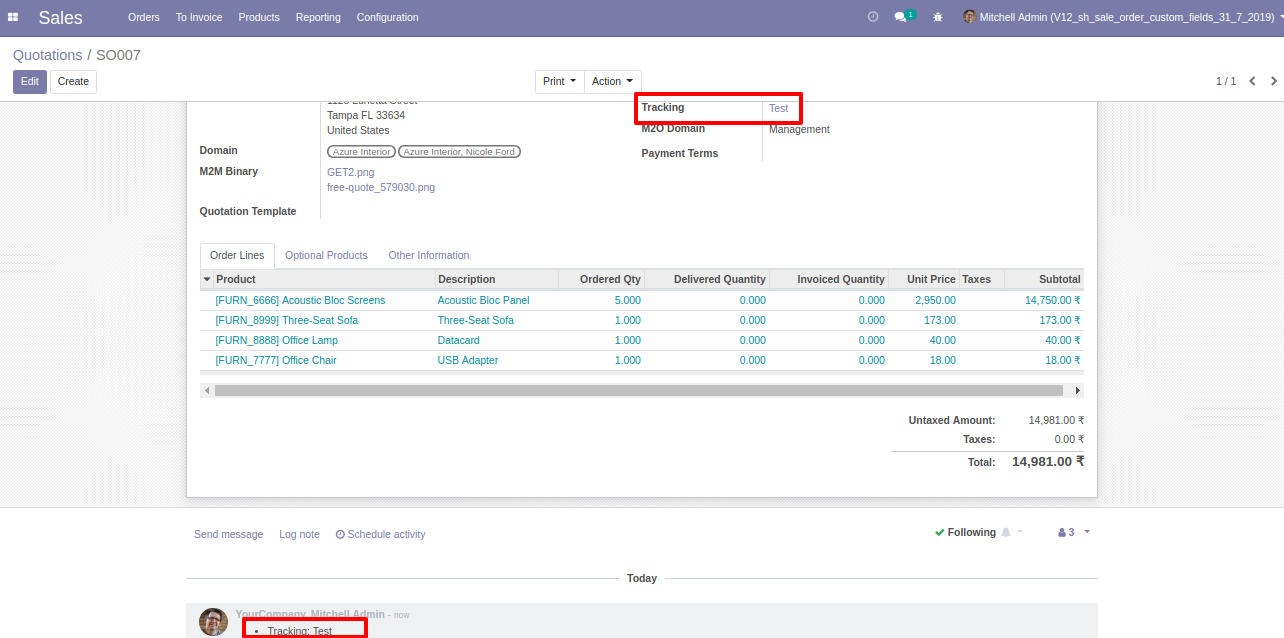
Tracking: This feature added for all the fields. It will be useful to track values on chatter. if any value change than you can get it very easily
Checkboxes: This feature added to select multiple values from model. in this you wil see all options with tickbox. you can tick multiple items.
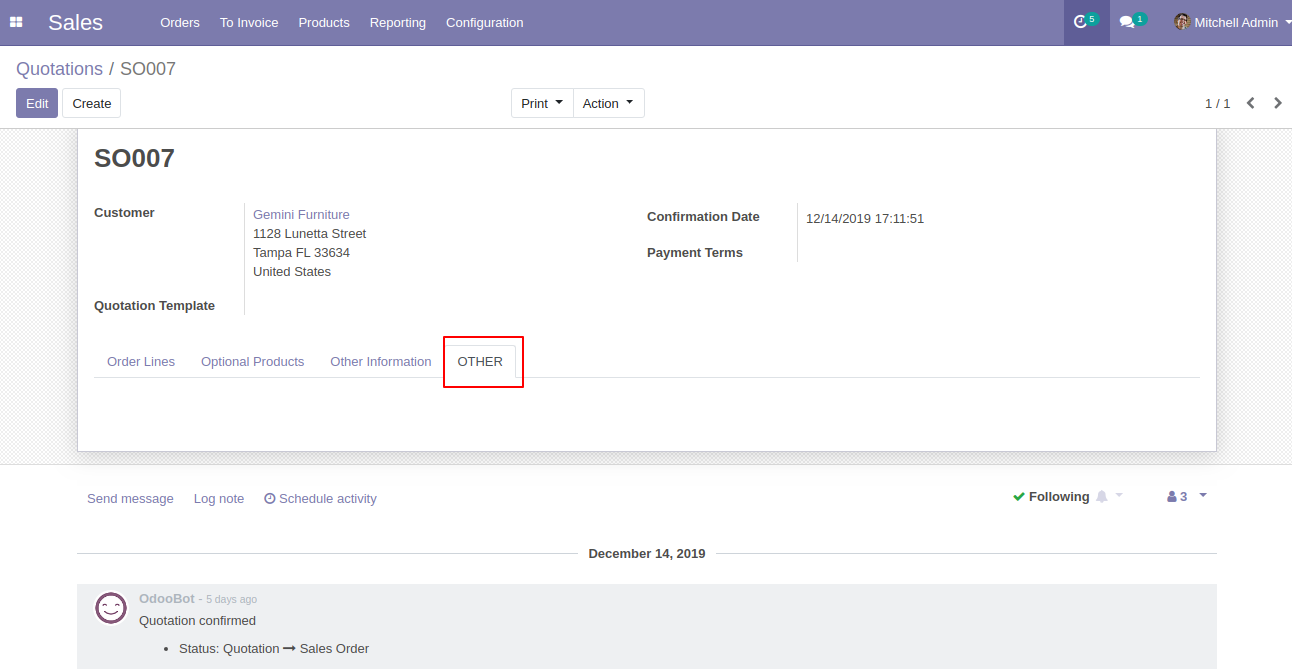
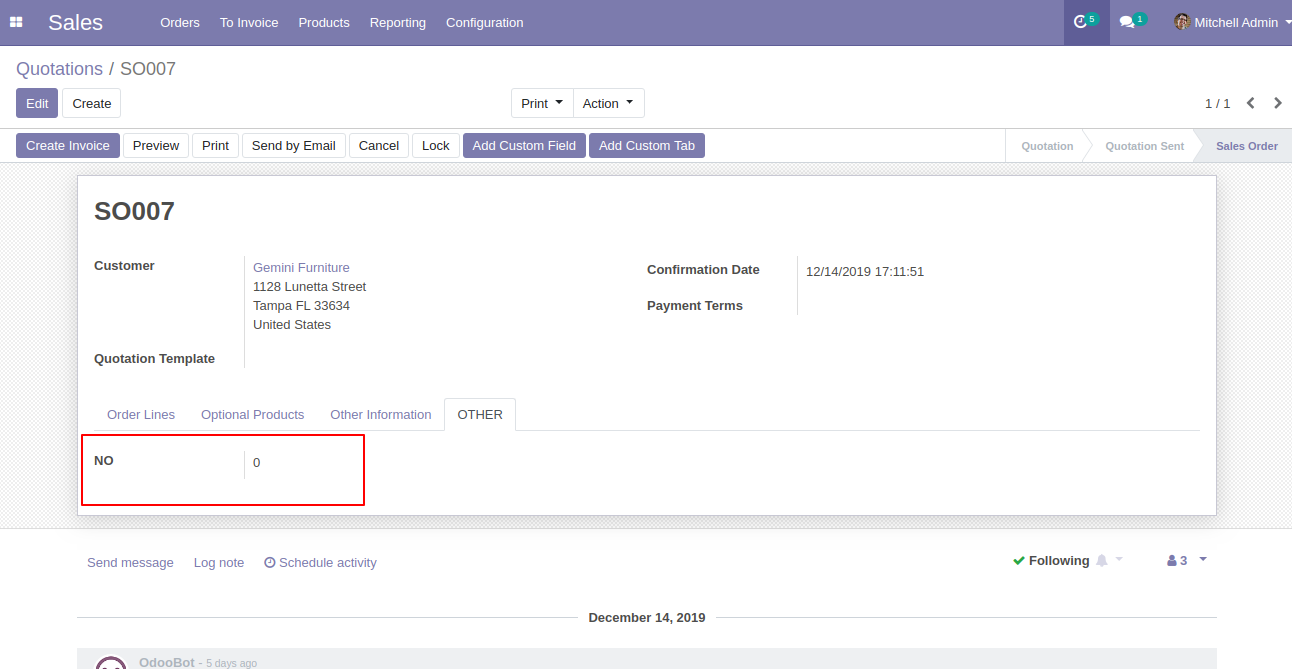
'Add Custom Tab' Button in Sales Order form view.
After click that button one wizard will popup. where you can set tab name, label, groups, tab, and position and click 'Create Tab'.

'OTHER' Tab is created.
For adding the field in custom tab click 'Add custom field' and add field name, label, type, tab(OTHER) and click 'Create field'.
The custom field 'NO' is created.
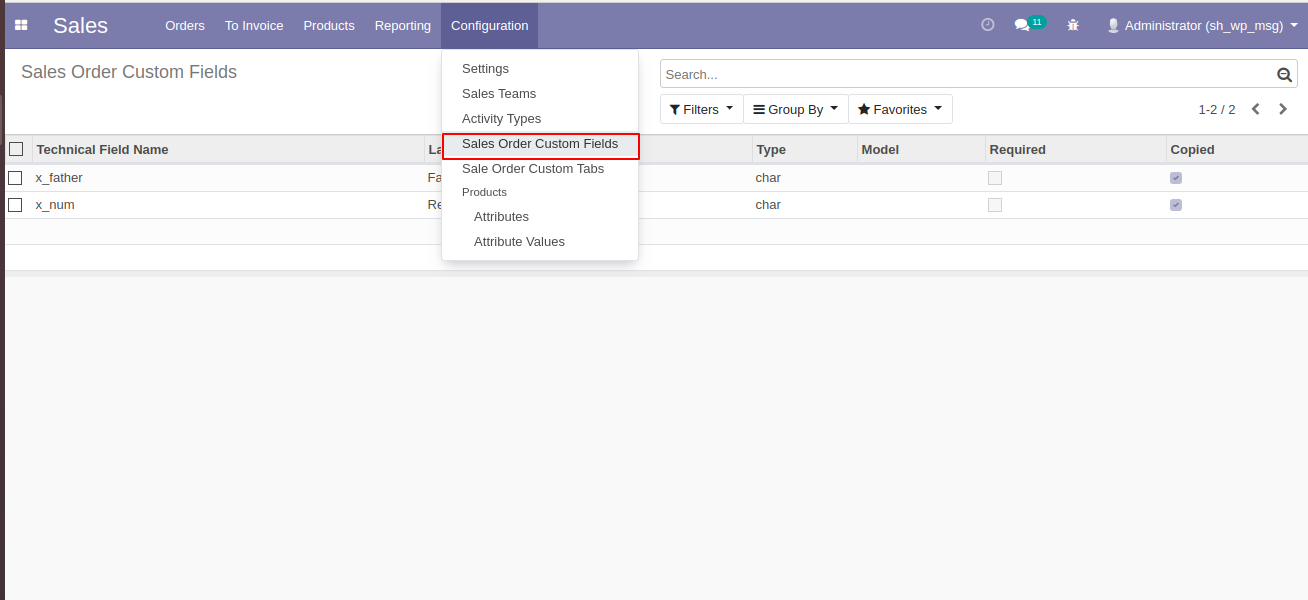
'Partner Custom Field' Menu in Configuration where you can see the list of the custom Fields.
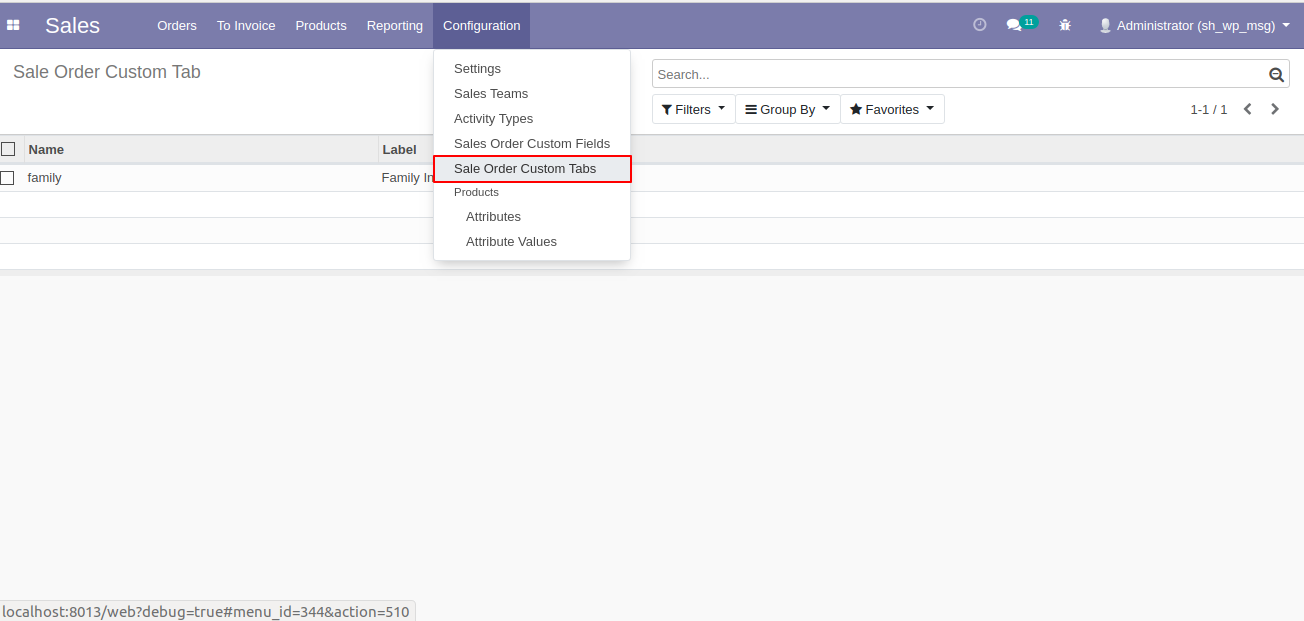
'Partner Custom Tab' menu in the configuration. where you can see the list of custom Tab.
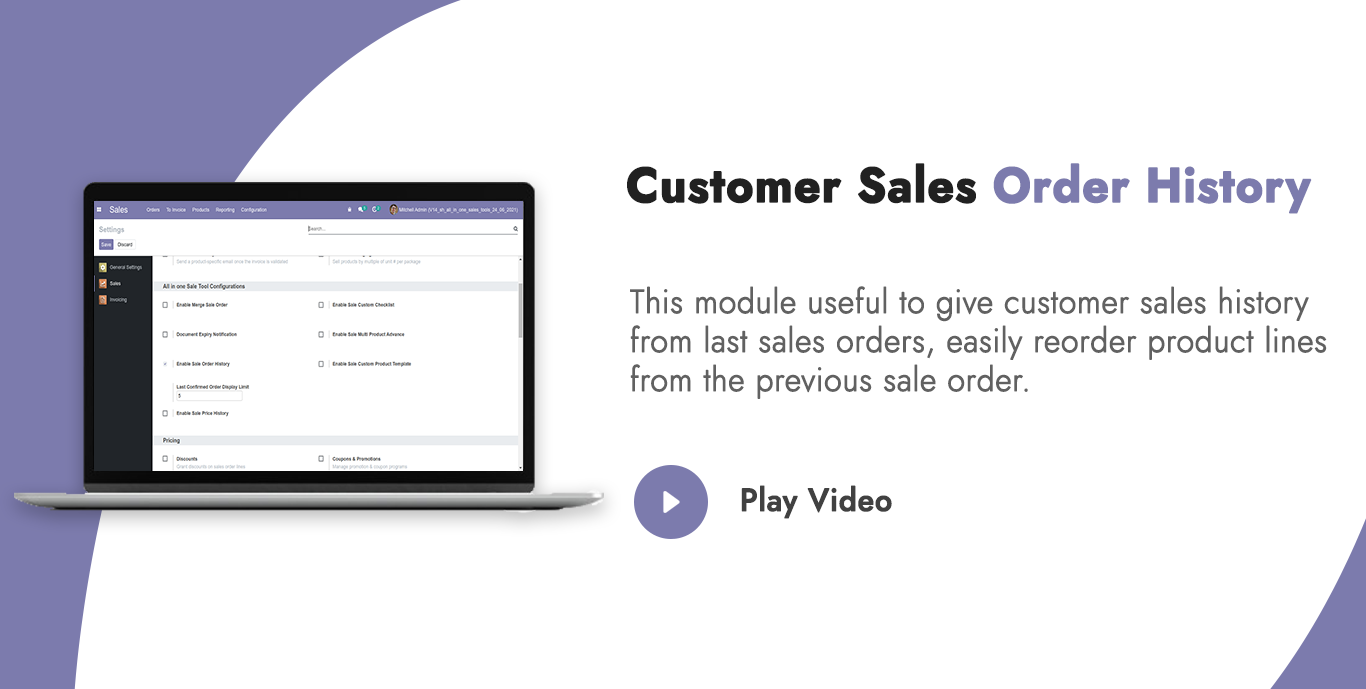
Tick "Enable Sale Order History" group.
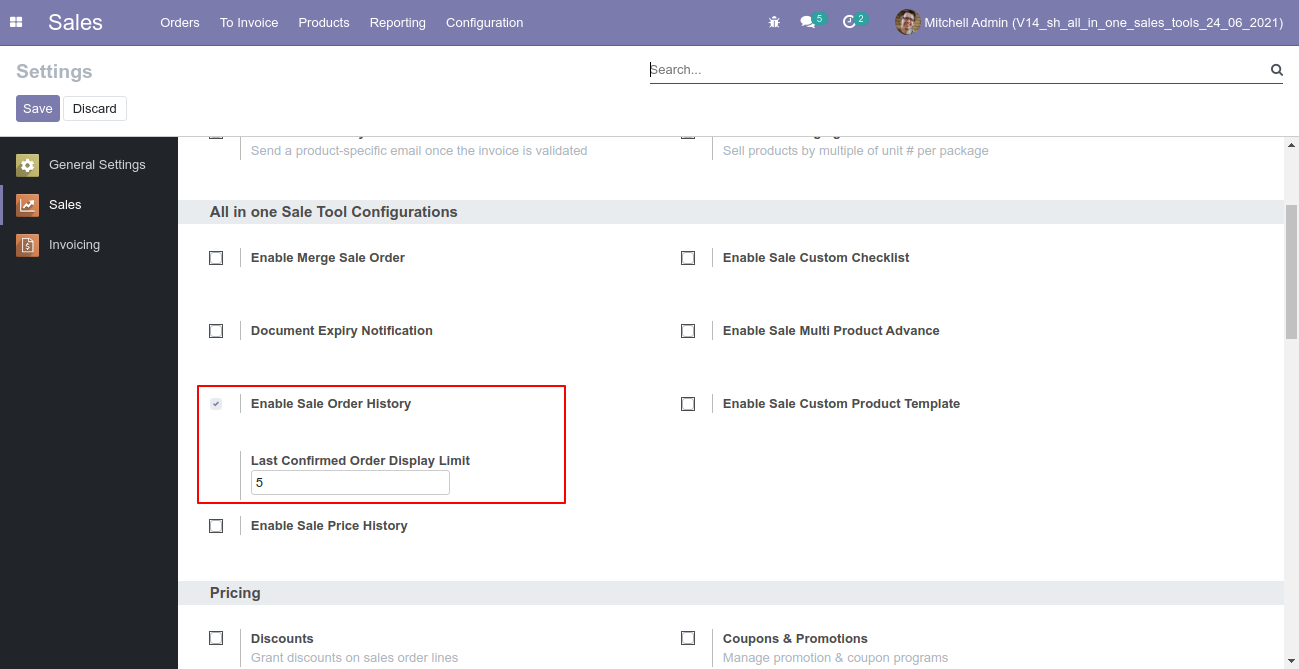
Only Confirmed last 5 Sale Order Line's Product List of selected Customer.
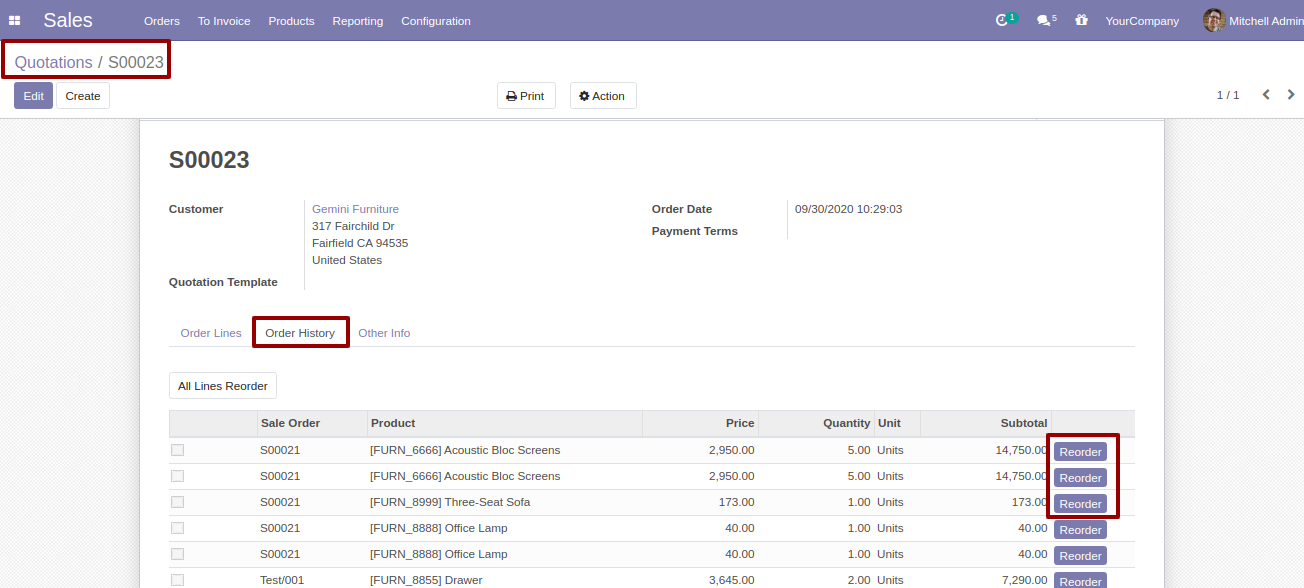
On "Reorder" button click, that order placed on Order Line.
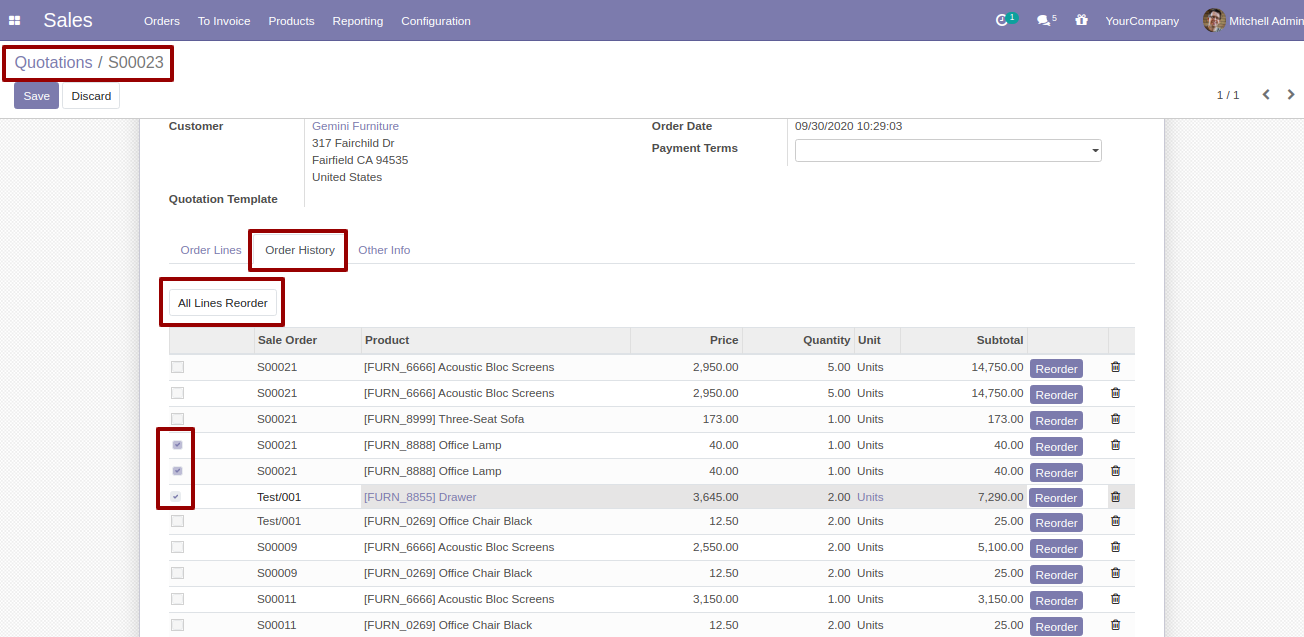
On "All Lines Reorder" button click, all selected lines from order history placed on Order Line on single click.
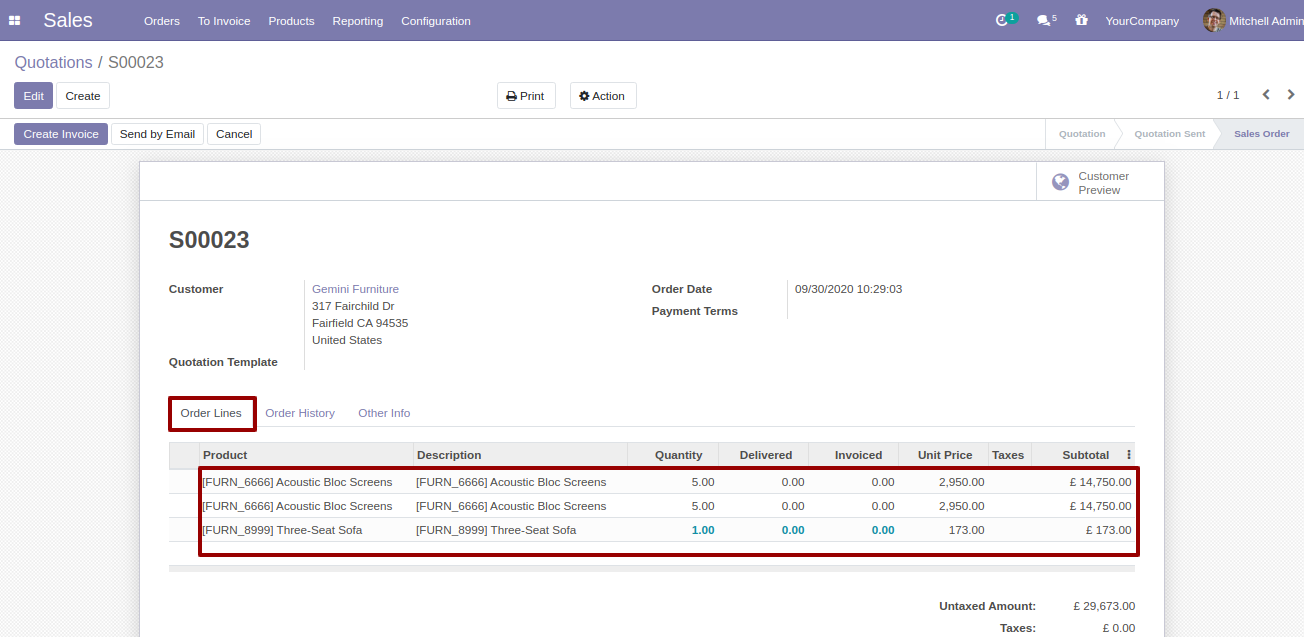
Selected line from order history again placed in new Order.
You can display the last confirmed order display limit.
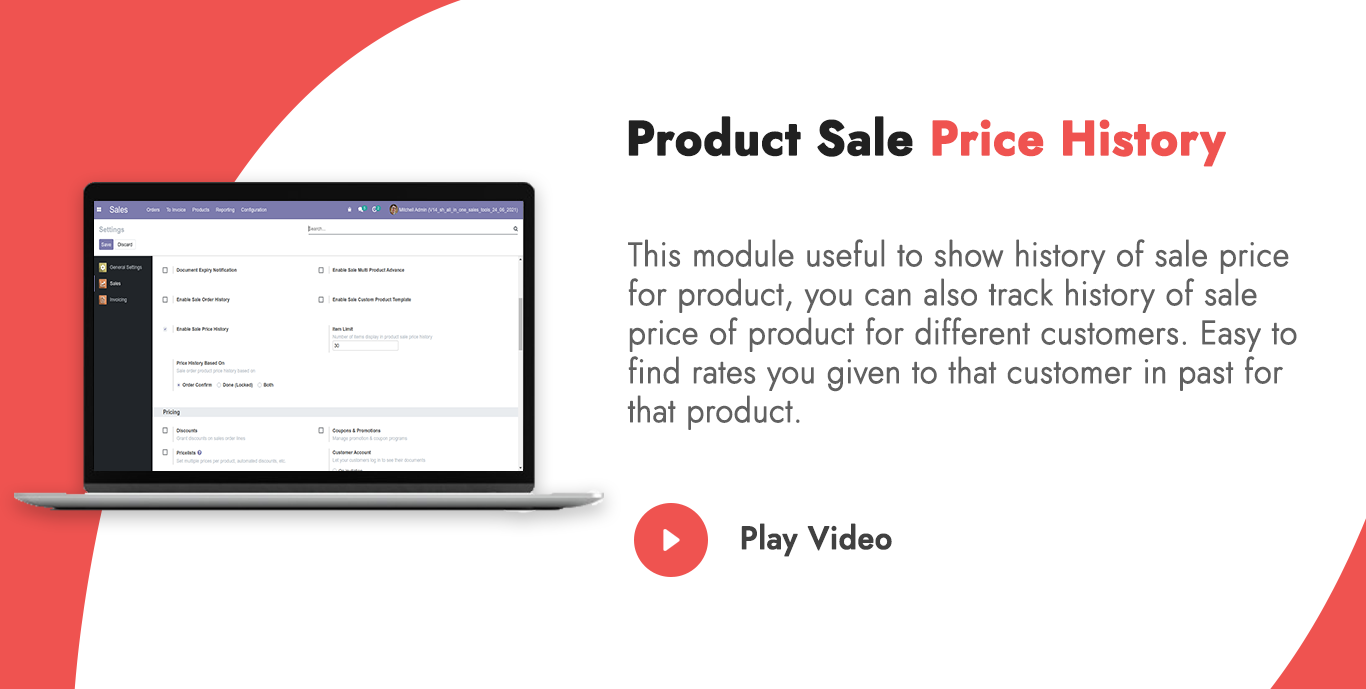
Tick "Enable Sale Price History" group.
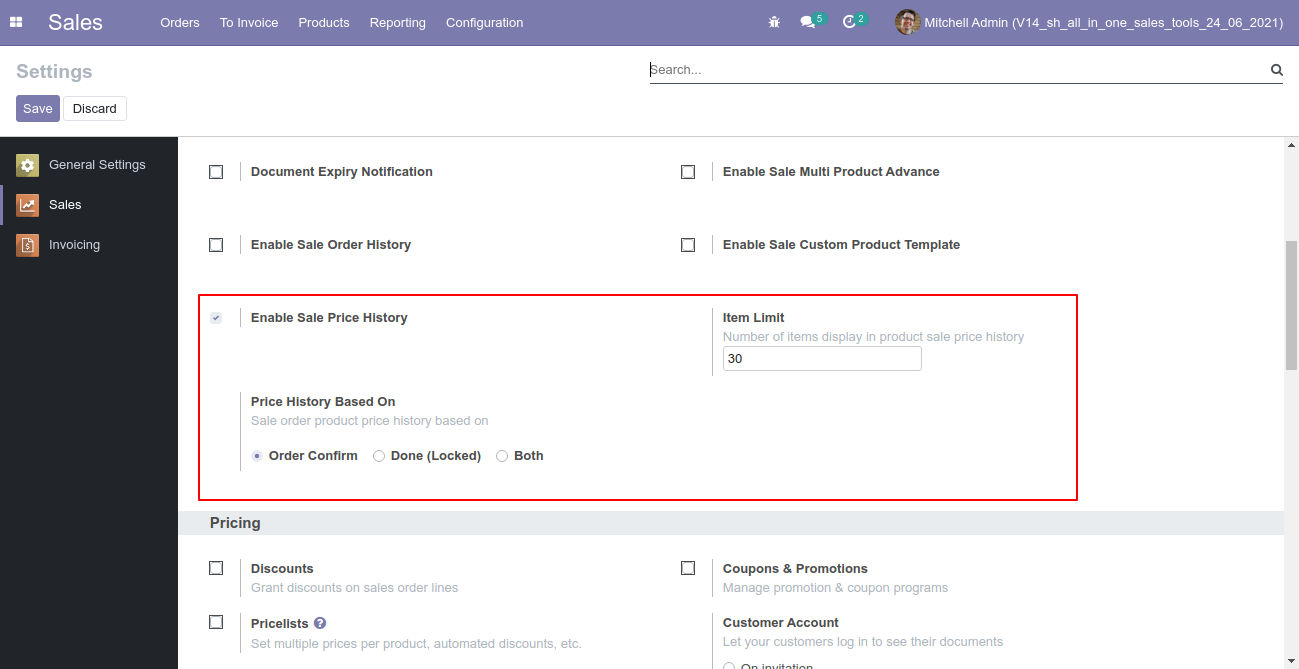
Inside sales settings set Item limit given as number of record display inside product "Sales Price History".On based on select "Order Confirm" to show record only from confirm sales order, select "Done (Locked)" to show record only from locked sales order, if both option selected shows record only from confirm sales order and locked sales order."
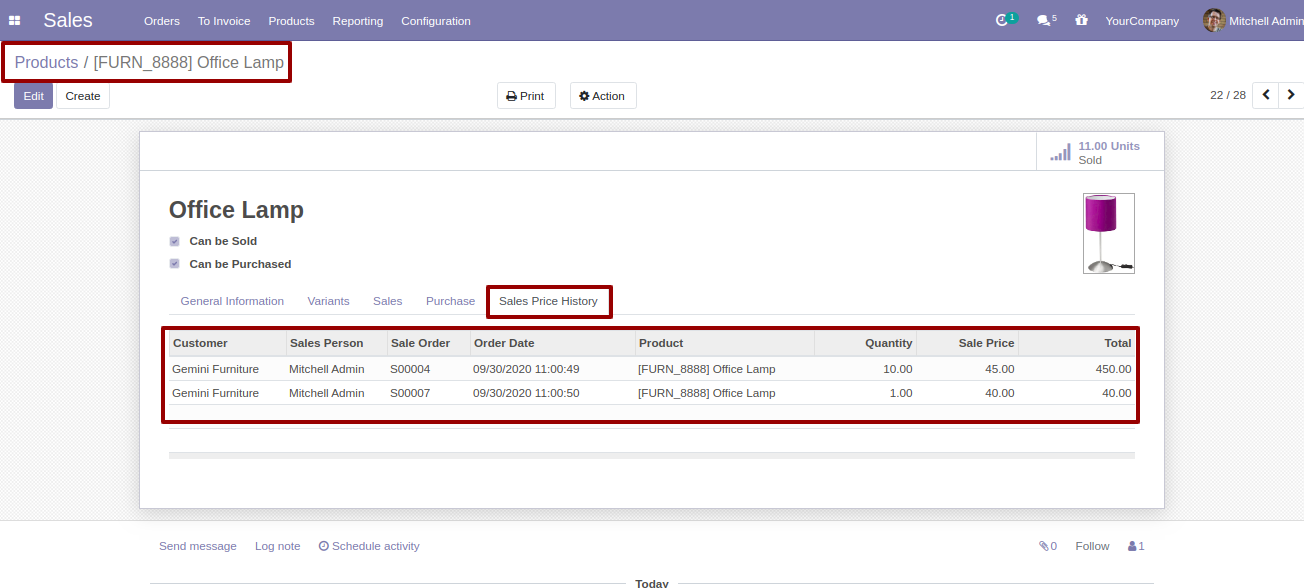
Inside Products in new tab "Sales Price History" sales order history of that product available as per item limit and record selection given.
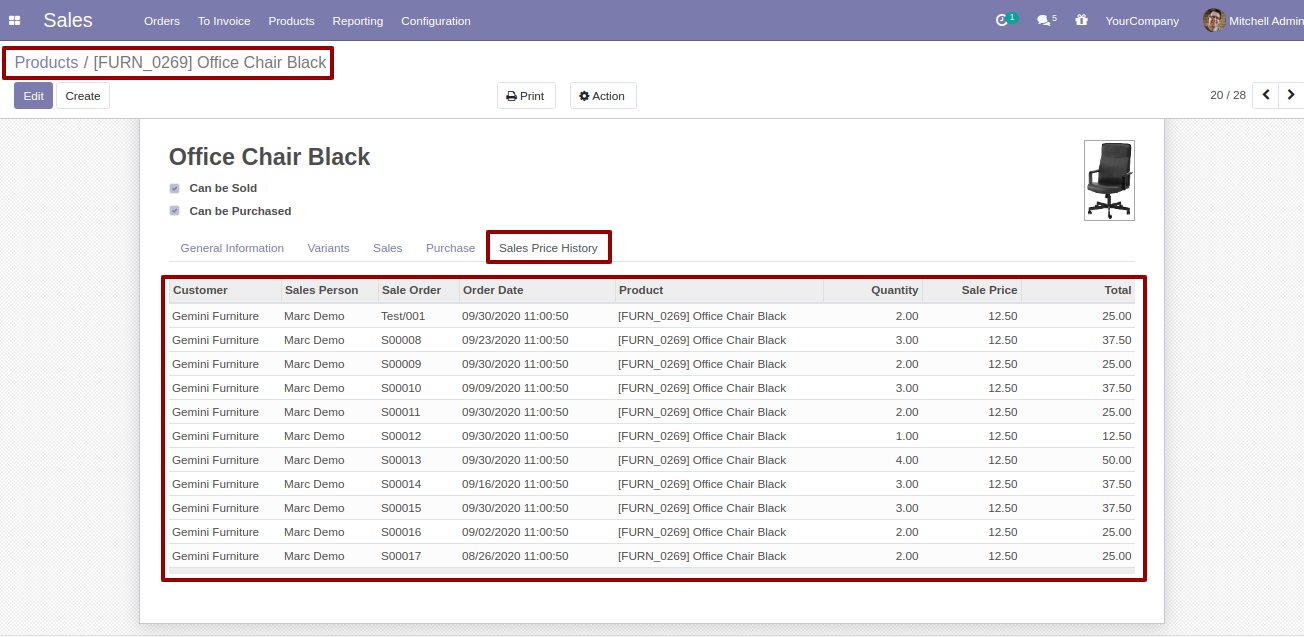
Inside Product Variant in new tab "Sales Price History" show only record of that variant only.
Set user rights to enable this functionality.
Goto Quotation => Select Reprot.
Quotation Report with terms and conditions and product brochure.
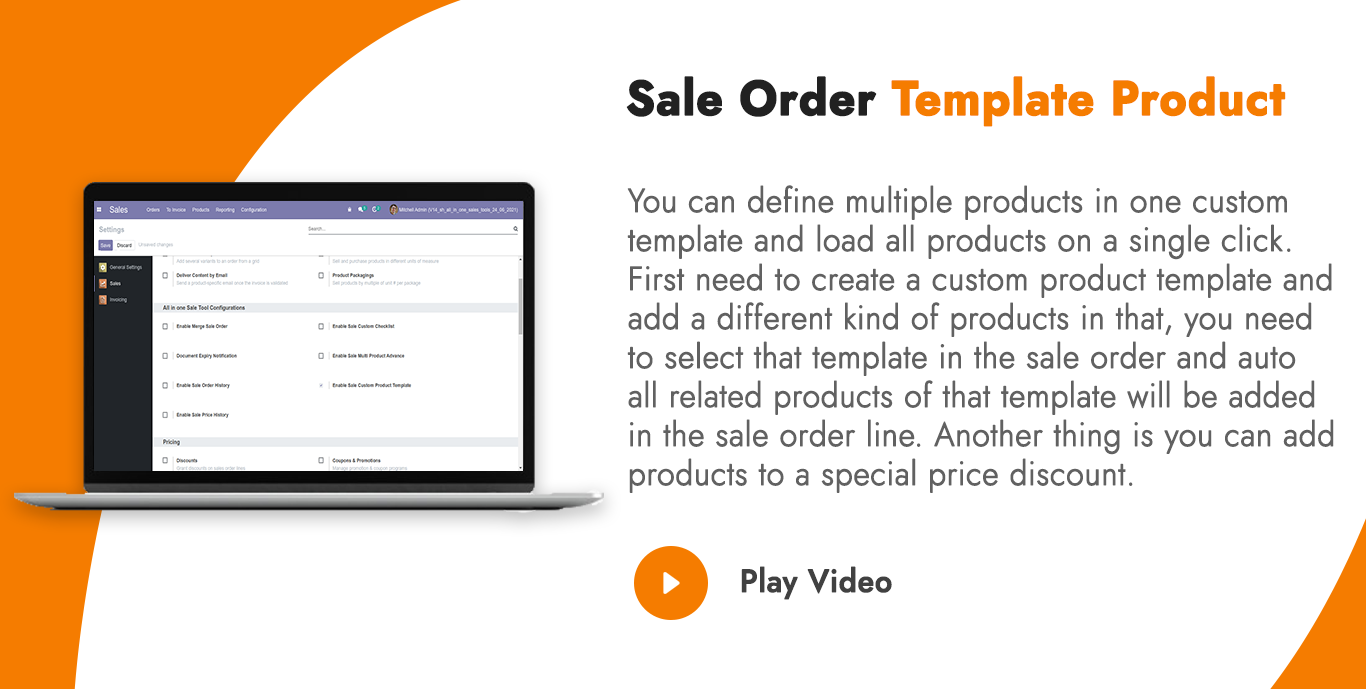
Set user rights to enable this functionality.
Create template and choose your product and set price, description, order quantity, unit price, discount, tax and UOM as per requirement. Product template that are set "Active", available in "Sales".
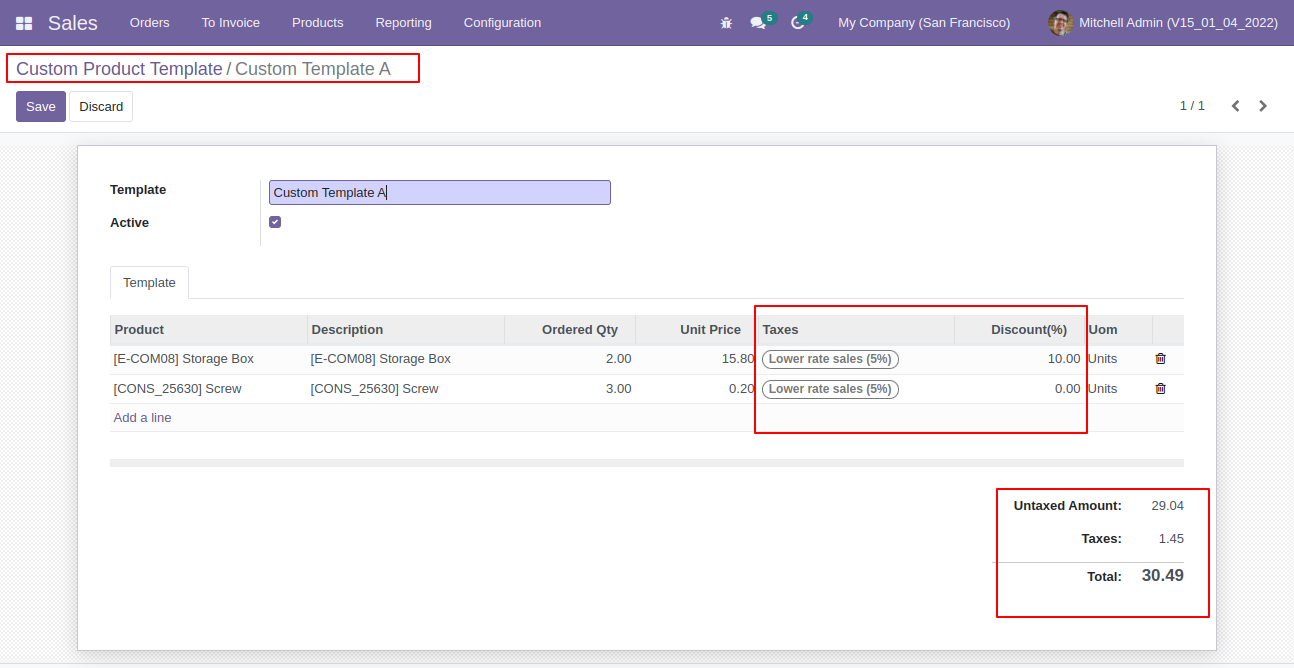
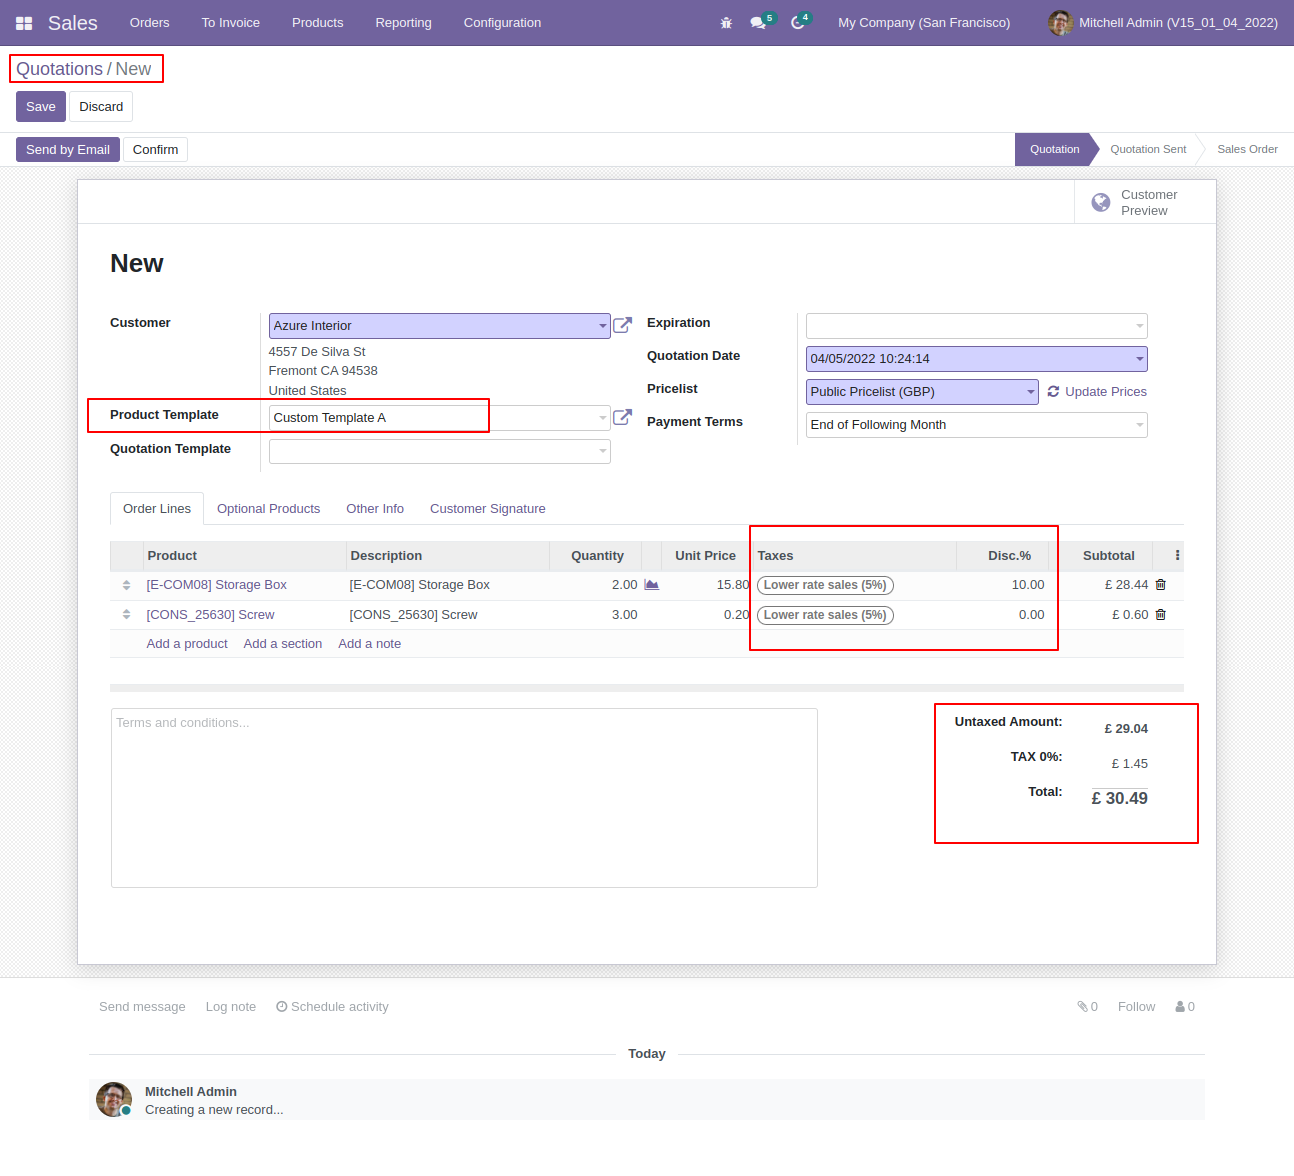
Choose product template that set to "Active", Products from selected "Active Template" are added in sales order line.
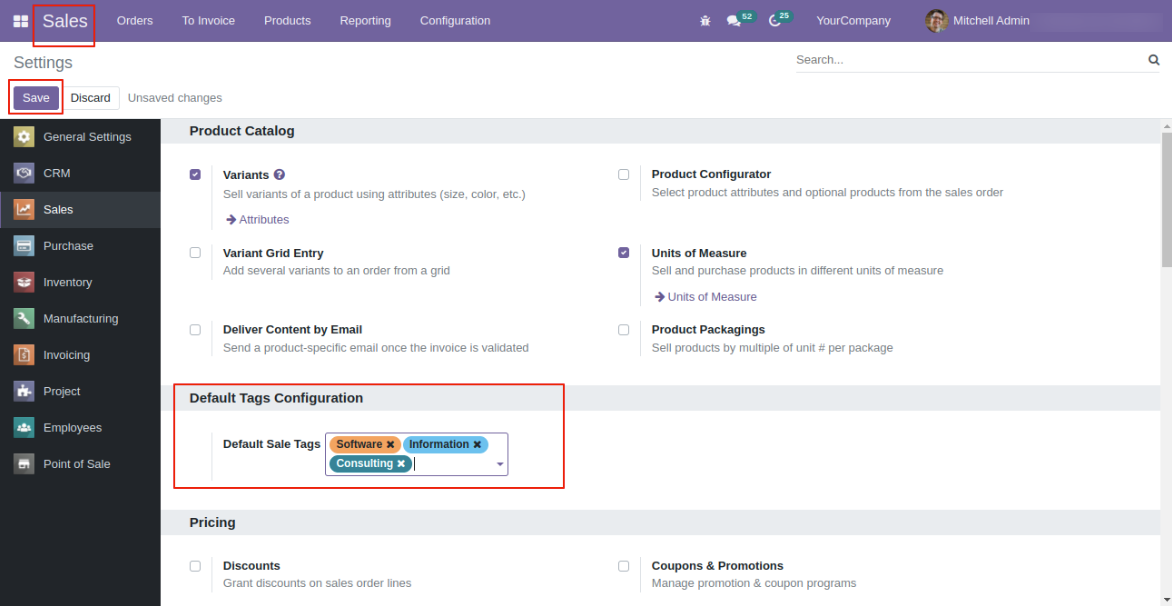
Add Defalt tags in sales general setting.
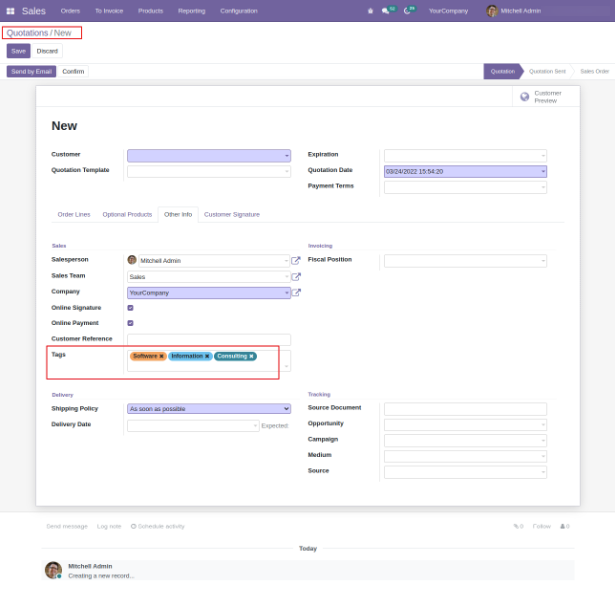
while create sales order default tags are added automatic.
Easy to search sale quotations with the help of tags.
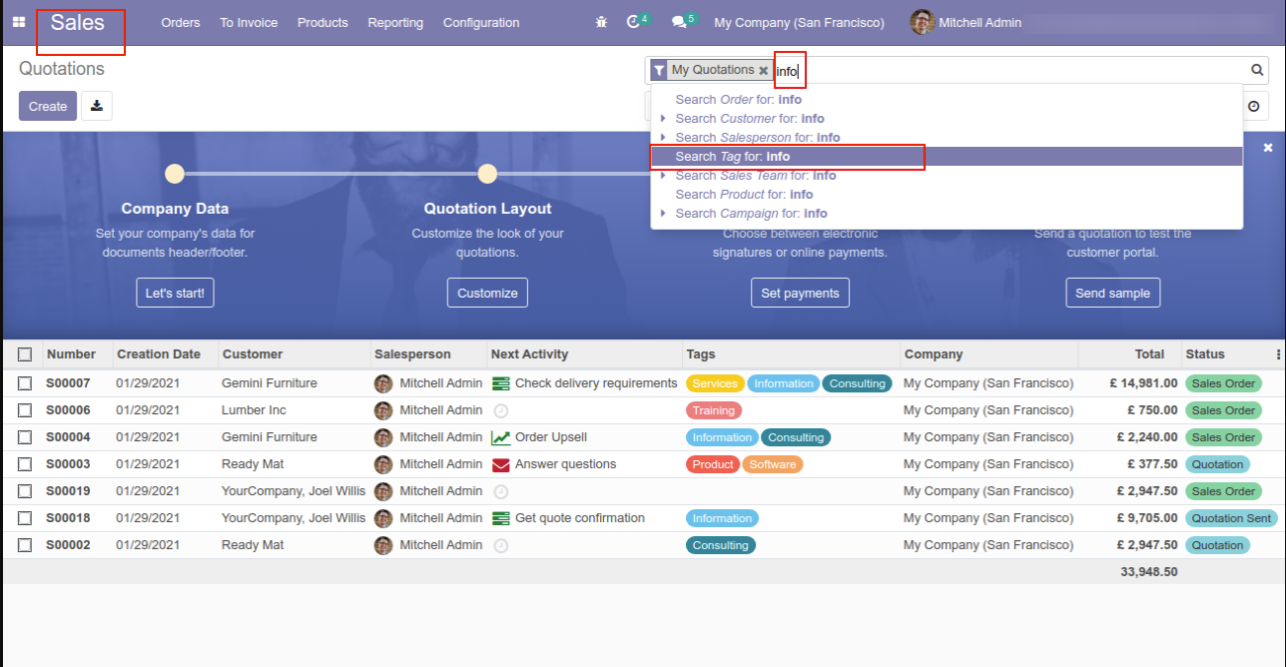
Search sale quotation with tags.

Easy to search sale order with the help of tags.
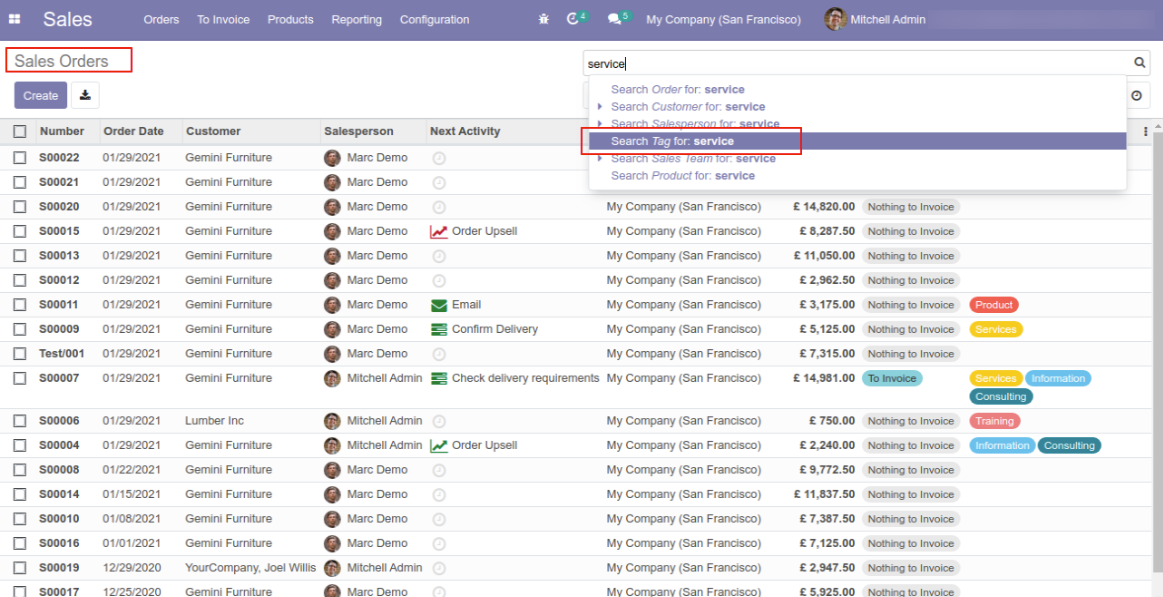
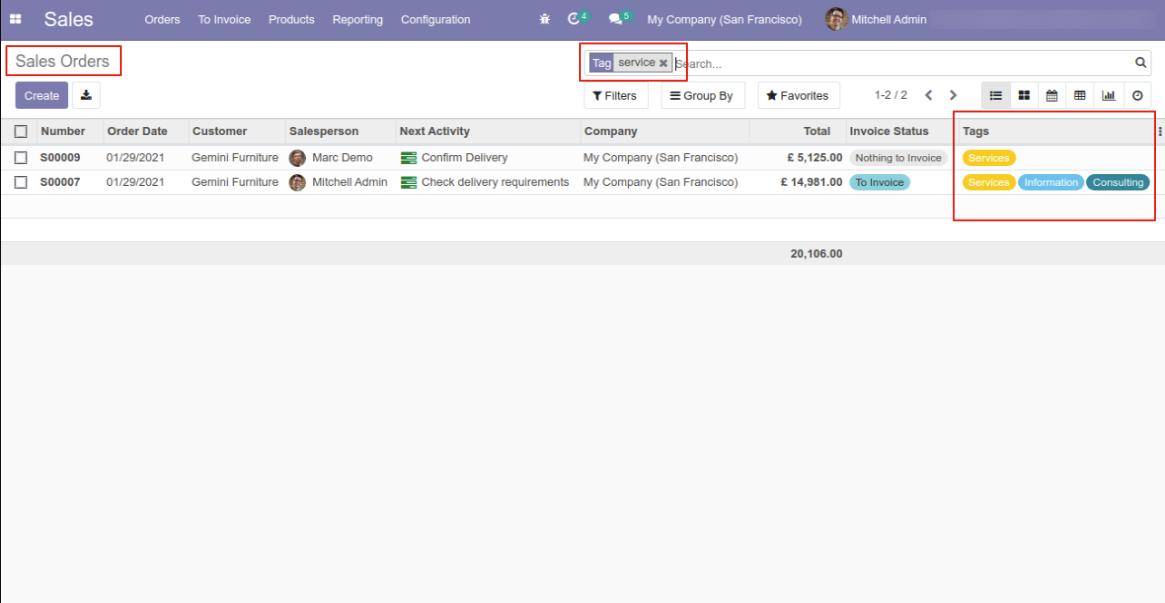
Search sale order with tags.
sales tag column in quotation.
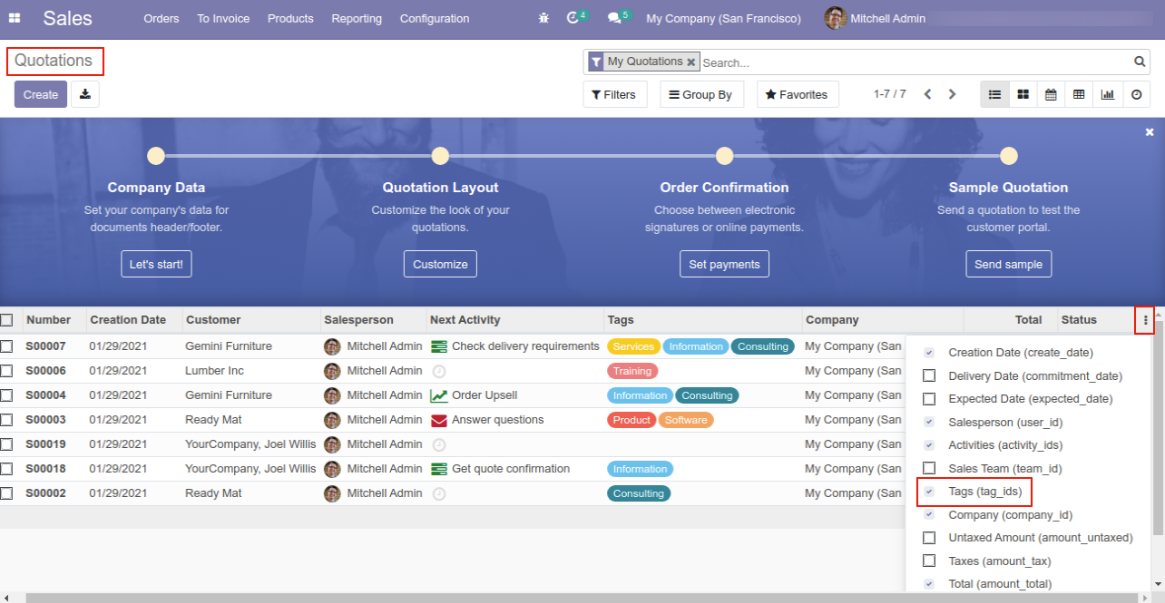
sales tag in sale order tree view, default hide.
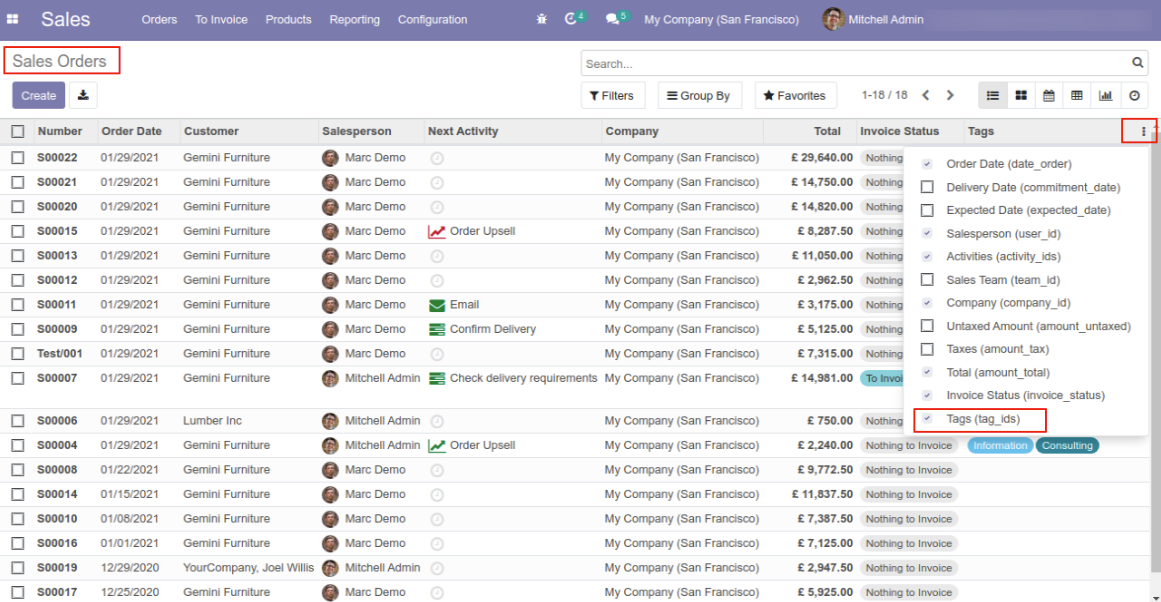
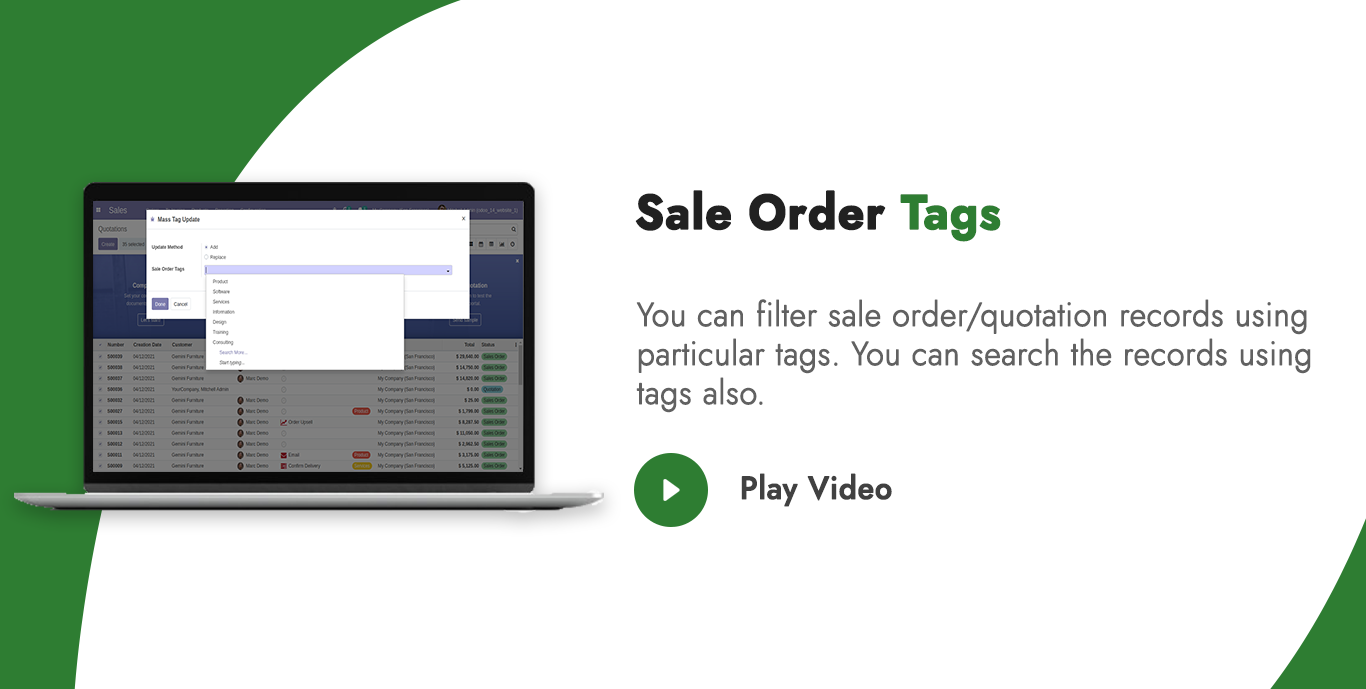
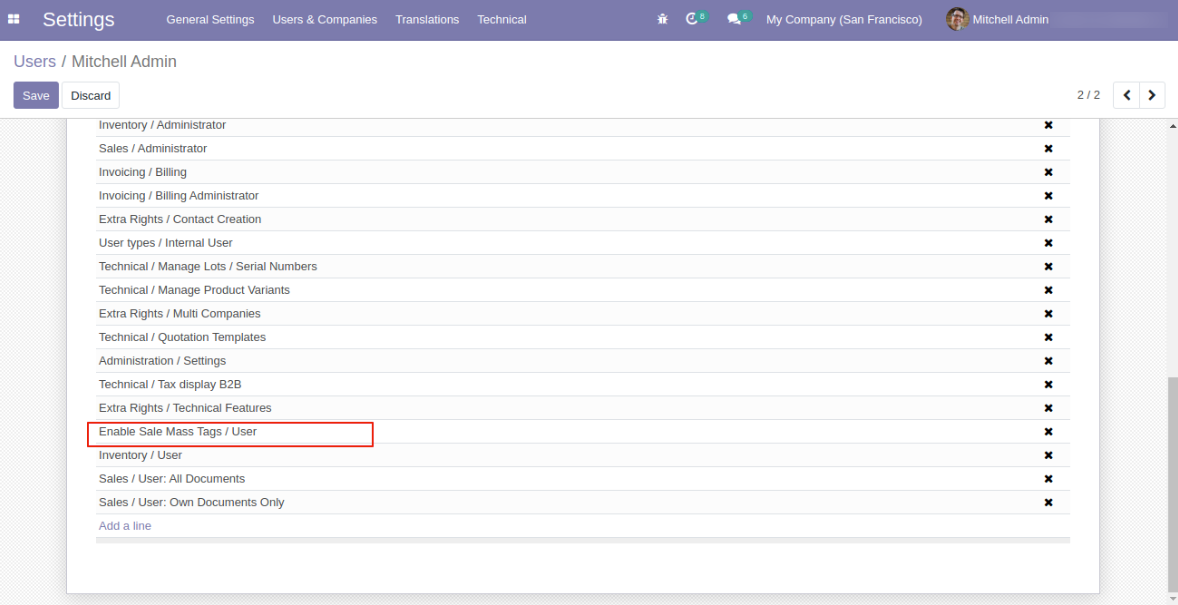
Enable user group for the mass sales tags.
Easy to update tags using mass action.
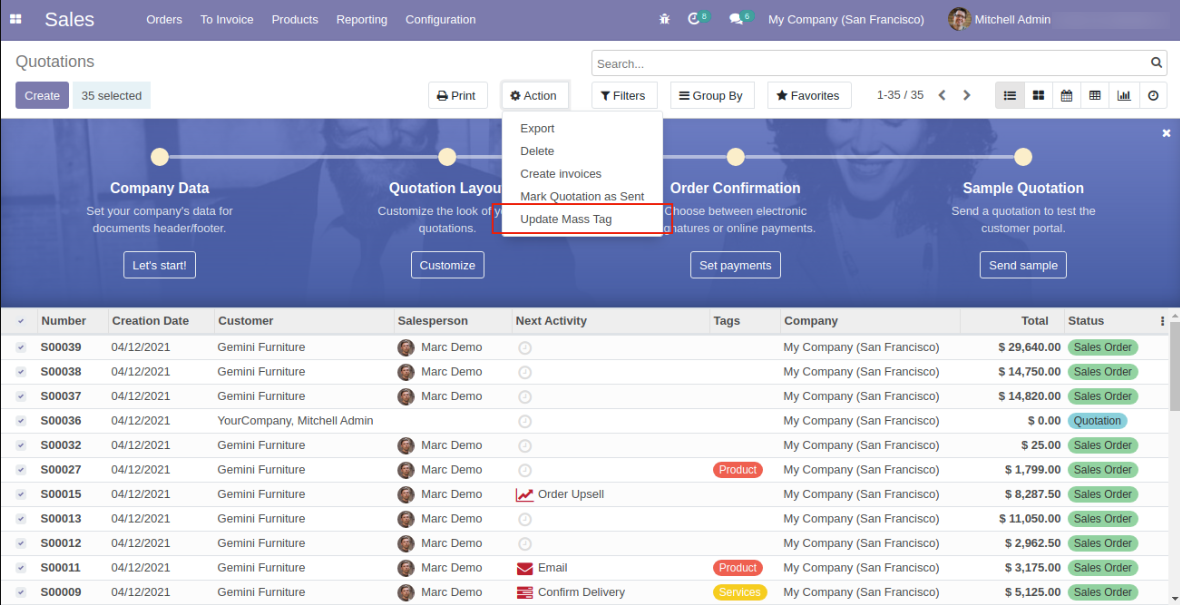
Just select desire sales order and click on action 'Update mass tags' in this popup just select methods and select tags and click on 'done'.

In "User", enable below options.
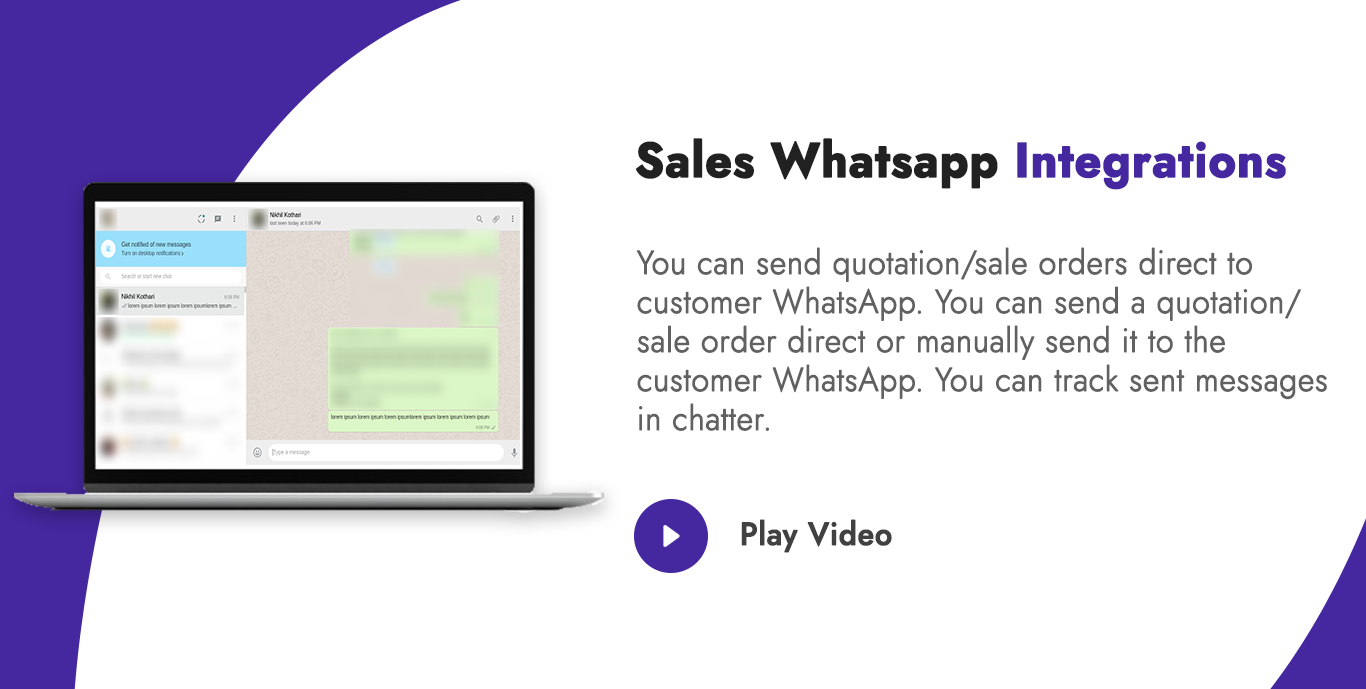
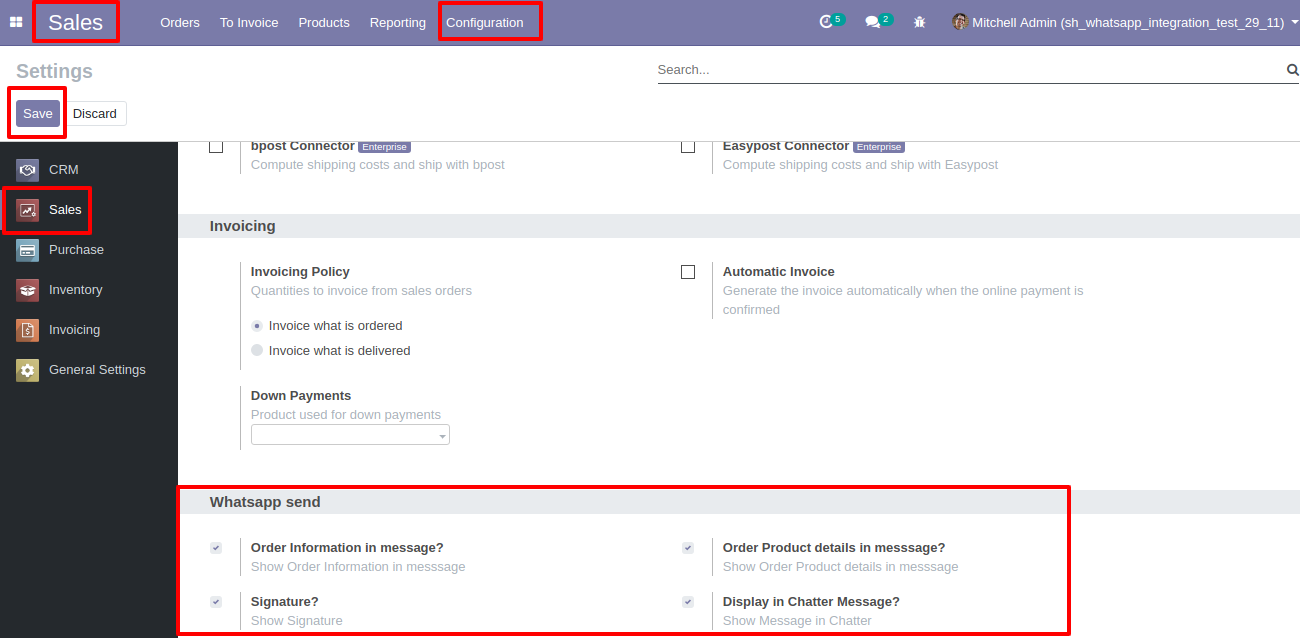
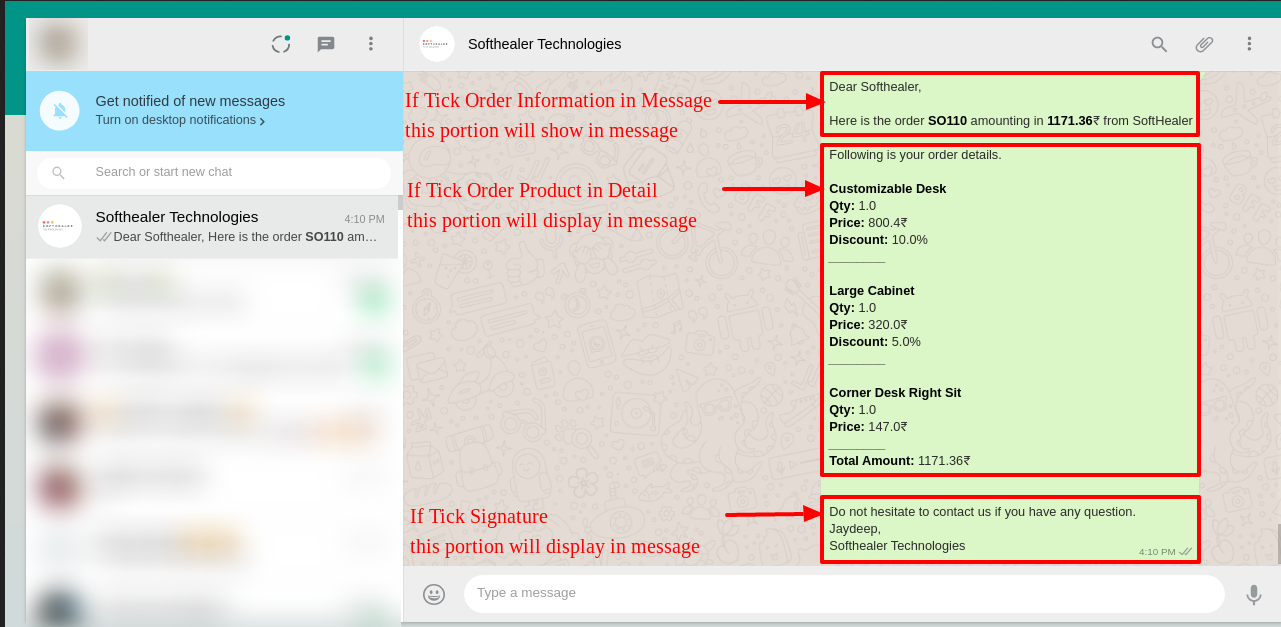
Whatsapp message description with the configuration setting.
This is the output shown in the WhatsApp messenger.
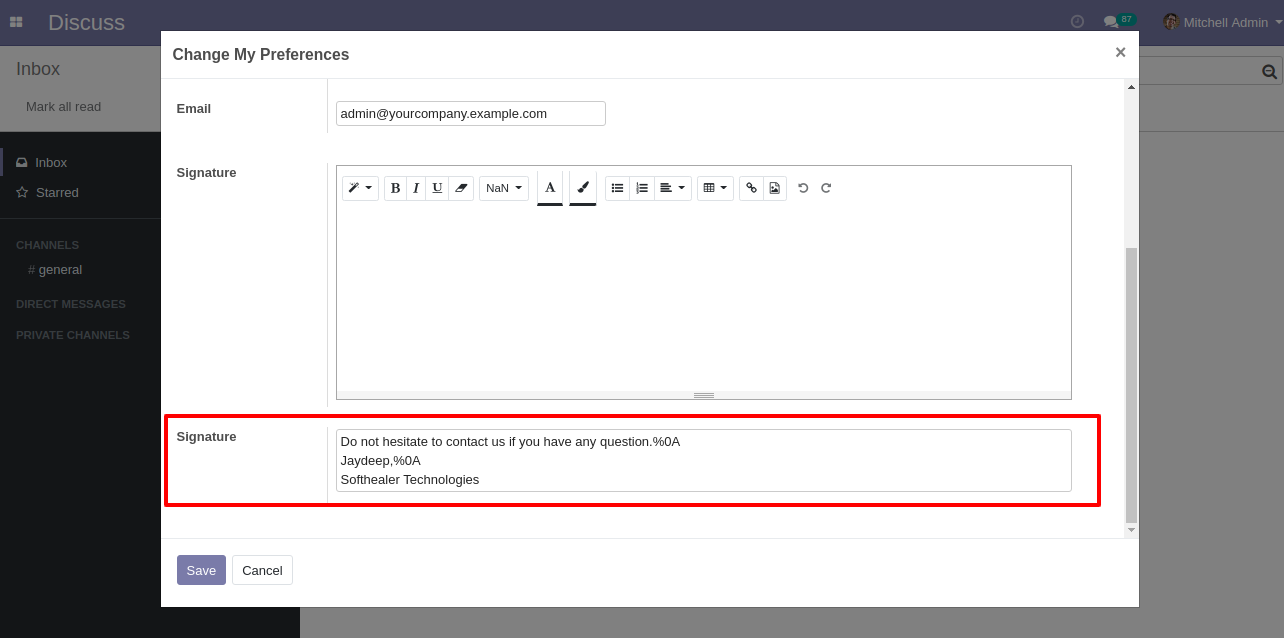
Set
the
signature
in
the
message,
1)
Go
to
Preferences.

2) Add Signature.
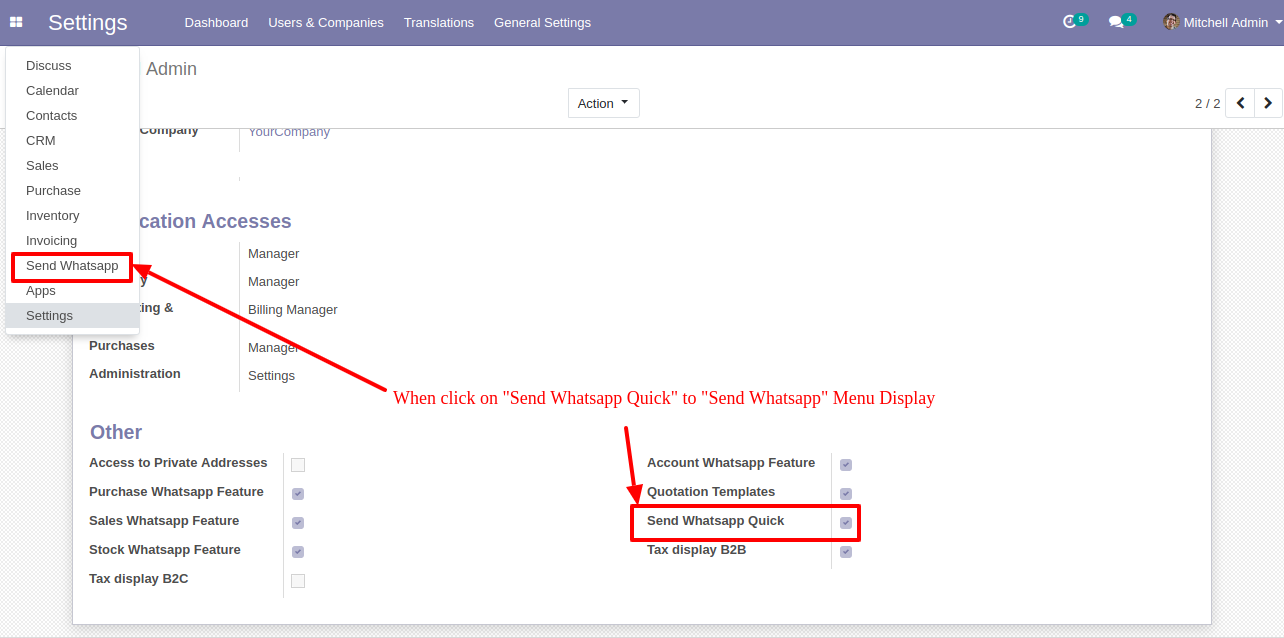
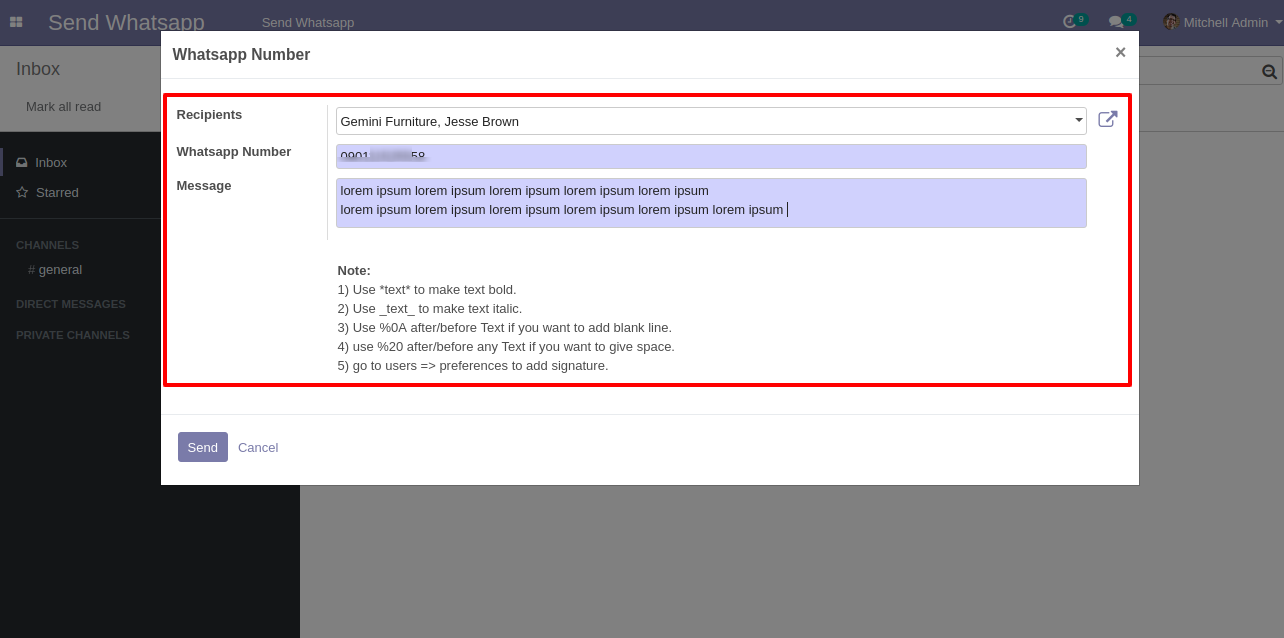
The user has one quick menu option to send a WhatsApp message to anyone. Users can easily send a message to anyone using that menu. This menu will be visible when the user has the SWQ group enable.
This page will open by clicking the WhatsApp Number menu and fill the detail and click send.
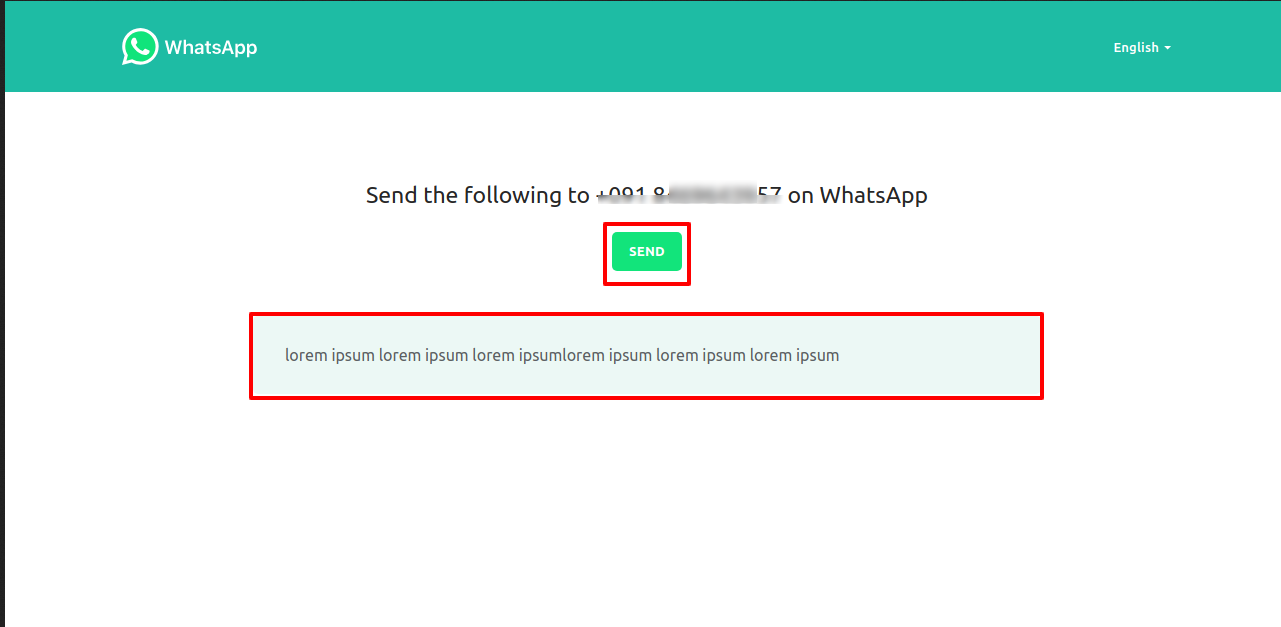
After clicking the send button you will see this WhatsApp confirmation page.
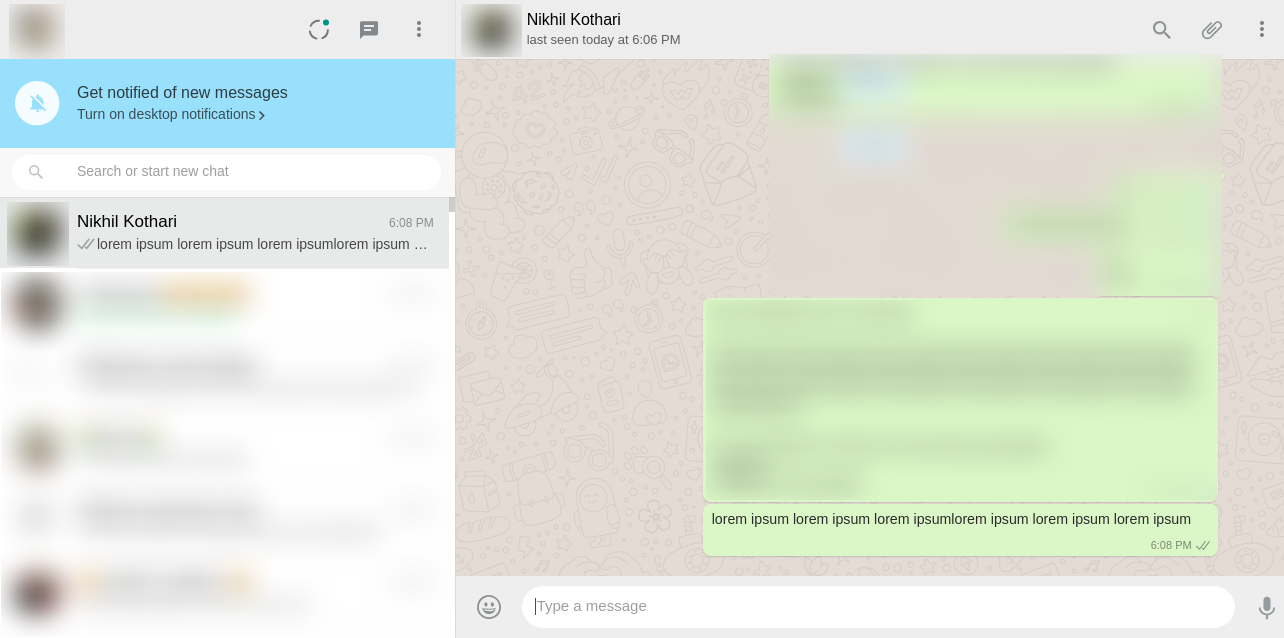
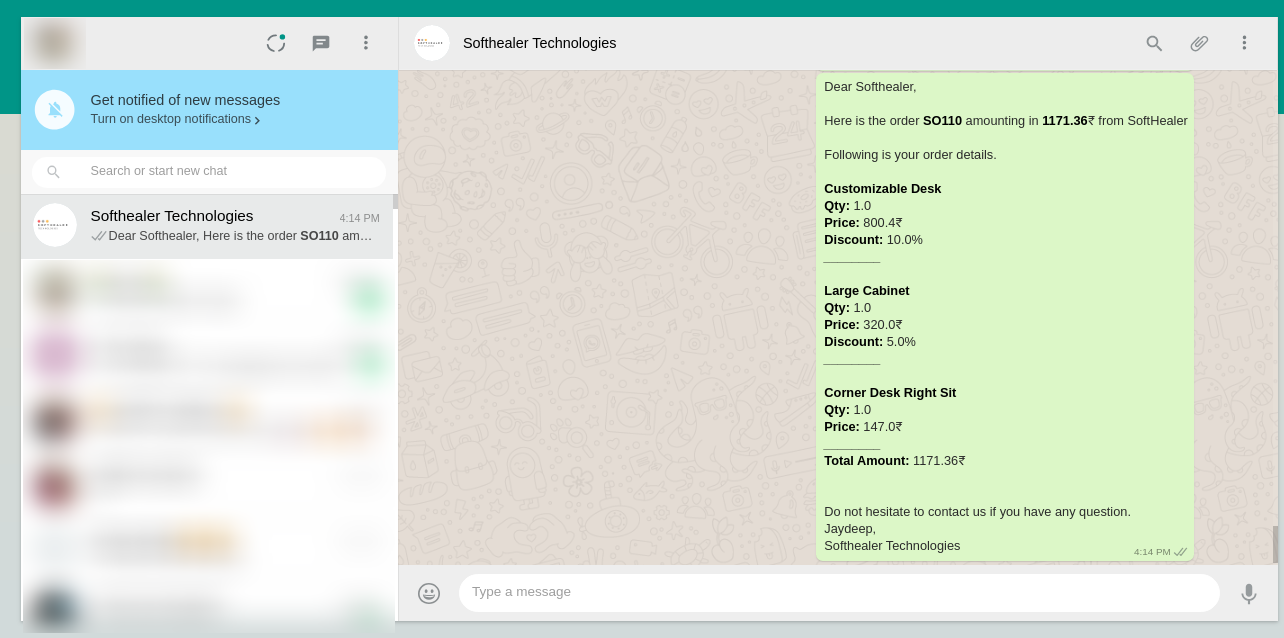
This is the output shown in the WhatsApp messenger.
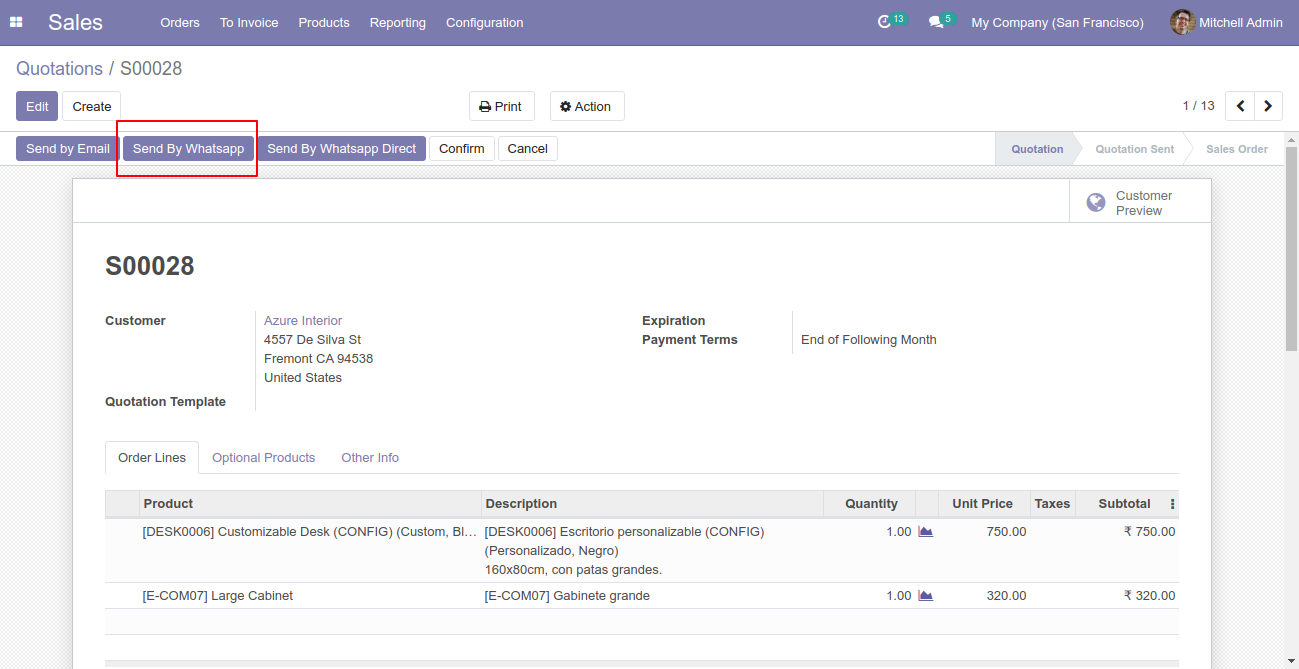
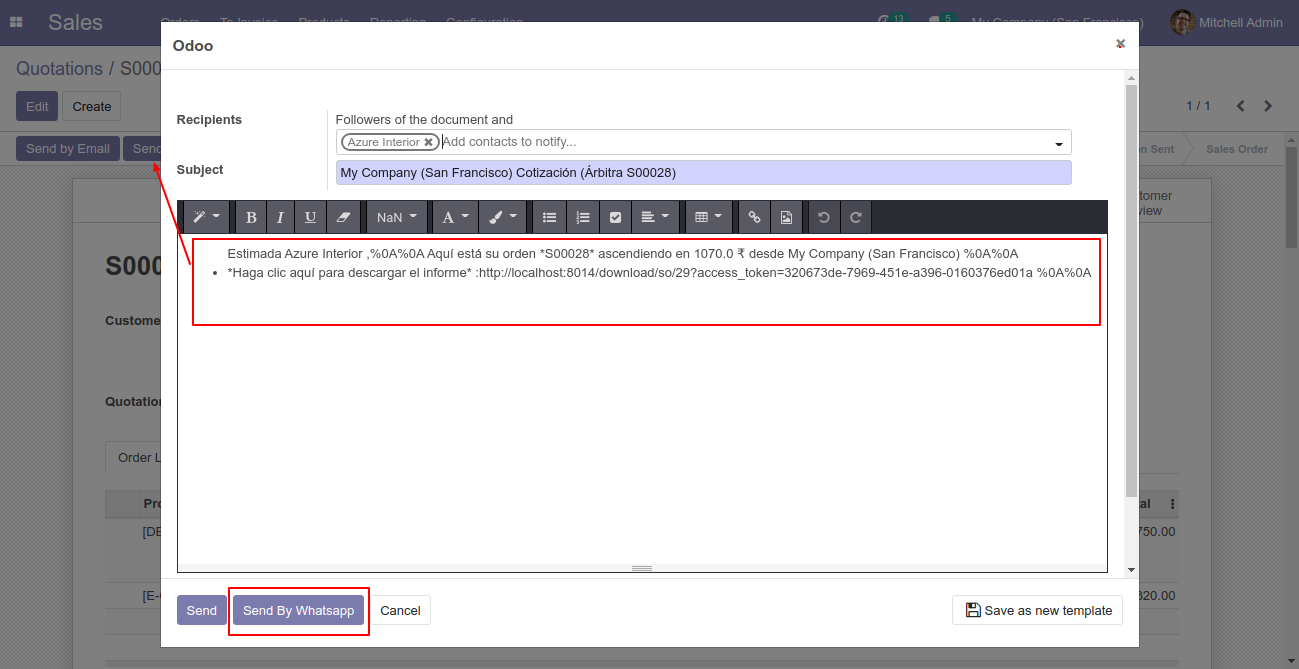
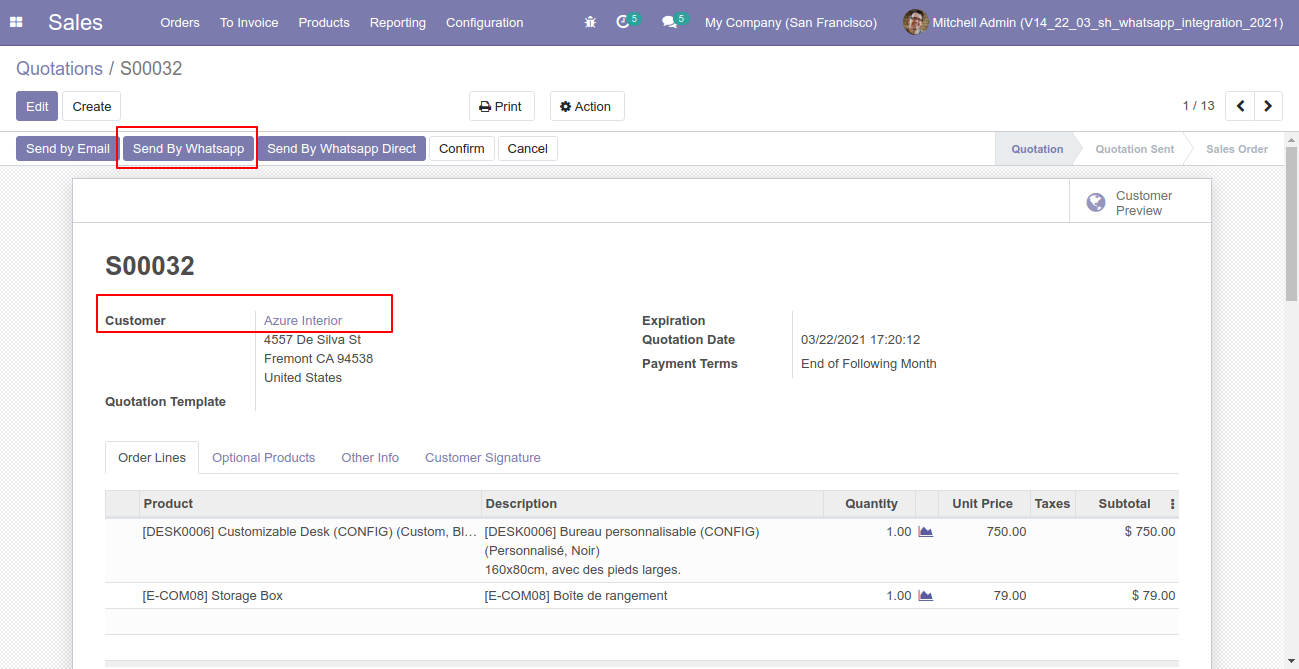
Click Send By WhatsApp Button in Sale Quotation.
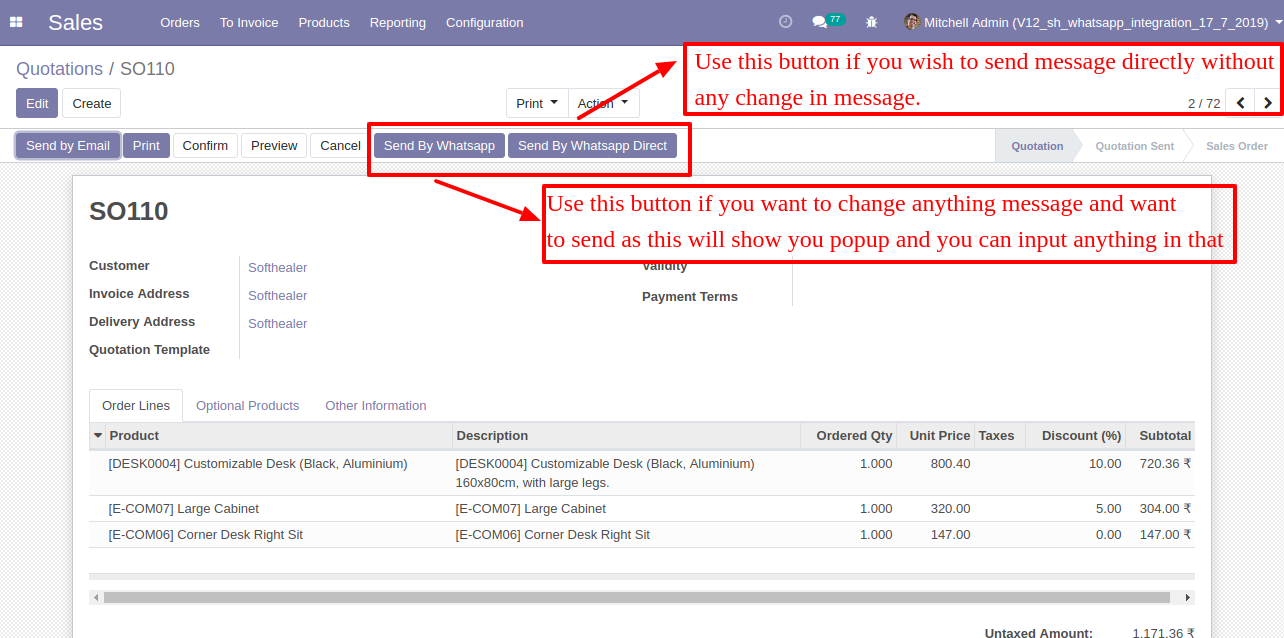
Recipient and Edit Message as your required and click send.
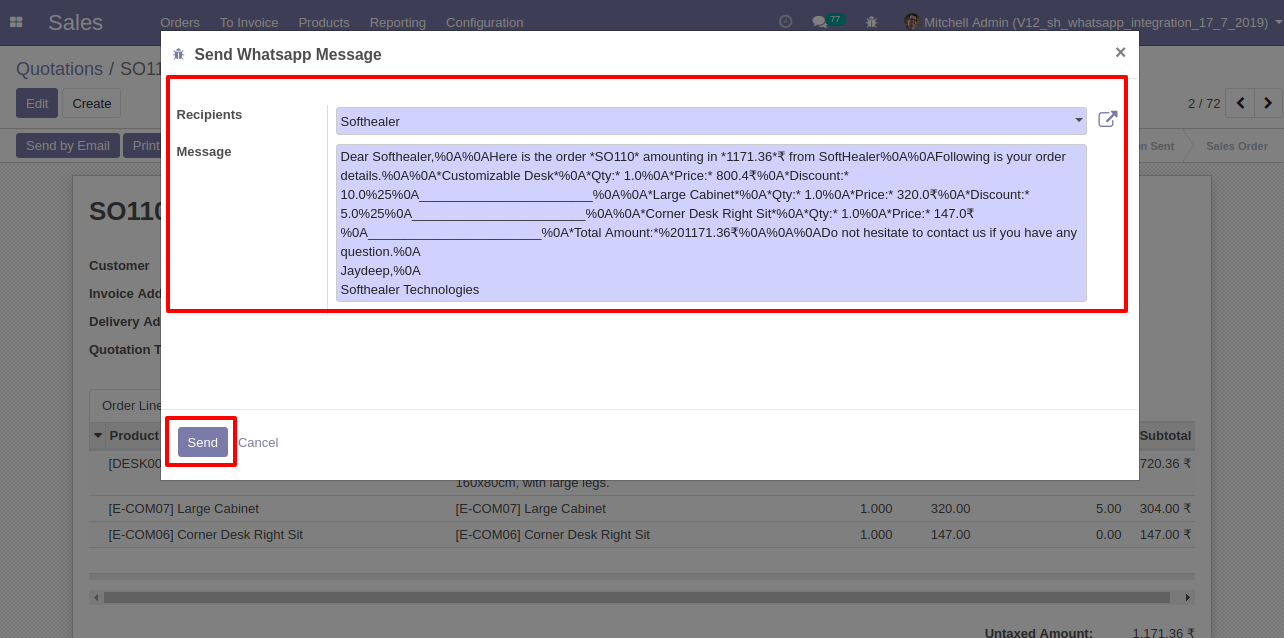
After click send you will see this WhatsApp confirmation page and click send.
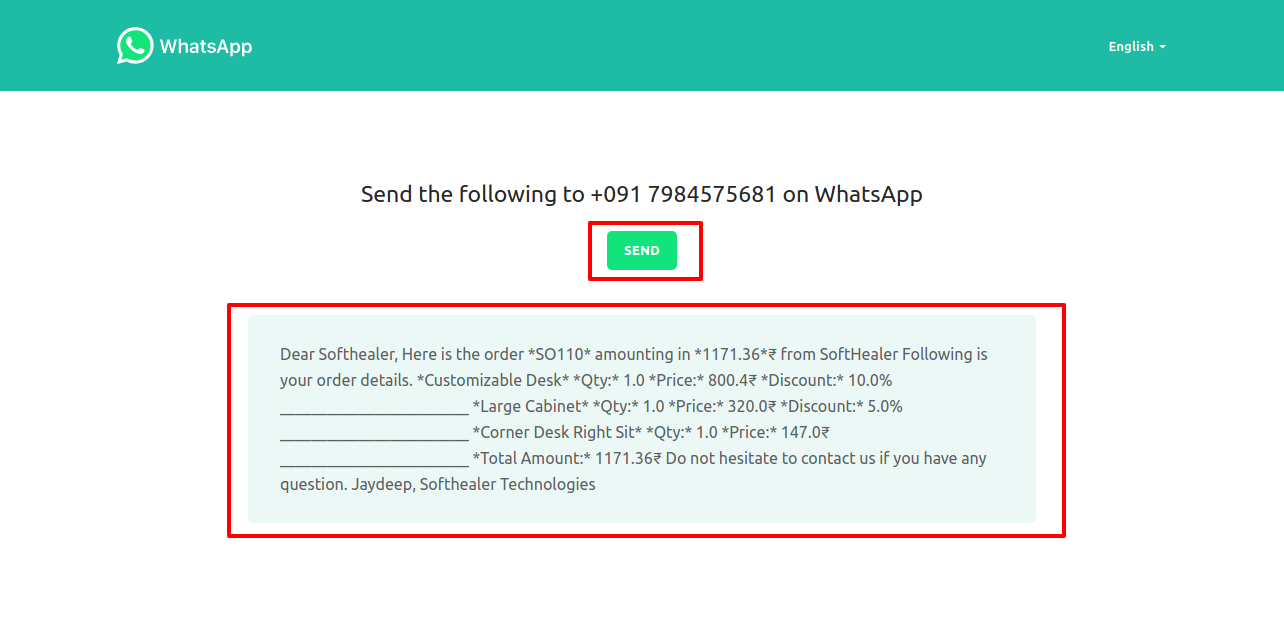
This is the output after the click sends button.

If you send quotation direct customers without edit message. Click 'Send By Whatsapp Direct'.
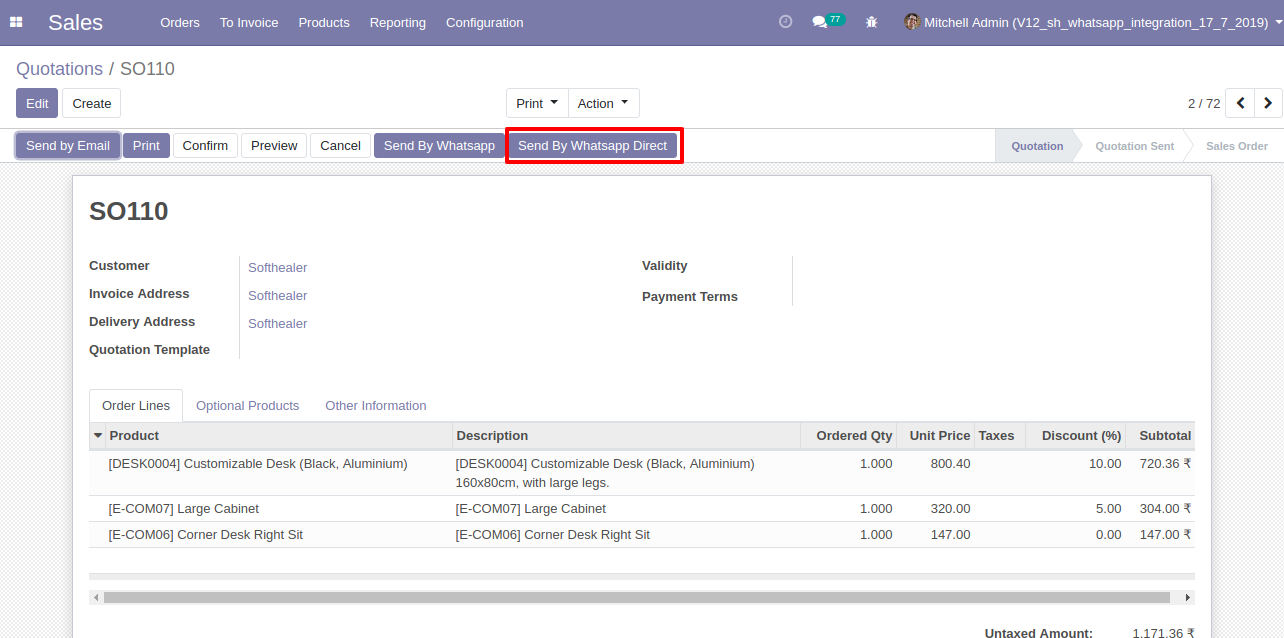
After click Send By WhatsApp Direct you will see a WhatsApp confirmation page and click send.
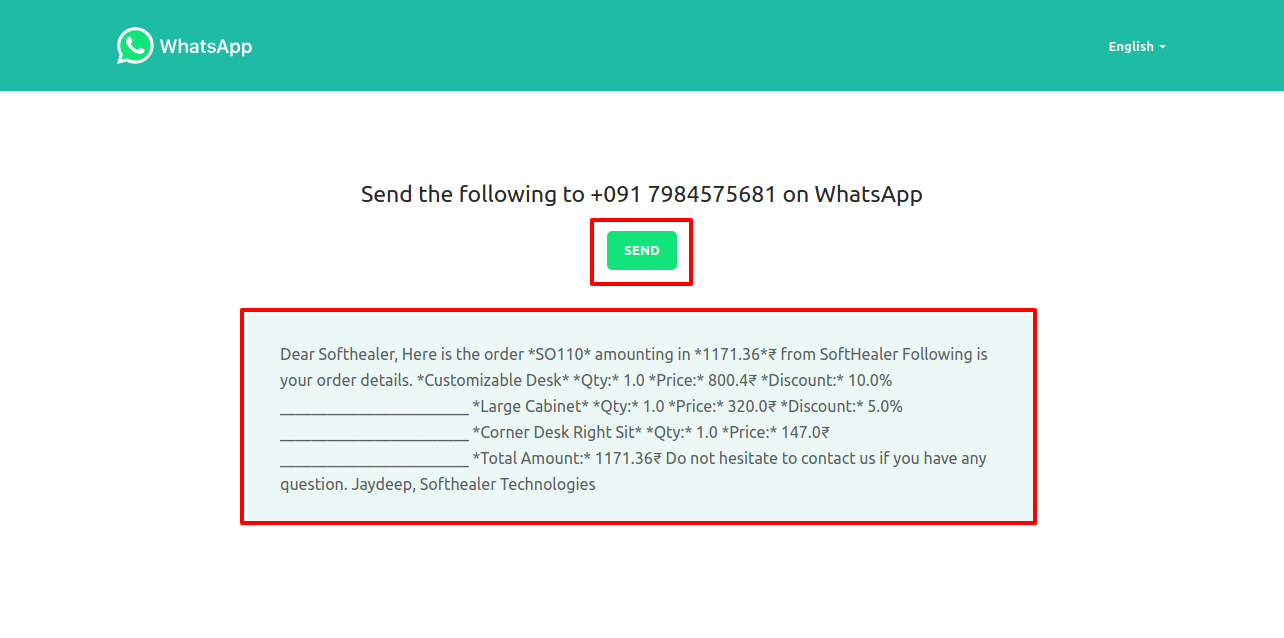
This is the output after the click send button.
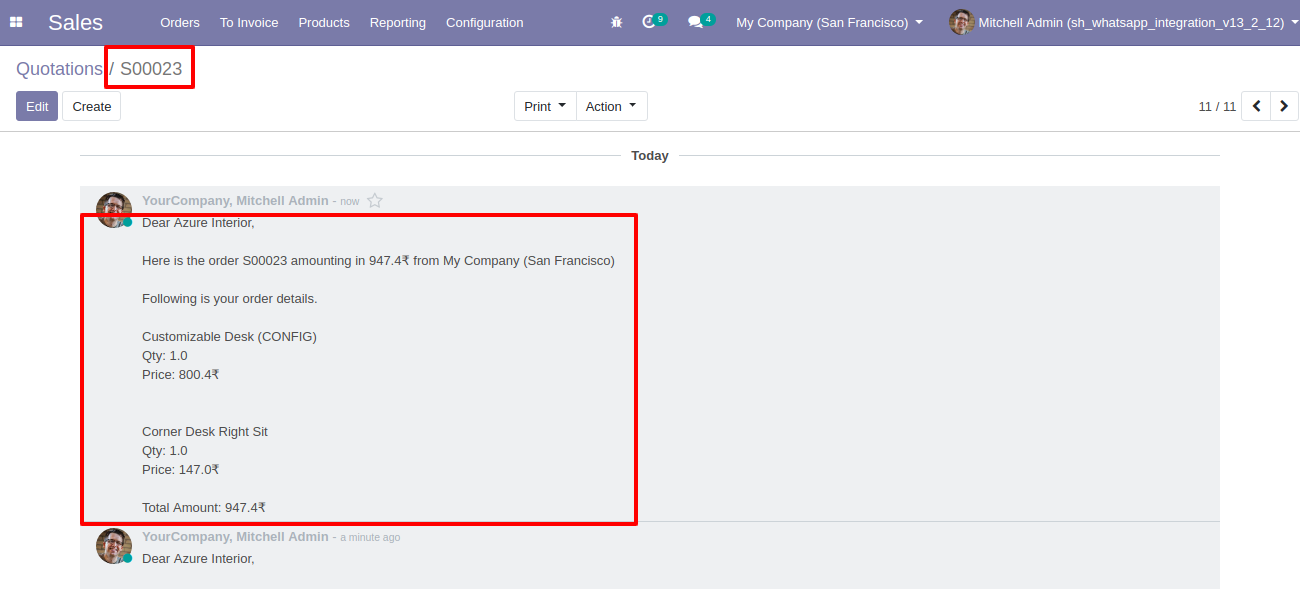
In Sale order Chatter you can see the message which is sent.
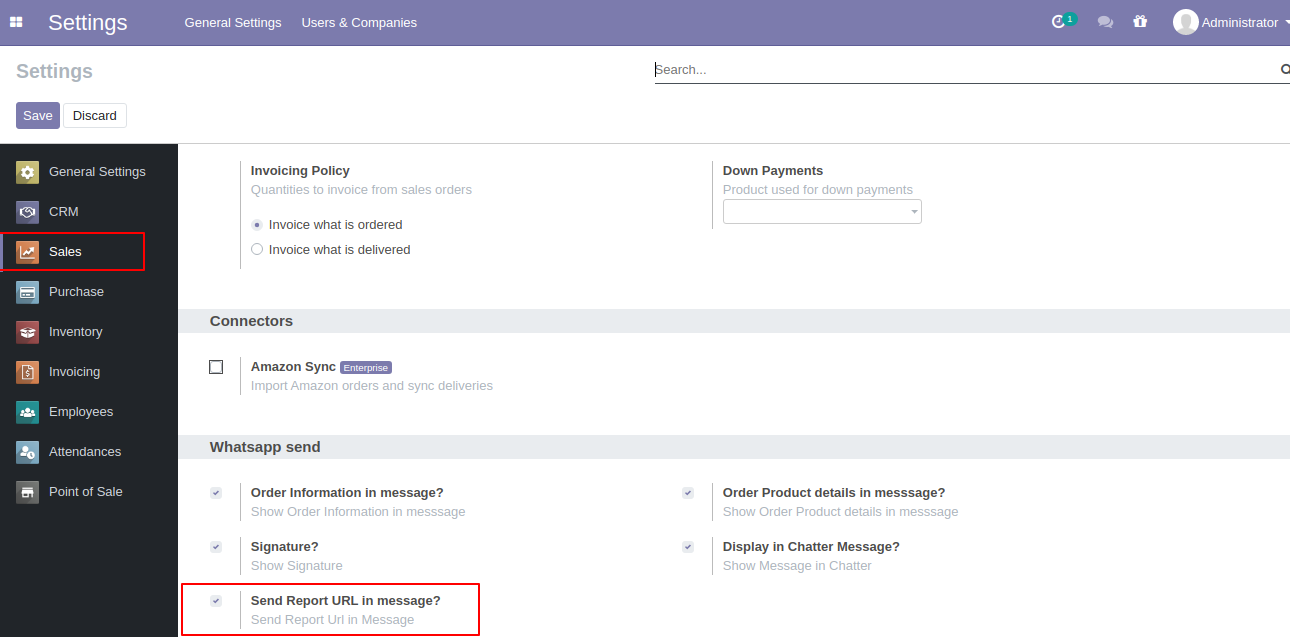
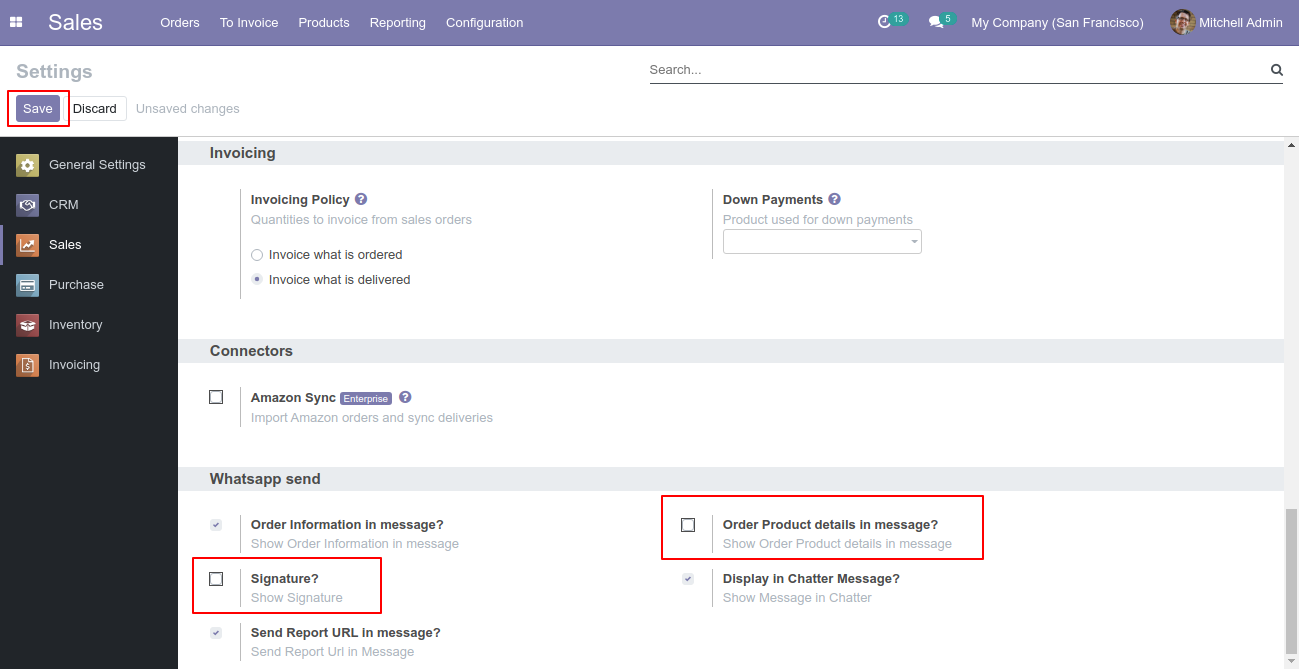
Tick the "Send Report URL in message" tickbox to send the sales report URL in WhatsApp.
Select the recipient and edit Message and click send.
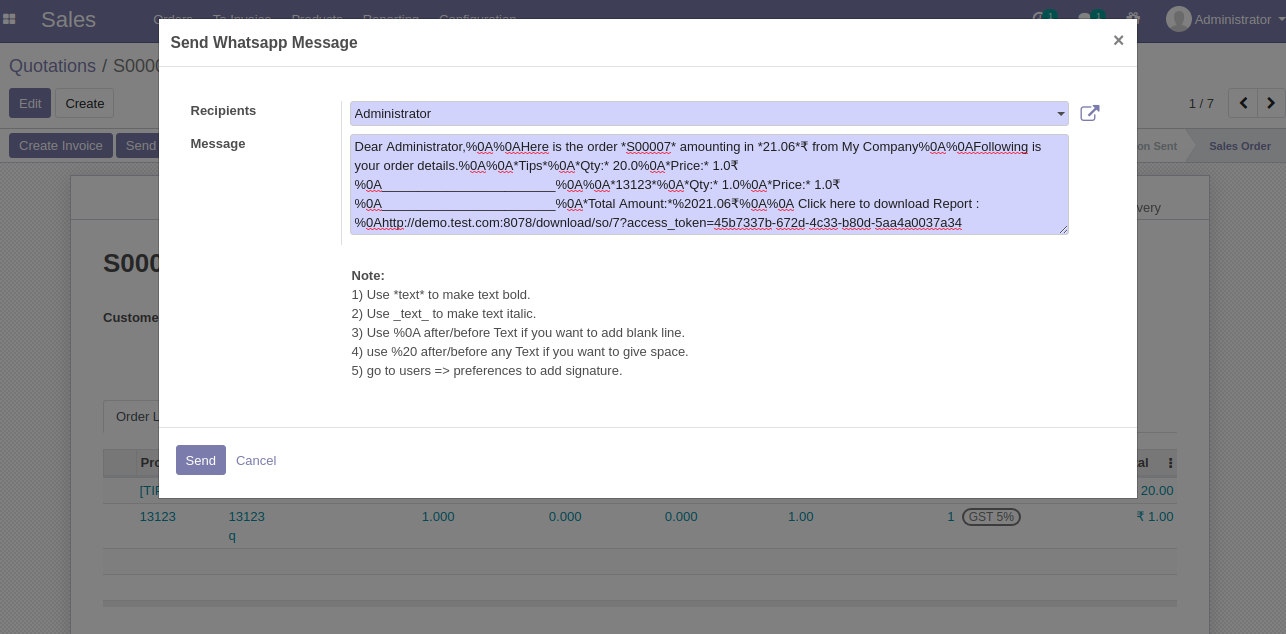
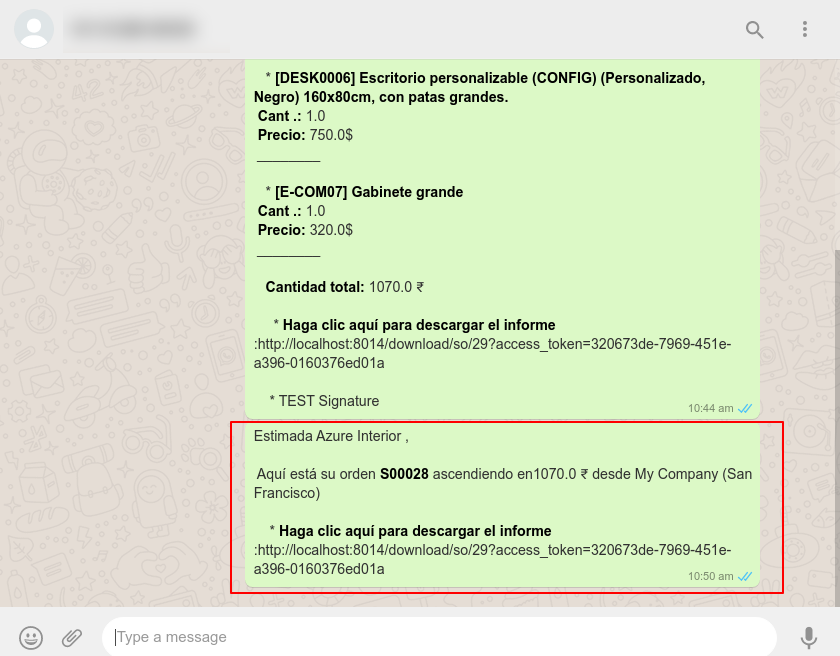
This is the output after the click sends a button.
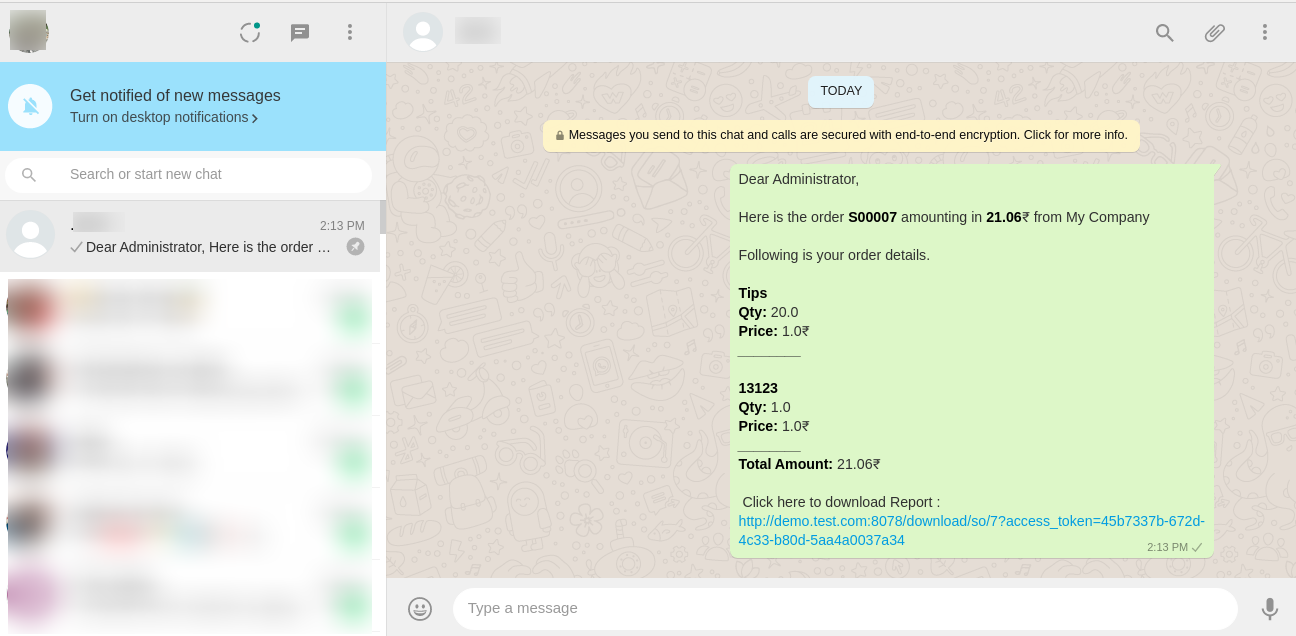
After clicking on the URL, you can see or download that document.
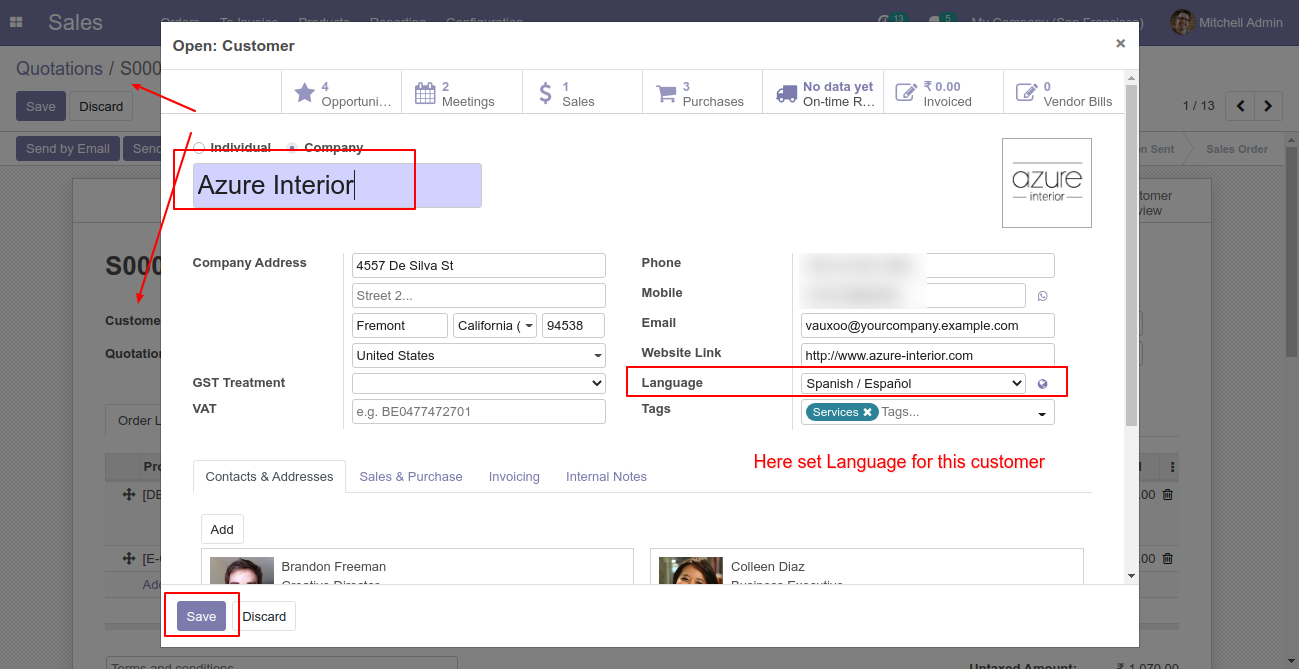
Here we set the language for this customer.
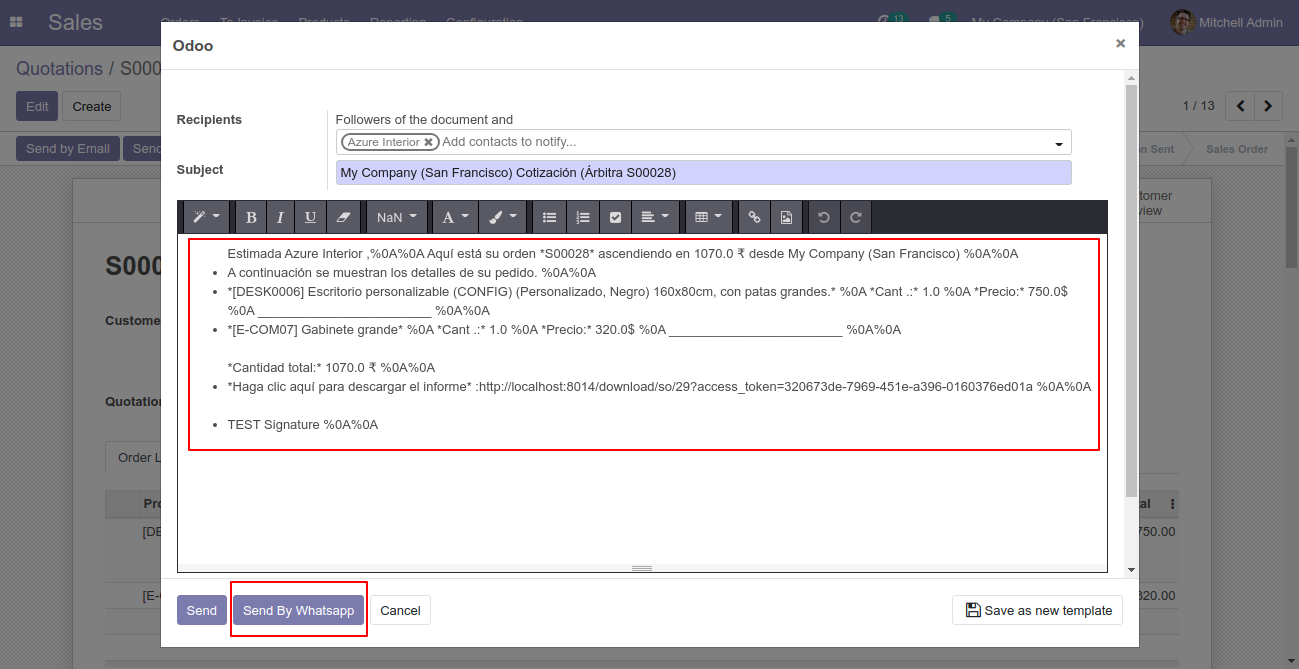
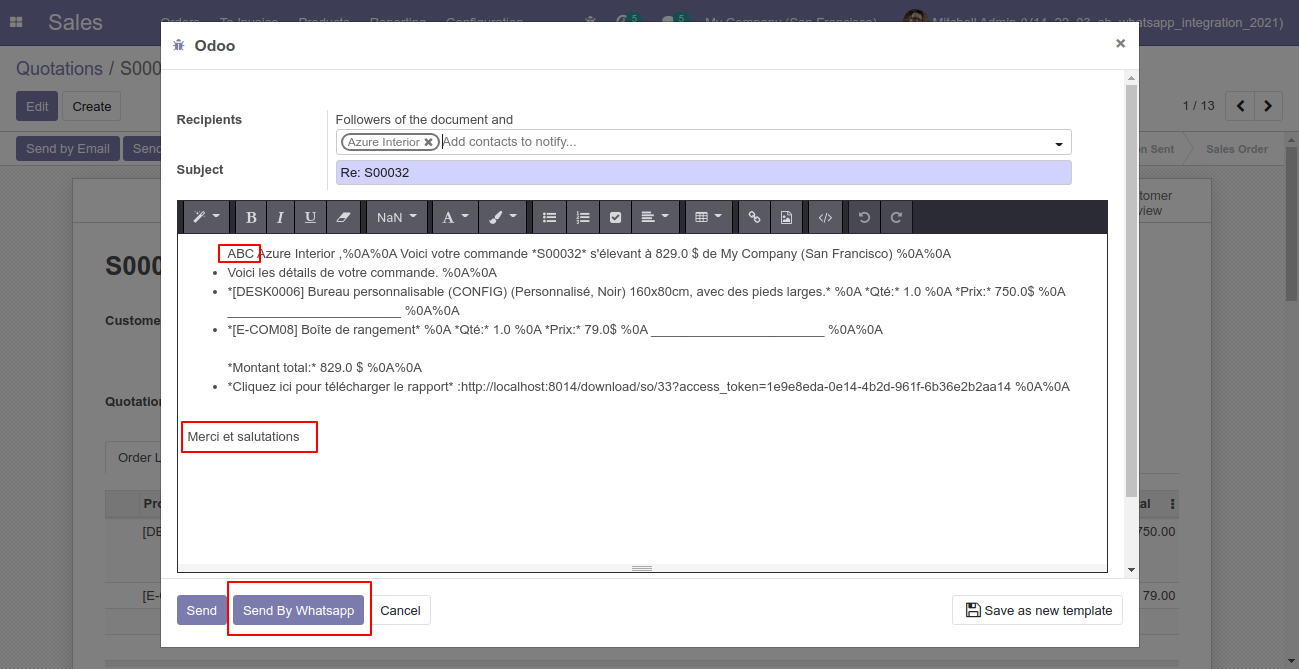
Click Send By WhatsApp Button in Sale Quotation.
Recipient, subject and edit message as your required and click send by whatsapp.
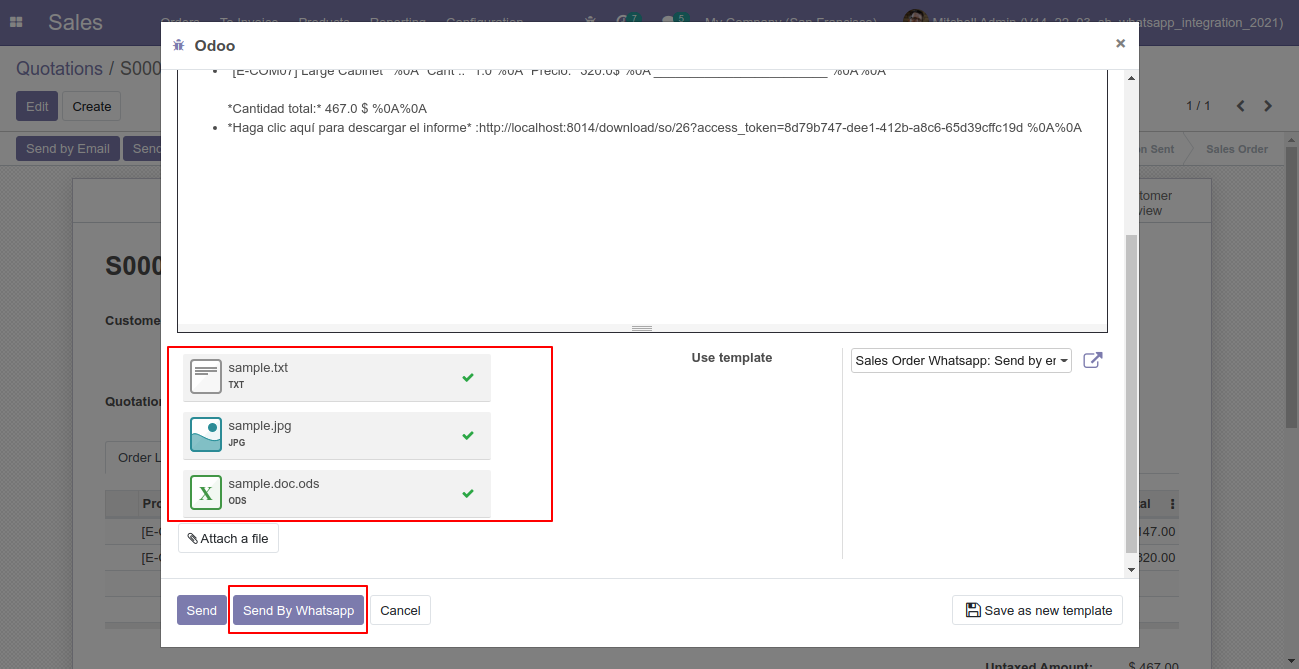
You can attach multiple attachments and then press send by whatsapp button.
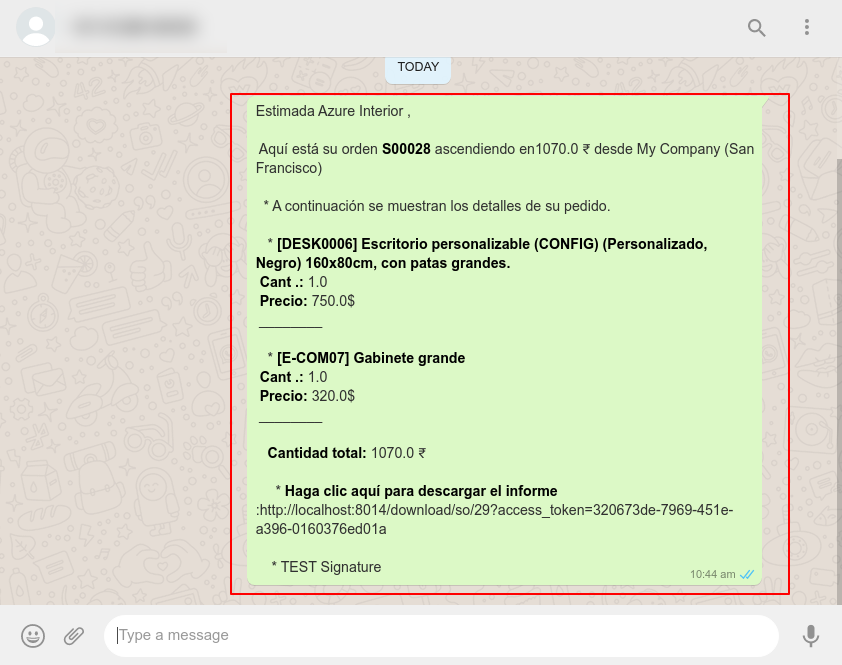
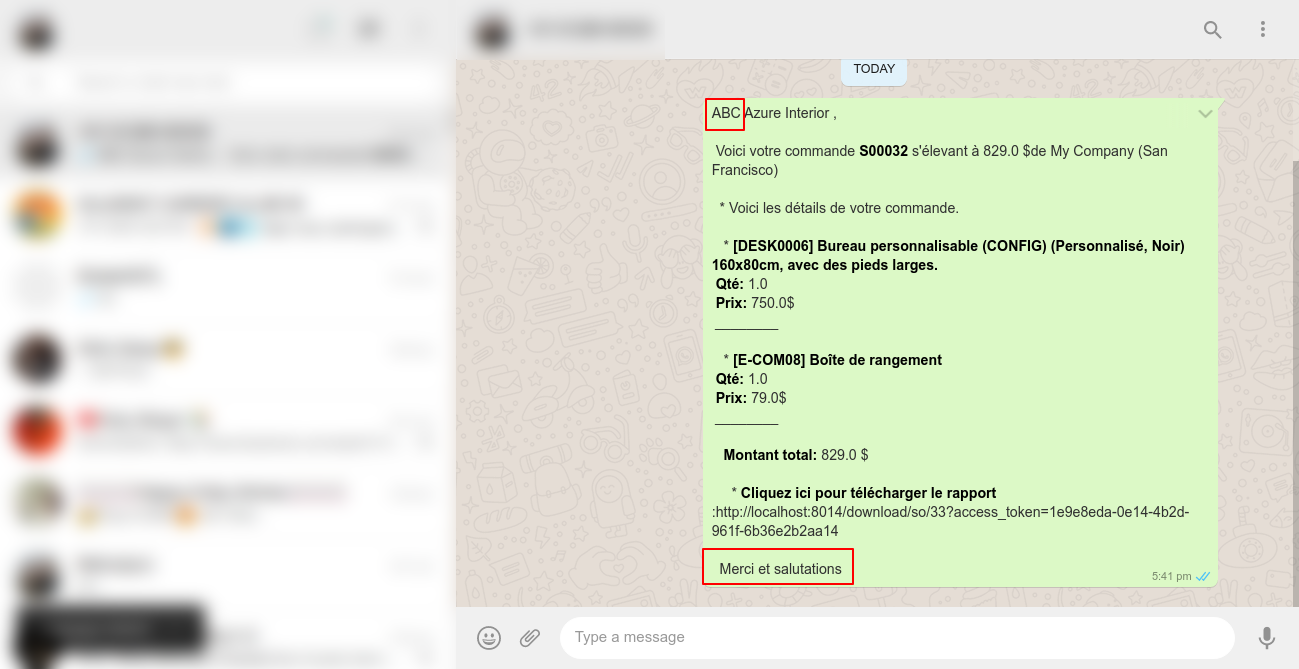
This is the output after the click sends button.
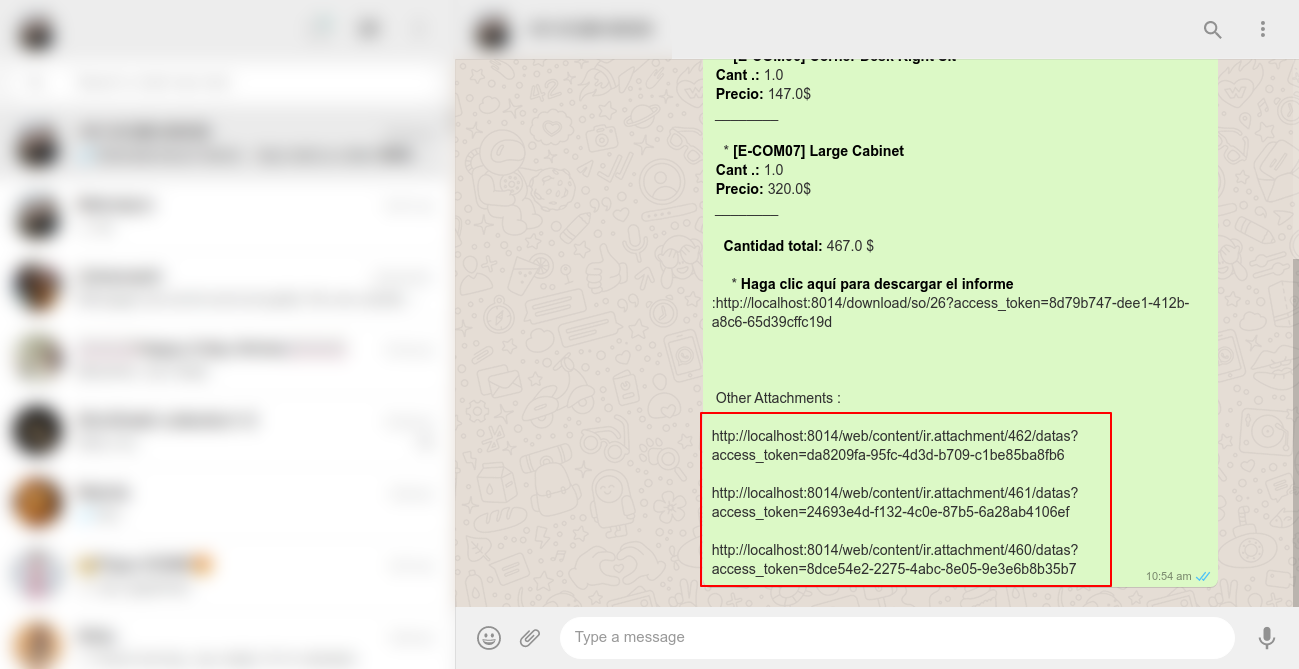
The multiple attachments are sent by URLs.
Whatsapp Message Description with the configuration setting.
Recipient, subject and edit message as your required and click send.
This is the output shown in the WhatsApp messenger.
Go to the settings => Templates.
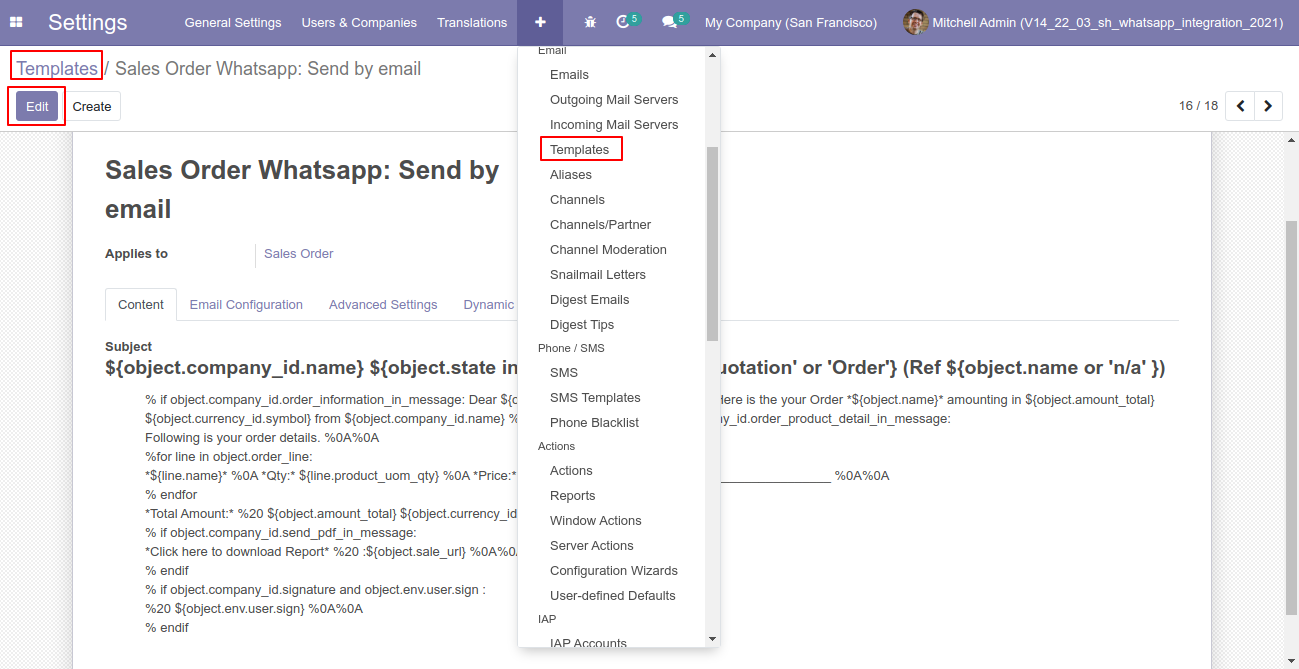
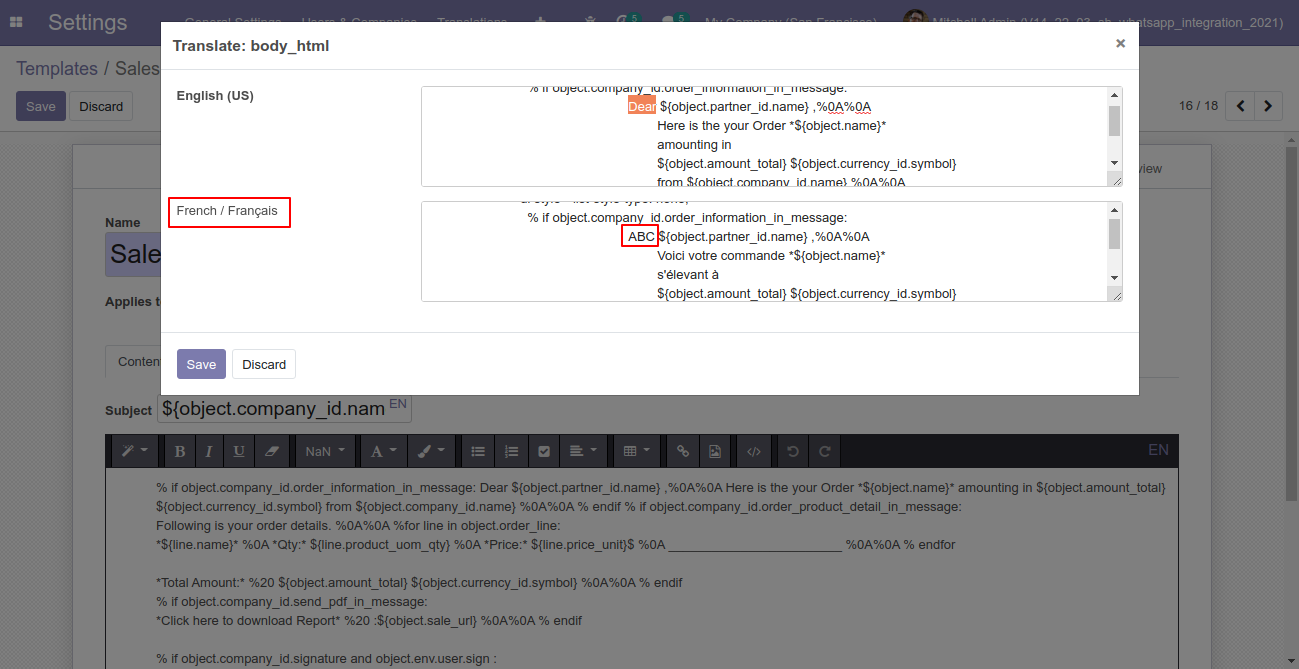
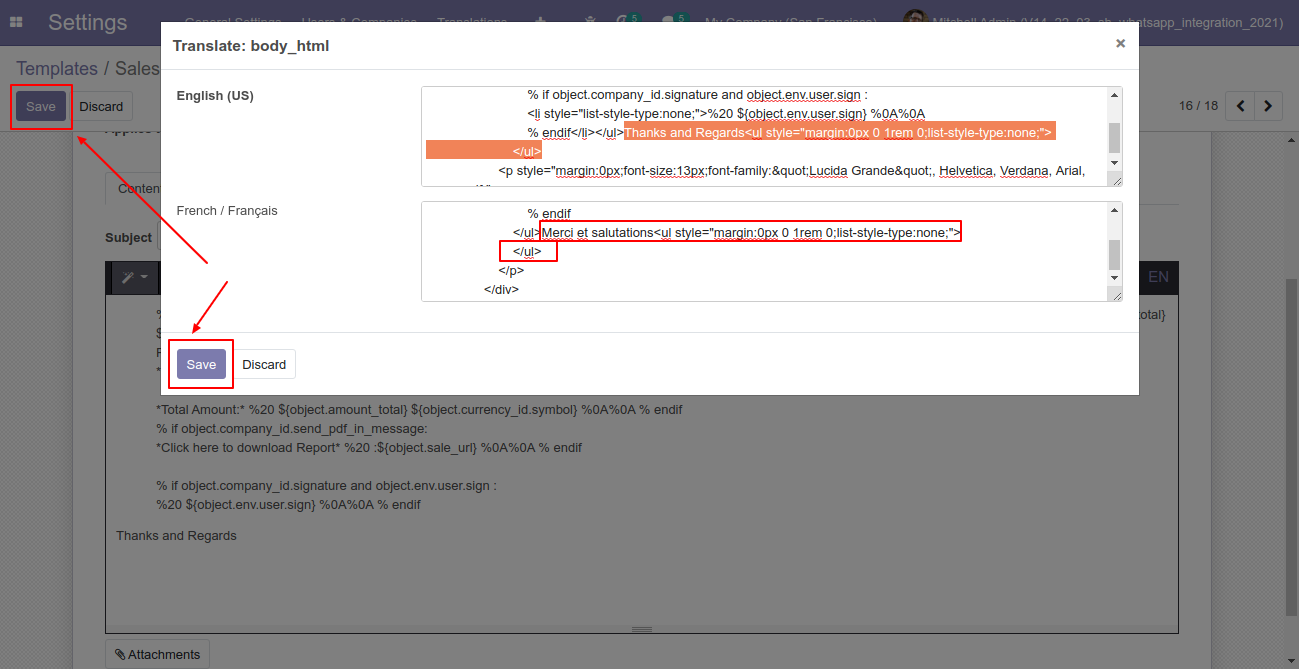
You can edit the template as per choice, If you do changes in the template then you have to translate that changes in the selected language so press the "EN" button.
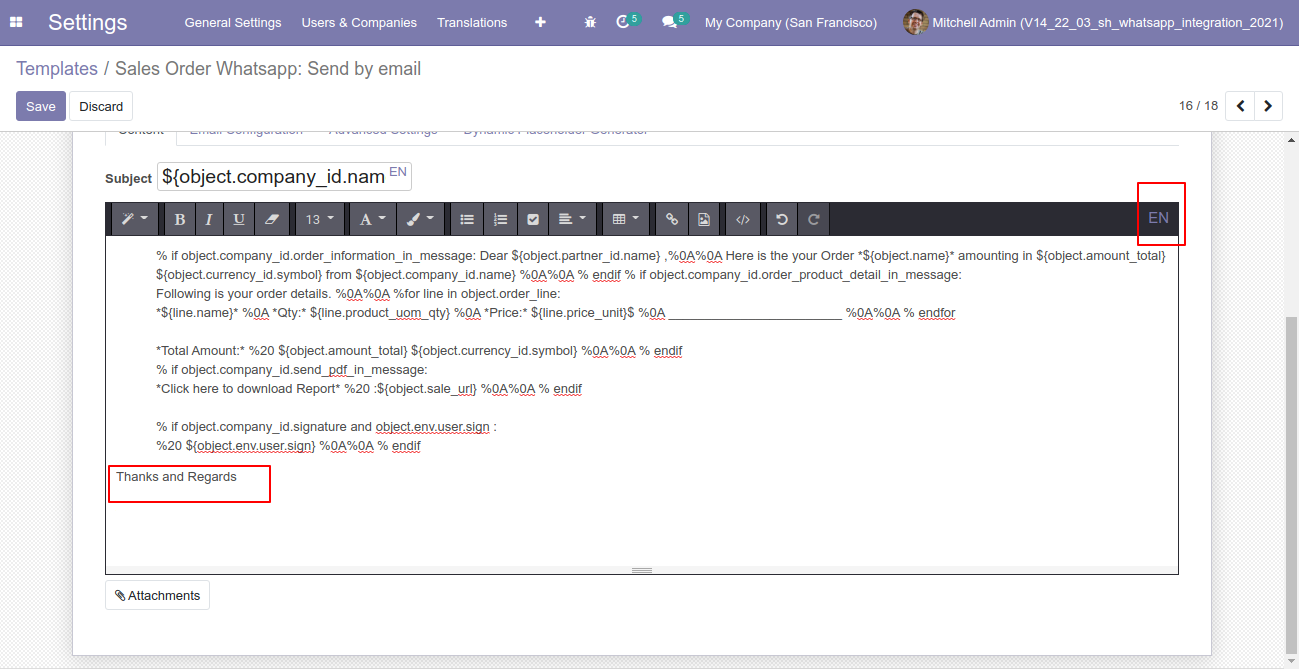
After that one popup opens, You can edit the template from there as well you have to translate that changes in the particular language from the google translation and save it.
Now click the "Send By WhatsApp" button.
After clicking the "Send By WhatsApp" button this wizard will appear you can edit the message also and then press "Send By WhatsApp".
The output looks like this.
Select responsible users for email notification.
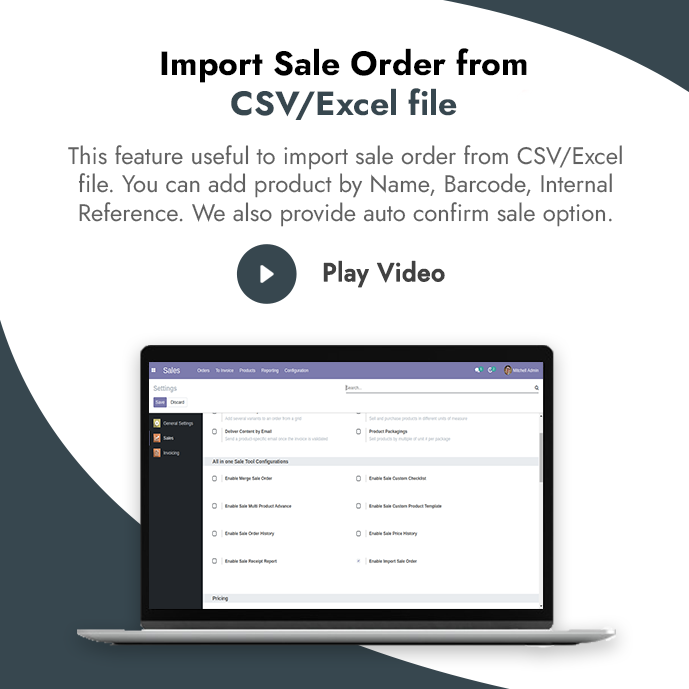
First you need to tick "Import Sale Order" group in order to import sale order
"Import Sale Order" menu in orders
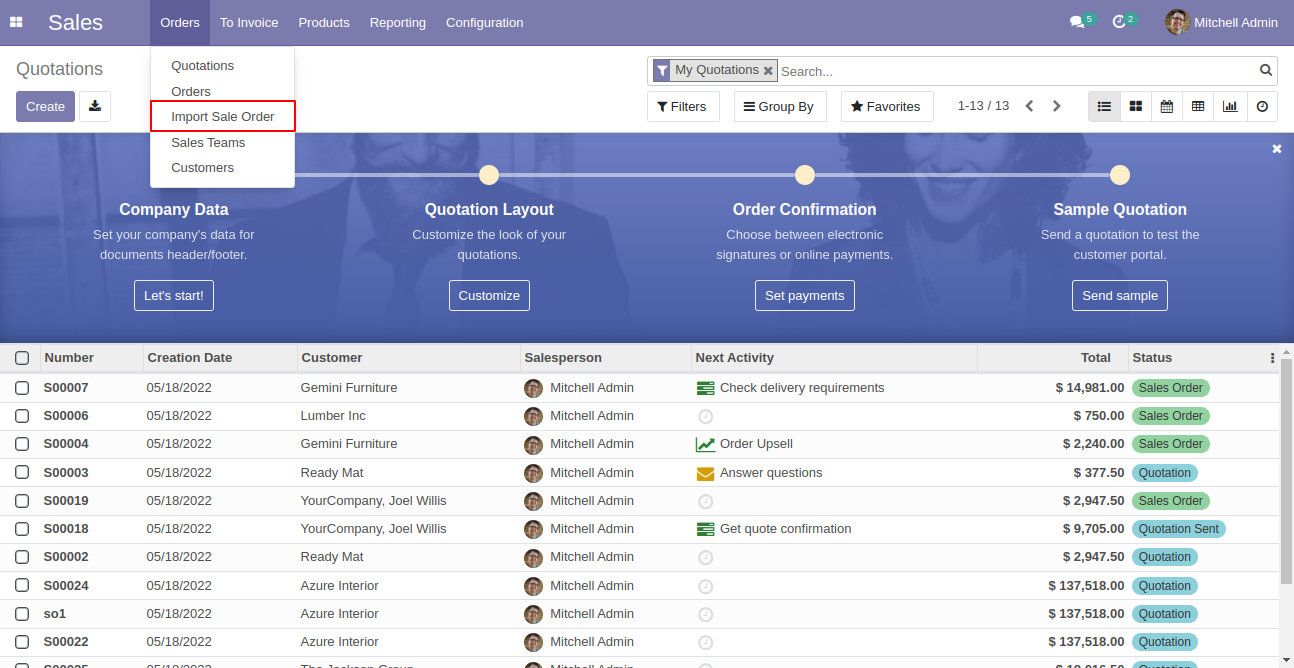
When you click "Import Sale Order" menu, wizard will open that looks like below
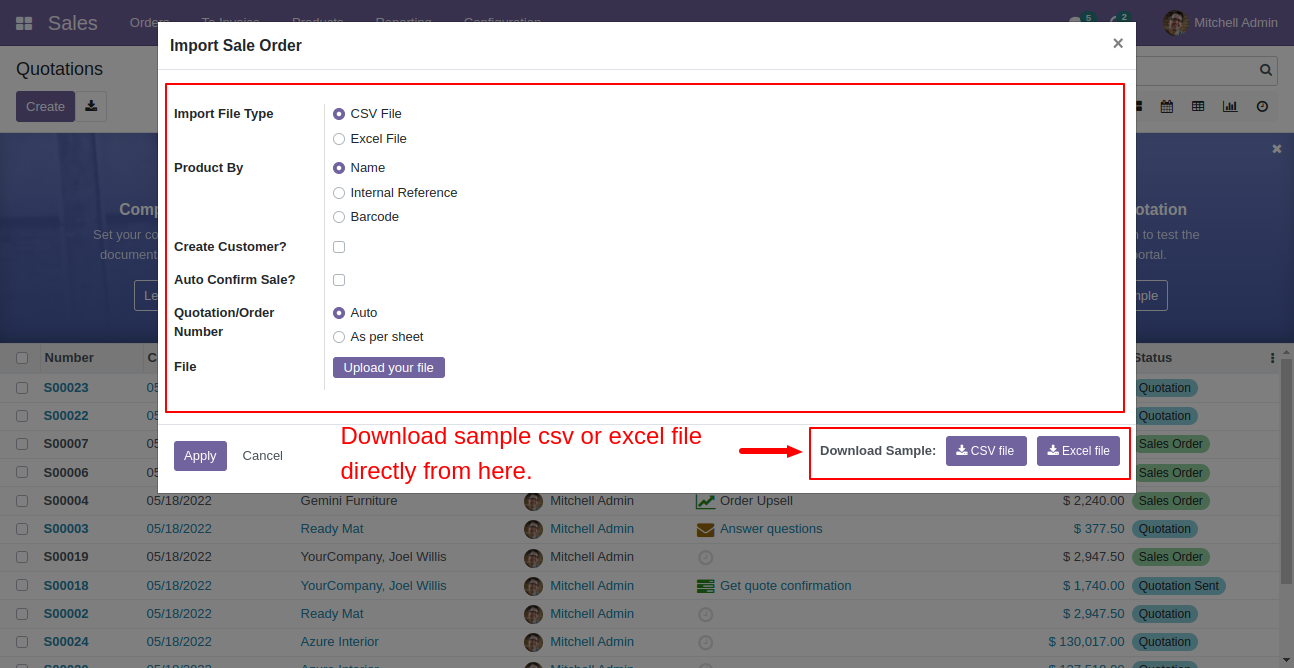
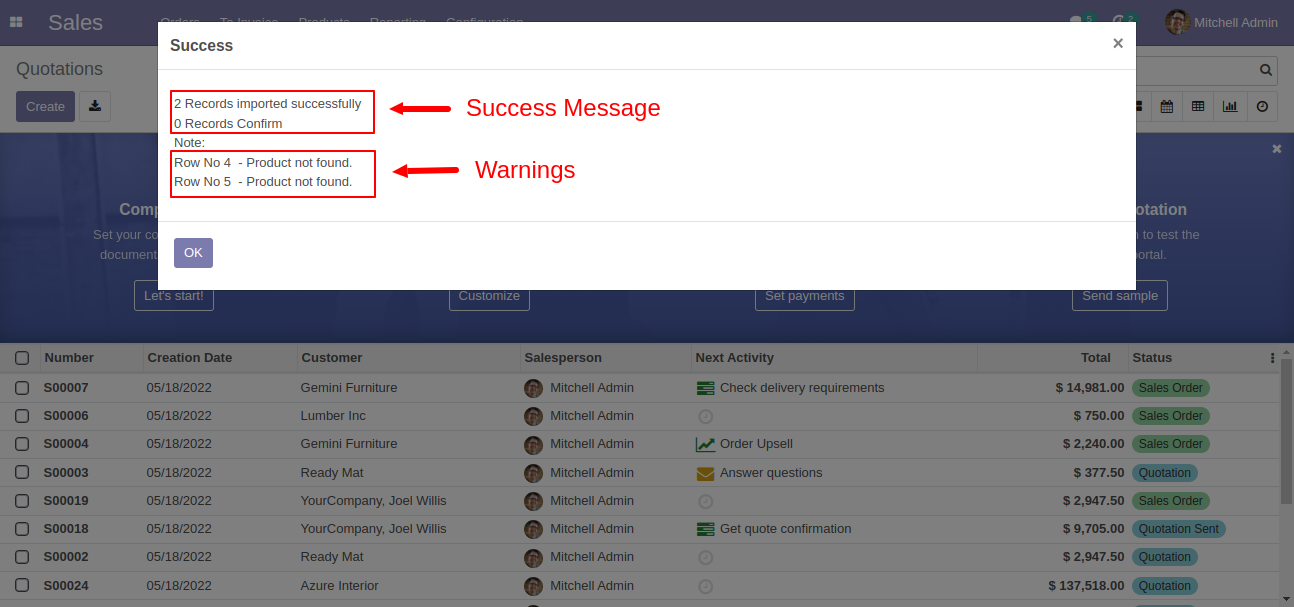
Success message looks like below it's shows successfully imported records and also provides list of unimported records with row number in sheet and relative details of data invalidation.
following fields are imported.
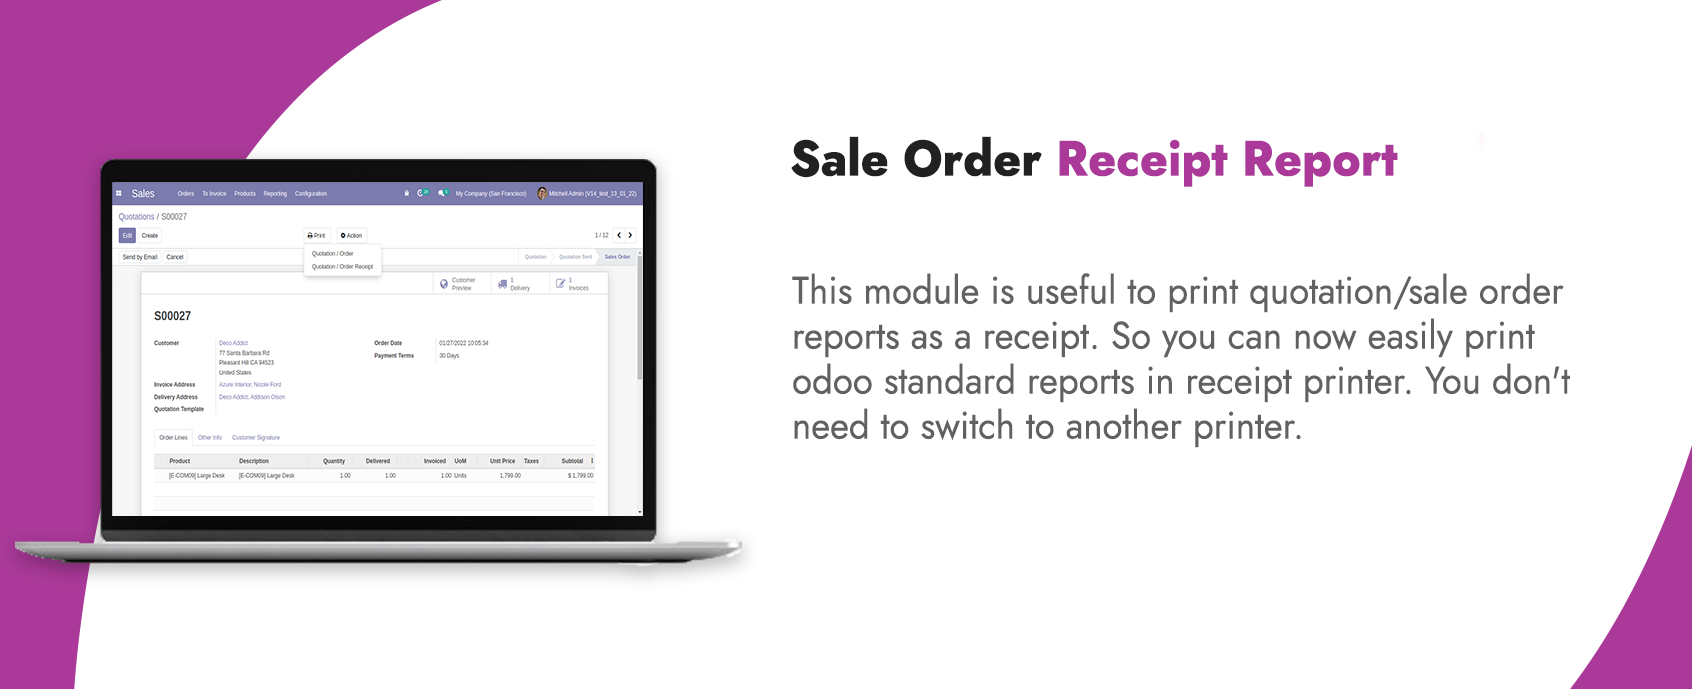
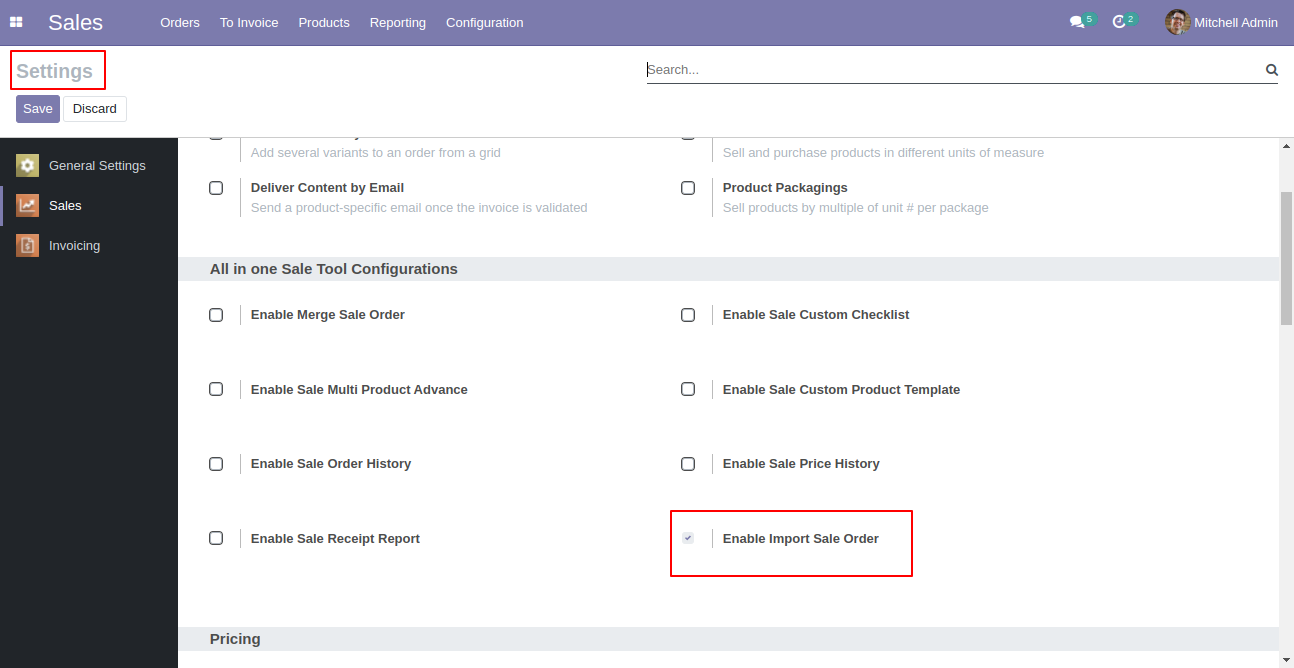
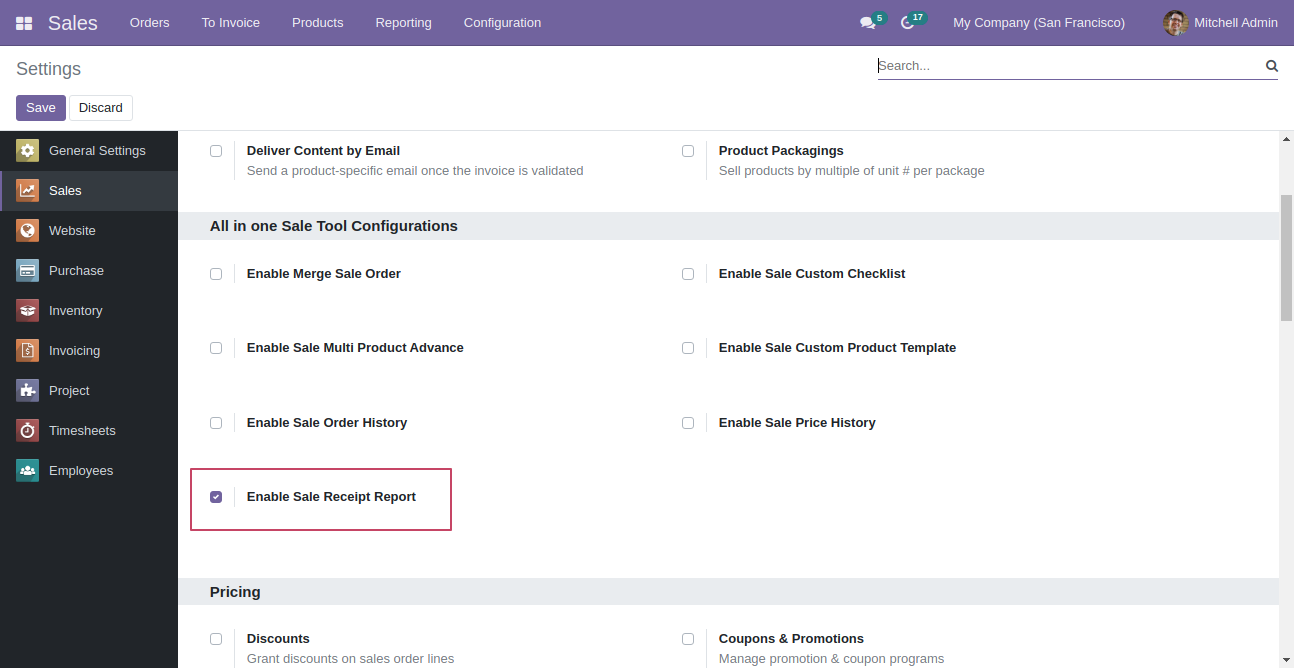
Tick "Enable Sale Receipt Report".
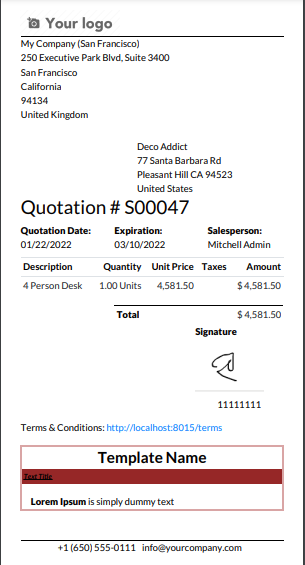
Quotation/Order receipt menu.
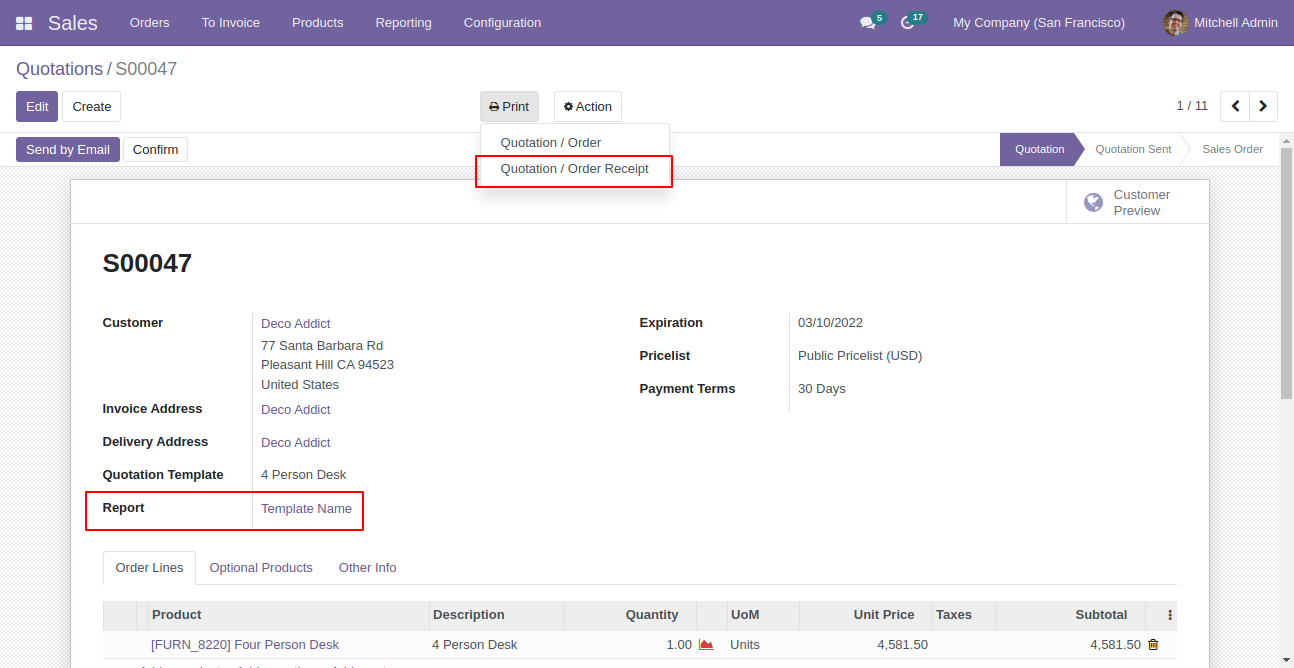
Quotation/Order receipt report.
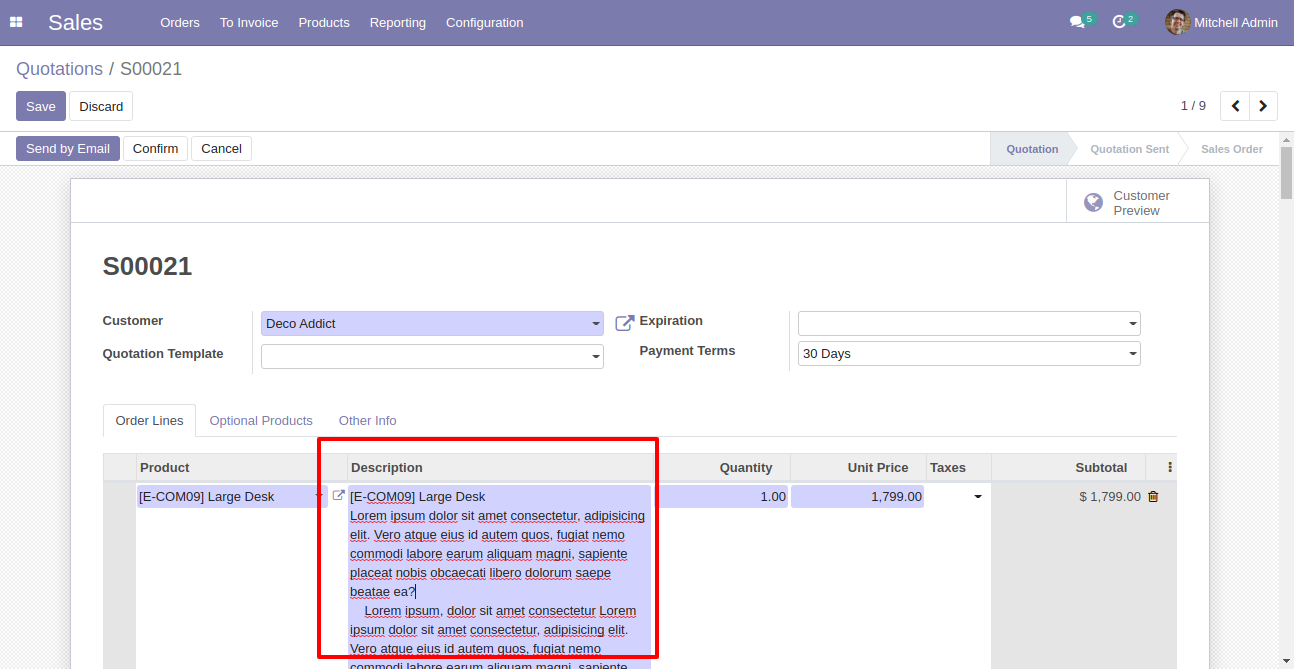
Long product description in the sale order line with ellips.

You can see full content in edit mode also.
Version 16.0.4 | Released on : 08th June 2023
Version 16.0.3 | Released on : 30th March 2023
Version 16.0.2 | Released on : 9th February 2023
Version 16.0.1 | Released on : 28th October 2022
- Yes, This app works perfectly with Odoo Community as well as Enterprise.
- No, this application is not compatible with odoo.com(odoo saas).
- Please Contact Us at sales@softhealer.com to request customization.
- Yes, we provide free support for 100 days.
- Yes, you will get free update for lifetime.
- No, you don't need to install addition libraries.
- Yes, You have to download module for each version (13,14,15) except in version 12 or lower.
- No, We do not provide any kind of exchange.
You May Also Like


Most Demanded Apps